
Owner's Manual


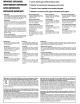


Table Of Contents

Dimensions
/
Dimensions
/
Dimensiones
/
Dimensioni
29
211
(8-5/16)
(1-1/8)
~
<0-
r
.,....
.,....
cry
.,....
.,....
c\J
~
(»
.,....
I"-
C\J
ll')
/
'S
C\J
CO)
J=
'S
---
231
(9-1/8)
Unit:
mm (inch)
Unite: mm (pouces)
Installation
1.
Place
the
supplied
template
on
the
panel
and
then
mark
the
hole
positions.
2.
Cut
open
a
large
hole
and
make
screw
holes.
3.
Peel
off
the
covering
sheet
from
the
spacer,
and
attach
the
spacer
on
the
back
of
the
speaker
flange
so
that
the
flange
is
completely
covered.
Installation
1.
Placer
Ie
gabarit
fourni
sur
Ie
panneau
et
marquer
les
positions
des
trous.
2.
Decouper
un
trou
de
grande
dimension
et
percer
trous
pour
les
vis.
3.
Retirez
la
feuille
de
protection
placee
sur
la
bande
et
fixez
cette
bande
sur
Ie
bord
arriere
du
haut-parleur
de
maniere
qu'iI
so
it
entierement
couvert.
Instalaci6n
1.
Ponga
la
plantilla
suministrada
en
el
panel
y
luego
marque
las
posiciones
de
los
agujeros.
2.
Haga
un
agujero
grande
y
agujeros
para
los
tornillos.
3.
Desprenda
la
cubierta
del
espaciador
y
coloque
el
espaciador
en
la
parte
poste-
rior
de
la
brida
del
altavoz
para
que
la
brida
quede
cubierta
completamente.
Installazione
1.
Posate
la
mascherina,
in
dotazione,
sui
pannello
e
marcate
Ie
posizioni
per
i
fori.
2.
Tagliate un
grande
foro
e
eseguirei
fori
per
Ie
viti.
3.
Togliete
il
foglio protettivo
del
distanziale
e
applicatelo
sui
bordo
posteriore
del
diffusore,
in
modo
che
esso
sia
completamente
coperto.
~)
[~?=