KPA-SD100 CONTROL ADAPTER 3page 2-7 INSTRUCTION MANUAL ADAPTEUR DE COMMANDE 3Page 8-13 MODE D’EMPLOI STEUERUNGS ADAPTER 3Page 14-19 BEDIENUNGSANLEITUNG BESTURINGS ADAPTER 3Page 20-25 GEBRUIKSAANWIJZING ADATTATORE DEI COMANDI 3Page 26-31 ISTRUZIONI PER L’USO ADAPTADOR DE CONTROL 3Page 32-37 MANUAL DE INSTRUCCIONES ADAPTADOR DE CONTROLO 3Page 38-43 MANUAL DE INSTRUÇÕES LA DICHIARAZIONE DI CONFORMITA' "CE" DI QUESTO PRODOTTO E' DEPOSITATA PRESSO: KENWOOD ELECTRONICS EUROPE B.V.
Applicable Models (Centre Units) This product operates when connected to a model compatible with the Centre Unit. For information on models compatible with the Centre Unit, see the attached table of compatible models. About this product When connected to your vehicle, this product will display information from the KENWOOD centre unit, on the display screen installed in your vehicle. It also enables the centre unit to be operated from the remote controller on the steering-wheel.
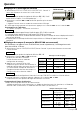
Operation 7 Vehicle’s display setup Centre Unit 4 FM 1. Select "EXT.ACC.CONT/ACC.CONT/EXT.ACC Control" from the Centre Unit menu items. ¢ PWR OFF DISC DAB NOTE EJECT SCAN RDM REP D.SCN M.RDM MENU AUTO AME This does not work during reception of MW / LW broadcasts(if the centre unit displays the sensors, it is displayed as "- - - -"). MENU 2. Hold down the 4 or ¢ button for more than two seconds. Centre Unit enters display-switching mode. 3.
Compass direction compensation: 1. Correct earth magnetism to allow the compass to operate normally. The Centre Unit displays "COMPASS.ADJUST/COMP.ADJ" and enters the earth magnetism direction setup verification mode. 2. Press the 4 or ¢ button. Automatic compensation starts. Upon entering automatic compensation, turn the vehicle 360 degrees. The compensation time lasts less than two minutes. (Compensation may not be achievable if the vehicle does not finish turning 360 degrees within two minutes.
Installation 7 Accessories 1Remote control light emitter (cable length:2.5m) ...1 2Connection cable(ISO AB :0.1m).............................1 3Connection cable(ISO C :2m) ..................................1 4Connection cable (2m)......................1 5Self-tapping screw (Ø4 X16mm) ......4 6Adhesive double coated tape ...........
Connection of centre unit to vehicle Connecting the KPA-SD100 and the KPA-SS100 Connecting the KPA-SD100 only Connection cable4 Connection cable(Provided with the KPA-SS100) Connection cable4 KPA-SD100 TO CH A B KPA-SS100 (Option) KPA-SD100 TO H/U DISPLAY OUT IF/IN IF/OUT TO CH A B TO H/U DISPLAY OUT IF/IN Centre Unit IF/OUT 10 10 Centre Unit KPA-CP100 (Option) Connection cable (ISO C )3 IF/IN IF/OUT KPA-CP100 (Option) Connection cable (ISO C )3 Connection cable (ISO AB )2 Connect
Display selector switch on Opel type display • Set to A in the case of 5 x 7 dot matrix display. • Set to B in the case of 14-segment display. The factory setting is "A". 2CAUTION If you set the switch wrongly, quotation marks will appear between the minutes and the seconds if your in-car display unit is a 5 x 7 dot-matrix display, or, if your in-car display unit is a 14-segment display, nothing will appear between the minutes and the seconds. If this happens, check the switch setting.
Modèles utilisables (Unités centrales) Ce produit fonctionne lorsqu’il est connecté à un modèle compatible à l’unité centrale. Pour plus d’informations sur les modèles compatibles à l’unité centrale, voyez le tableau de modèles compatibles joint. Au sujet de cet appareil Lorsqu'il est connecté à votre véhicle, cet appareil affiche les informations de l'unité centrale KENWOOD sur l'écran d'affichage installé dans votre véhicle.
Opération 7 Réglage de l’affichage du véhicule Unité centrale 1. Sélectionnez "EXT.ACC.CONT/ACC.CONT/EXT.ACC Control" à partir des éléments du menu de l’unité centrale. FM 4 ¢ PWR OFF DISC REMARQUE DAB EJECT Ceci ne fonctionne pas pendant la réception des diffusions MW / LW(si l'unité centrale affiche les capteurs, il est affiché pendant que "- - - -"). AM 2. Maintenez la touche 4 ou ¢ enfoncée pendant plus de deux MENU secondes. L'Appareil Central entre en mode de commutateur-affichage. 3.
Mode de direction nord Le sens de déplacement du véhicule sera affiché en lettres comme l'une des 8 ou 16 directions de la boussole. Mode de direction cible Dans le programme direction vers l’objectif, vous pouvez choisir l’itinéraire de l’objectif que vous désirez, et toutes les trajectoires pour cet objectif seront affichées sur l’affichage. (Voir ’Programme direction objectif’ pour les explications de la mise en marche de direction objectif.) REMARQUE Si elle est affichée en tant que " RIGHT 90.0/ R 90.
Installation 7 Accessories 1Emetteur de lumière de la télécommande (longueur de cordon: 2.5m) .......................................................1 2Câble de connexion (ISO AB :0.1m)........................1 3Câble de connexion (ISO C :2m) .............................1 5Vis auto-taraudeuse (Ø4X16mm) .....4 4Câble de connexion (2m).........................................1 6Ruban adhésif double face ...............1 7 Installer l’unitlê de Contrôl 2ATTENTION 7 Installer le KPA-CP100 (Option) 1.
Connexion de l'appareil central au véhicule Connecter le KPA-SD100 et le KPA–SS100 Connecter le KPA-SD100 uniquement Câble de connexon4 KPA-SD100 TO CH A Câble de connexon(Fourni avec le KPA-SS100) Câble de connexon4 B KPA-SS100 (Option) KPA-SD100 TO H/U DISPLAY OUT IF/IN IF/OUT TO CH A B TO H/U DISPLAY OUT IF/IN Unité centrale IF/IN IF/OUT IF/OUT 10 10 Unité centrale KPA-CP100 (option) Câble de connexion (ISO C )3 KPA-CP100 (option) Câble de connexion (ISO C )3 Câble de connexion
Afficher l'interrupteur de l'affichage sur l'affichage de type Opel • Régler à A en cas d'affichage de la matrice à points 5 x 7. • Régler à B en cas d'un affichage à 14 segments. Le réglage usine est "A". 2ATTENTION Si vous réglez le commutateur incorrectement, des guillemets apparaîtront entre les minutes et les secondes si votre affichage en voiture est une matrice à points 5 x 7, ou, si votre affichage en voiture est un affichage à 14 segments, rien n’apparaîtra entre les minutes et les secondes.
Verwendbare Modelle (Zentralgeräte) Dieses Produkt kann betrieben werden, wenn es an ein mit der Zentraleinheit kompatibles Modell angeschlossen ist. Weitere Informationen zu mit der Zentraleinheit kompatiblen Modellen, finden Sie in der beigefügten Liste. Wissenswertes über dieses Produkt Nach dem Anschluss an Ihr Fahrzeug zeigt dieses Produkt auf dem in Ihrem Fahrzeug installierten Bildschirm Informationen vom KENWOODHauptgerät an.
Betrieb 7 Einrichtung dem Displays des Fahrzeuges Zentraleinheit FM 4 1. Wählen Sie aus den Zentraleinheit-Menüpunkten "EXT.ACC.CONT/ACC.CONT/EXT.ACC Control" an. ¢ PWR OFF DISC DAB EJECT SCAN ANMERKUNG RDM REP D.SCN M.RDM MENU AUTO AME DISP NAME.S NF AUD Funktioniert nicht während des MW-Senderempfangs(wenn die Zentraleinheit die Sensoren anzeigt, erfolgt die Anzeige als "- - - -"). MENU 2. Halten Sie die 4 oder ¢ Taste länger als zwei Sekunden gedrückt.
ANMERKUNG Wenn "RIGHT 90.0/ R 90.0" angezeigt wird, ist die 90-Grad-Richtung rechts die Zielrichtung. Kompass-Richtungskompensierung: 1. Korrigieren Sie die Erdanziehungskraft, um einen ordnungsgemäßen Betrieb des Kompasses zu ermöglichen. Die Zentraleinheit zeigt "COMPASS.ADJUST/COMP.ADJ" an und setzt sich in den Einrichtungsmodus zur Prüfung der Erdanziehungskraft-Richtung. 2. Drücken Sie die 4 oder ¢ Taste. Die automatische Kompensierung beginnt.
7 Installation des Steuergerätes Blechschraube (Ø4X16mm)5 2ACHTUNG 7 Installation der KPA-CP100 (Option) CONT ROL ADAP TER KPA-S D100 • Stellen Sie vor dem Bohren eines Loches unter einem der Sitze oder im Koffernraum sicher, dass sich hinter der geplanten Bohrstelle weder der Gastank, die Bremsleitung noch irgendwelche Kabelbäume befinden. Sind diese Teile in der Nähe, achten Sie unbedingt darauf, diese nicht zu beschädigen.
Anschluss an die Zentraleinheit Nur der KPA-SD100 wird angeschlossen Anschlusskabel4 Anschluss des KPA-SD100 und der KPA-SS100 Anschlusskabel4 Anschlusskabel(Zubehör des KPA-SS100) KPA-SD100 TO CH A B KPA-SS100 (Option) KPA-SD100 TO H/U DISPLAY OUT IF/IN IF/OUT TO CH A B TO H/U DISPLAY OUT IF/IN Zentraleinheit IF/IN IF/OUT IF/OUT 10 10 Zentraleinheit KPA-CP100 (Option) Anschlusskabel (ISO C )3 Anschlusskabel (ISO C )3 KPA-CP100 (Option) Anschlusskabel (ISO AB )2 Anschlusskabel (IS
Display-Wahlschalter am Opel-Display • Beim 5 x 7 Punktmatrix-Display auf A stellen. • Beim aus 14 Segmenten bestehenden Display auf B stellen. Die werkseitige Einstellung ist "A". 2ACHTUNG Wenn Sie den Schalter fehlerhaft bewegen, erscheinen Anführungzeichen zwischen den Minuten und den Sekunden, falls Ihre Autoinnenanzeige-Einheit eine 5x7-Punkte-Matrix-Anzeige hat: falls Ihre Autoinnenanzeige-Einheit eine 14-SegmentAnzeige hat, wird nichts zwischen den Minuten und Sekunden erscheinen.
Bruikbare modellen (centrale eenheden) Dit product werkt wanneer het wordt aangesloten op een model dat compatibel is met de centrale eenheid. Voor meer informatie over modellen die compatibel zijn met de centrale eenheid, zie de bijgevoegde tabel van compatibele modellen. Meer over dit toestel Wanneer u dit toestel aansluit in uw auto, zal het informatie van de centrale KENWOOD-eenheid weergeven op het in uw auto gemonteerde scherm.
Bediening 7 Instelling van display de vehicle 1. Kies "EXT.ACC.CONT/ACC.CONT/EXT.ACC Control" in het menu van de centrale eenheid. Centrale eenheid4 FM ¢ PWR OFF OPMERKING DISC DAB Dit is niet mogelijk tijdens de ontvangst van een MW / LW-uitzending(als de centrale eenheid de sensors toont, worden ze aangeduid als "- - - -"). 2. Druk de toets 4 of ¢ gedurende meer dan twee seconden in. De centrale eenheid schakelt de stand voor displayomschakeling in. 3.
Compensatie van kompasrichting: 1. Corrigeer het aardmagnetisme opdat het kompas normaal zou kunnen werken. De centrale eenheid toont "COMPASS.ADJUST/COMP.ADJ" en schakelt de stand in voor verificatie van de richtinginstelling van het aardmagnetisme. 2. Druk op de toets 4 of ¢. De automatische compensatie begint. Draai na het begin van de automatische compensatie het voertuig 360 graden. De compensatie neemt minder dan twee minuten in beslag.
Installatie 7 Accessoires 1Indicatiediode van afstandsbediening (longueur de cordon: 2.5m) ................................................................1 2Aansluitkabel (ISO AB :0.1m) ..................................1 3Aansluitkabel (ISO C :2m) .......................................1 5Zelftappende schroef (Ø4X16mm) ...4 4Aansluitkabel (2m) ...................................................1 6Dubbelzijdige kleefband....................
Aansluiting op de centrale eenheid Aansluiten van de KPA-SD100 alleen Aansluitkabel4 Aansluiten van de KPA-SD100 en de KPA-SS100 Aansluitkabel4 Aansluitkabel(Bijgeleverd met de KPA-SS100) KPA-SD100 TO CH A B KPA-SS100 (Optie) KPA-SD100 TO H/U DISPLAY OUT IF/IN IF/OUT TO CH A B TO H/U DISPLAY OUT IF/IN Centrale eenheid IF/IN IF/OUT IF/OUT 10 10 Centrale eenheid KPA-CP100 (optie) Aansluitkabel (ISO C )3 KPA-CP100 (optie) Aansluitkabel (ISO C )3 Aansluitkabel (ISO AB )2 Aansluitkabel
Displaykeuzeschakelaar op Opel-display • Instellen op A in geval van 5 x 7 puntenmatrix-display. • Instellen op B in geval van display van 14 tekens. De fabrieksinstelling is "A". 2OPGELET Als u de schakelaar verkeerd instelt, zullen er aanhalingstekens verschijnen tussen de minuten en de seconden als u het 5 x 7 puntenmatrixdisplay in de auto gebruikt, of zal er niets verschijnen tussen de minuten en de seconden als u het display met 14 segmenten gebruikt.
Modelli applicabili (Unità centrale) Questo prodotto funziona quando è collegato con un modello compatibile con l'Unità centrale. Per informazioni sui modelli compatibili con l'Unità centrale, si veda la tabella allegata dei modelli compatibili. Riguardante questo prodotto Quando effettuate il collegamento al vostro veicolo, l'unità visualizza sul display installato nei veicolo delle informazioni provenienti dall'unità centrale KENWOOD.
Funzionamento 7 Settaggio del Display del veicolo Unità Centrale 4 1. Selezionate"EXT.ACC.CONT/ACC.CONT/EXT.ACC Control" dalle voci del Menù dell'Unità centrale. FM ¢ PWR OFF DISC DAB NOTA EJECT SCAN RDM REP D.SCN Questo non funziona durante la ricezione di trasmissioni MW / LW(se l'Unità Centrale visualizza il sensore, questo è visualizzato come "- - - -"). 2. Tenere premuto il tasto 4 o ¢ per più di due secondi. L'unità centrale entra nel modo di commutazione del display. 3.
Modo direzione nord La direzione di guida del veicolo è indicato con delle lettere come una delle 8 o 16 direzioni della bussola. Modo direzione obiettivo Nel modo della direzione bersaglio, potete impostare la direzione desiderata del bersaglio e qualsiasi deviazione da questa direzione apparirà sullo schermo del display nell'automobile. (Fate riferimento alla sezione "Impostazione delle istruzioni bersaglio" per ulteriori informazioni sull'impostazione dela direzione bersaglio.
Installazione 7 Accessori 1Emettitore luminoso del telecomando (lunghezza del cavo: 2.5m)................................................................1 2Cavo di collegamento (ISO AB :0.1m).....................1 3Cavo di collegamento (ISO C :2m) ..........................1 5Vite autofilettante (Ø4X16mm).........4 4Cavo di collegamento (2m)......................................1 6Nastro adesivo a due strati...............
Collegamento dell'unità centrale Collegamento del KPA-SD100 e del KPA-SS100 Collegamento solo del KPA-SD100 Cavo di collegamento4 Cavo di collegamento4 KPA-SD100 TO CH A B Cavo di collegamento(In dotazione con il KPA-SS100) KPA-SS100 (Opzione) KPA-SD100 TO H/U DISPLAY OUT IF/IN IF/OUT TO CH A B TO H/U DISPLAY OUT IF/IN Unità Centrale IF/IN IF/OUT IF/OUT 10 10 Unità Centrale KPA-CP100 (Opzione) Cavo di collegamento (ISO C )3 Cavo di collegamento (ISO C )3 KPA-CP100 (Opzione) Cavo di
Visualizza l'interruttore di selezione sul display di tipo Opel • Impostate su A in caso di display a matrice di 5 x 7 punti. • Impostate su B in caso di display a 14-segmenti. L'impostazione di fabbrica è "A". 2ATTENZIONE Se il contatto viene montato erroneamente, appariranno tracce di quotazione tra i minuti e i secondi se il quadro indicatore nella vostra auto e` un 5 x 7 matrice a punti,se il vostro quadro indicatore e` un quadro a 14 segmenti niente apparira` tra i minuti e i secondi.
Modelos aplicables (Unidades centrales) Este producto funciona cuando se encuentra conectado a un modelo compatible con la unidad central.Para información sobre modelos compatibles con la unidad central, vea la tabla adjunta de modelos compatibles. Sobre este producto Cuando este conectado a su vehiculo, este producto le mostrará información sobre la unidad crentral KENWOOD, sobre la pantalla de visualización instalada en su vehiculo.
Funcionamiento 7 Configuración de la pantalla de visualización del vehiculo 1. Seleccione "EXT.ACC.CONT/ACC.CONT/EXT.ACC Control" de los ítems del menú de la unidad central. Unidad central 4 FM ¢ NOTA Esto no funciona durante la recepción de las emisiones MW / LW(si la unidad central visualiza los sensores, se visualiza como "- - - -"). 2. Mantenga pulsado el botón 4 o ¢ durante más de dos segundos. AM MENU La Unidad Central introduce el modo de visualización conmutación. 3.
Modo de dirección norte La dirección de viaje del vehiculo será visualizada con letras como una de las 8 o 16 direcciones de la brújula. Modo de dirección del objetivo En el modo Dirección Objetivo, usted puede ajustar la dirección del objetivo deseado, y cualquier desviación de esta dirección será entonces visualizada en la pantalla de visualización dentro del automovil.(Vease "Configuración de la dirección del objetivo" para instrucciones sobre ajuste de la dirección del objetivo.
Instalación 7 Accesorios 1Emisor de luz del mando a distancia (longitud del cable: 2.5m) ....................................................................1 2Cable de conexión (ISO AB :0.1m)..........................1 3Cable de conexión (ISO C :2m) ...............................1 5Tornillo autorroscante (Ø4X16mm)...4 4Câble de connexion (2m).........................................1 6Cinta adhesiva de doble capa...........
Conectar a la unidad central Conectar el KPA-SD100 yel KPA-SS100 Conectar sólo el KPA-SD100 Cable de conexión4 Cable de conexión4 KPA-SD100 TO CH A B Cable de conexión(Proporcionado el KPA-SS100) KPA-SS100 (Opción) KPA-SD100 TO H/U DISPLAY OUT IF/IN IF/OUT TO CH A B TO H/U DISPLAY OUT IF/IN Unidad central IF/IN IF/OUT IF/OUT 10 10 Unidad central KPA-CP100 (Opción) Cable de conexión (ISO C )3 KPA-CP100 (Opción) Cable de conexión (ISO C )3 Cable de conexión (ISO AB )2 Cable de conex
Visualizar el interruptor selector en la pantalla de visualización del Opel • Ajustar a A en el caso de pantalla de visualización de matriz de puntos de 5 x 7. • Ajustar a B en el caso de pantalla de visualización de 14 segmentos. La configuración de fábrica es "A".
Modelos Aplicáveis (Unidade Central) Este produto funciona quando ligado a um modelo compatível com a Unidade Central. Para informação sobre modelos compatíveis com a Unidade Central, consulte a tabela anexa de modelos compatíveis. Sobre este produto Quando ligado ao seu veículo, este produto apresentará informação da unidade central KENWOOD, no ecrã instalado no seu veículo. Ele também possibilita que a unidade central seja operada a partir do controlo remoto no volante.
Operação 7 Definição do mostrador do veículo 1. Seleccione "EXT.ACC.CONT/ACC.CONT/EXT.ACC Control" dos itens do menu Unidade Central. Unidade Central 4 FM ¢ PWR OFF NOTA DISC DAB Isto não funciona durante a recepção de emissões OM / OL (se a unidade central apresentar os sensores, é apresentado como "- - - -"). 2. Mantenha premido o botão 4 ou ¢ durante mais de dois MENU segundos. A Unidade Central entra em modo mostrador-comutação. 3.
Compensação de direcção da bússola: 1. Corrige o magnetismo terrestre para permitir à bússola funcionar normalmente. A Unidade Central apresenta "COMPASS.ADJUST/COMP.ADJ" e entra em modo verificação de definição de direcção do magnetismo terrestre. 2. Prima o botão 4 ou ¢. Começa a compensação automática. Ao entrar em compensação automática, rode o veículo 360 graus. O tempo para a compensação dura menos que dois minutos.
Instalação 7 Acessórios 1Emissor de luz do controlo remoto (comprimento do cabo: 2.5m) ................................................................1 2Cabo de ligação (ISO AB :0.1m)..............................1 3Cabo de ligação (ISO C :2m) ...................................1 5Parafuso auto-roscante(Ø4X16mm) .4 4Cabo de ligação (2m)...............................................1 6Fita adesiva de duas faces ...............
Ligação à Unidade Central Ligação do KPA-SD100 e do KPA-SS100 Ligação apenas do KPA-SD100 Cabo de ligação4 Cabo de ligação4 KPA-SD100 TO CH A B Cabo de ligação(Fornecido com o KPA-SS100) KPA-SS100 (Opção) KPA-SD100 TO H/U DISPLAY OUT IF/IN IF/OUT TO CH A B TO H/U DISPLAY OUT IF/IN Unidade Central IF/IN IF/OUT IF/OUT 10 10 Unidade Central KPA-CP100 (Opção) Cabo de ligação (ISO C )3 KPA-CP100 (Opção) Cabo de ligação (ISO C )3 Cabo de ligação (ISO AB )2 Connector cable (ISO AB )2 Pa
Interruptor selector de mostrador no mostrador de tipo Opel • Regule em A no caso de mostrador de matriz de 5 x 7 pontos. • Regule em B no caso de mostrador de 14 segmentos. A regulação de fábrica é "A". 2CUIDADO Se regular incorrectamente o interruptor, no mostrador aparecerão aspas entre os minutos e os segundos se o mostrador do seu carro for de matriz de pontos 5 x 7, ou, se o mostrador for um de 14 segmentos, nada aparecerá entre os minutos e os segundos.
-20 +20 +15 -15 +10 +20 -10 -5 +5 +15 +10 +5 -15 -20 -15 -10 -5 0 0 -10 -5 0 +5 +15 Figure 1. Correction values by area / Figure 1.Valeurs de correction par région / Abbildung 1. Korrekturwerte durch Bereich / Figuur 1. Correctiewaarden per gebied / Figura 1. Valori di correzione per area / Figura 1. Valores de corrección por área / Figura 1.