LED Linear High Bay Series User Manual PLEASE READ THE USER MANUAL CAREFULLY BEFORE USE
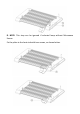
1. Product Description KERI® LED Lighting presents the newest version of LED luminaire based on the latest semiconductor technology. The advantageous features of this product are large light-emitting surface, light output uniformity, long lifespan, anti-glare design and capability of saving great energy. This product adopts cool light source and adapts to frequent on/off operations.
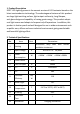
. Functions • Standard fixture • Infrared sensing With regard to the use of infrared sensors, please refer to "Sensor Manual" • Wireless dimming With regard to the use of remote control, please refer to "Wireless Remote Control Manual" • Microwave sensor With regard to the use of remote control, please refer to "JS-SO-R Manual" 4.
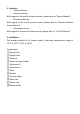
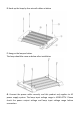
Installation Steps: A. Screw the four M8 screw rings to the corresponding position on lamp back as shown below. B. NOTE: This step can be ignored if selected lamp has no Wireless Dimming Function. Remove the red cover for signal cable and screw the black antenna on the lamp. The black antenna can be bent to 90 degree as shown below. C. NOTE: This step can be ignored if selected lamp without Microwave Sensor. Put connector A and connector B connected, as shown below.
D. NOTE: This step can be ignored if selected lamp without Microwave Sensor. Fix the plate to the heat sink with two screws, as shown below.
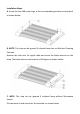
E. Hook up the lamp by four aircraft cables as below F. Hang on the lamp as below. The lamp should be same as below after installation G. Connect the power cable correctly and this product only applies to AC power supply system. The lamp input voltage range is AC100-277V. Please check the power output voltage and lamp input voltage range before connection.
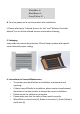
White/Blue: N Black/Brown: L Green/Yellow: E H. Turn the power on to use the product after installation. I. Please referring to "Infrared Sensors for Use" and "Wireless Controller Manual" for use of the infrared sensors and wireless dimming. 5. Packaging Lamp ends are covered by protective EPE and lamp is packed with special carton box with proper sealing. 6. Instructions for Use and Maintenance • The power must be off when in installation, maintenance and repairing.
• • • • • • Keep emitting surface clean. Please use dry cloth to clean the lamp. Do not use any corrosive detergent. Prevent any contact between liquid and electrical parts. Alcohol can be used on the cloth to remove the heavy dirt. Please read lamp specifications carefully as well as the label on the product. Repairing Instructions • Power off before repairing • Disconnect the power lines and remove the lamp according to the instructions.
5 Year Limited Warranty Service If the product will not work after you have read the troubleshooting guide and practiced the troubleshooting options, you are advised to return the light system to the retailer you purchased it from. The dealer will be able to examine the light and test its components. If they are not able to repair the light, they will return it to us for examination and repair/replacement. Do not attempt to repair any product on your own, as serious injury or death may result.