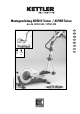
Montageanleitung NORDIC-Trainer / ALPINE-Trainer Art.–Nr. 07851-500 / 07851-590 D GB USA F NL E I Auf 100% Altpapier! 75 kg 150 kg max. Abb.
D Montagehinweise ■ Bitte prüfen Sie, ob alle zum Lieferumfang gehörenden Teile vorhanden sind (s. Checkliste) und ob Transportschäden vorliegen. Sollte es Anlaß für Beanstandungen geben, wenden Sie sich bitte an Ihren Fachhändler. packungsmaterial so, dass keine Gefahren davon ausgehen können. Bei Folien/Kunststofftüten für Kinder Erstickungsgefahr! ■ Das für einen Montageschritt notwendige Verschraubungsma- das Gerät entsprechend der Bilderfolge.
GB USA thoroughly every 1 -2 months. Pay particular attention to the tightness of bolts and nuts. This is particularly true for the attachment of grip strap, running plate and fastening of the handlebar and front tube. ■ Any interference with parts of the product that are not descri- bed within the manual may cause damage, or endanger the person using this machine. Extensive repairs must only be carried out by KETTLER service staff or qualified personnel trained by KETTLER.
GB USA / 2 pieces / S/N .................... Waste Disposal Please keep original packaging of this article, so that it may be used for transport at a later date, if necessary. KETTLER products are recyclable. At the end of its useful life please dispose of this article correctly and safely (local refuse sites). Goods may only be returned after prior arrangement and in (internal) packaging, which is safe for transportation, in the original box if possible.
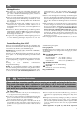
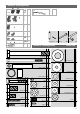
Checkliste (Packungsinhalt) GB E Checklist (contents of packaging) F Liste de vérification (contenu de l’emballage) NL Checklijst (verpakkingsinhoud) Lista de control (contenido del paquete) I Lista di controllo (contenuto del pacco) PL Lista kontrolna (zawartość opakowania) 1 1 1 1 1 1 1 1 1 1 1 14
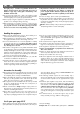
Checkliste (Packungsinhalt) 2/2 1/1 1 1 1 1 1 1 2 2 2/2 4/2/2 S-19/1200 1 M8x45 SW 10/13 Checkliste (Packungsinhalt) M10x105 2 M5x90 2 ø10x2,4x52 2 ø22,2x2x16 2 M5 2 M10 2 1x SW 17 2x SW 15 1x Actual Size ø31,5x16,3 6 ø25x8,4x3 2 ø18x11,3x2 4 ø16x8,3x2 1 ø15,5x5,4x1,5 2 ø10 8 1 M10x20 8 M8x16 2 4x35 6 3,9x19 2 M10x1,25 2 M5x12 4 3,9x13 4 15
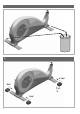
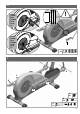
1 2 A “klick” “klick” B “klick” 16
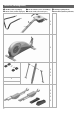
3A 3B 1x D ACHTUNG! Die beiden Schrauben D müssen aus technischen Gründen zuerst angezogen werden. Erst dann die Schrauben E anziehen. GB IMPORTANT! Due to technical reasons the screws D have to be tightend first. Tighten the screws E last. F ATTENTION! Pour des raisons techniques il faut d’abord serrer les deux vis D. Serrez ensuite seulement les vis E. NL LET OP! Om technische redenen moeten de beide schroeven D eerst vastgedraaid worden. Pas daarna de schroeven E vastdraaien.
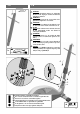
4 2x M8x16 ø25x8,4x3 5 D ACHTUNG! Achten Sie auf die Ausrichtung der Pedalarme! GB IMPORTANT! Pay attention to the direction of the pedal arms! F ATTENTION! Veillez à l'alignement des bras de pédale ! NL LET OP! Let op de juiste stand van de pedaalarmen! E ¡ATENCIÒN! ¡Preste atención a la alineación de los brazos de pedal! I ATTENZIONE! Si prega di badare all'allineamento della pedivella! PL UWAGA! Proszę uważać na wyregulowanie ramion pedałów! 4x M5x12 18
6 ! FALSCH ! WRONG ! FAUX ! VERKEERD ! FALSO ! FALSO ! żle ! FALSCH ! WRONG ! FAUX ! VERKEERD ! FALSO ! FALSO ! żle ! ()( 2x ø22,2x16 ø31,5x16,3 7 A C B C B C 4x B 2x A 2x M10x105 M10x1,25 ø18x11.
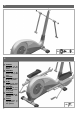
8 B A C 9 A 4x 3,9x13 B 2x 4x35 C 2x 4x35 10 ! 1x 1x 3,9x19 20 M5x90 ø10x52 ø15 M5
11 D GB F NL E I PL ACHTUNG! Die beiden Schrauben D müssen aus technischen Gründen zuerst angezogen werden. Erst dann die Schrauben E anziehen. IMPORTANT! Due to technical reasons the screws D have to be tightend first. Tighten the screws E last. ATTENTION! Pour des raisons techniques il faut d’abord serrer les deux vis D. Serrez ensuite seulement les vis E. LET OP! Om technische redenen moeten de beide schroeven D eerst vastgedraaid worden. Pas daarna de schroeven E vastdraaien.
Poti ! 1x 3,9x19 14 15 1x B 1x 22 2x M5x90 ø10x52 ø15 M5 4x35
Handhabungshinweise GB Handling F Utilisation NL Handleiding E Aplicación I Utilizzo PL Zastosowanie A B Batteriewechsel Rücknahmestellen der Kommunen ab, damit die gesammelten Batterien anschließend ordnungsgemäß beseitigt oder umweltverträglich recycelt werden können. GB Battery change A weak or an extinguished computer display makes a battery change necessary. The computer is equipped with two batteries.
Batteriewechsel deux piles neuves du type AA 1,5V. ■ Veillez au marquage au fond du logement lors de la mise en place des piles. ■ En cas de dysfonctionnement après la remise en marche, enle- vez brièvement les piles et remettez-les ensuite. I Cambio delle batteria Una visualizzazione debole o spenta del computer richiede il cambio della batteria. Il computer è munito di due batterie.
Ersatzteilbestellung GB E Spare parts order Pedido de recambios F I Commande de pièces de rechange Ordine di pezzi di ricambio HEINZ KETTLER GmbH & Co. KG D-59463 Ense-Parsit Trainingsgerät nach DIN EN 957-1, 5 Nicht für therapeutische Zwecke geeignet Art.-Nr. 07961-800 Serien-Nr.: 1-334 O - 1801 00001 max Belastung 130 kg Made in Germany 1 2 D Pos.Nr.
Ersatzteilbestellung Pos.Nr.
Ersatzteilbestellung 67 27
docu 2043b/10.07 HEINZ KETTLER GmbH & Co. KG · Postfach 1020 · D-59463 Ense-Parsit www.kettler.