
Installation Guide


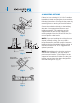

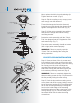
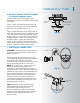
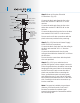
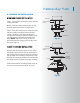
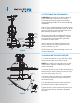

Fig. 16
Fig. 17
10. INSTALLING THE LIGHT FIXTURE
CAUTION: Remove the five rubber shipping
blocks attached to the face of the motor.
These blocks keep the motor from shifting
during shipping and MUST be removed during
installation.
Step 1. Place a blade between a blade bracket
and a blade bracket medallion. Attach all three
pieces using the screws, metal washers and
fiber washers provided. (Fig. 16)
Make sure the blade is straight when set on
the blade bracket and the medallion. Tighten
each mounting screw and then repeat this
procedure for each blade.
Step 2. Attach each blade assembly to the
motor using two mounting screws for each
blade assembly. (Fig 16)
NOTE: Make sure these mounting screws are
securely tightened.
1. Loosen the padlock on one side of the light
fixture allowing the lens holder to open.
NOTE: Be careful not to drop the lens as the
holder opens and then carefully lay it aside
before continuing.
2. Loosen the two screws on the mounting ring
attached to the motor shaft and "remove" and
save the third screw. (Fig. 17)
3. Place the key hole slots on the light fixture
over the two screws previously loosened on
the mounting ring.
Turn the light fixture until is locks in place at
the narrow section of the key hole slots.
Tighten both key hole screws and replace the
third screw previously removed and tighten
securely.
Blades bracket
Blade bracket
medallions
Blades
Glass plate
Screws
Padlocks
Mounting ring
Light fixture
Screws
Washers
Rubber
washers
9. ATTACHING THE FAN BLADES
1
2
9