
Installation Guide
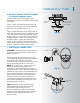
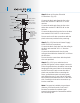
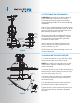


Fig. 18
Fig. 19
Step 1. Install 4, 40W T3 halogen bulbs
(provided). (Fig. 19)
Step 2. Place the light fixture lens back into the
lens holder and close the light fixture. Make
sure to lower the padlock and tighten to
prevent the lens holder from coming open.
(Fig.19)
12. INSTALL THE LIGHT BULBS
Step 1. Loosen the three mounting screws on
the inside of the light fixture.
Hold the light plate close to the light fixture and
connect the white wires from the light plate
and the fan. Follow the same procedure with
the black wire connectors. (Fig. 18)
Step 2. Tuck the connections neatly into the
light fixture.
NOTE: Be careful not to pinch the light plate
wires between the light plate and the light
fixture.
Step 3. Place the light plate key holes over the
three mounting screws inside the light fixture
and turn the light plate until it locks in place at
the narrow section of the key hole slots.
Secure by tightening all three screws. (Fig. 18)
11. INSTALLING THE LIGHT FIXTURE
Light fixture
Wire connector
Mounting screws
Light plate
Bulbs
Light plate
Padlocks
Glass lens
Light fixture
1
2
10
Hatteras Bay
TM
Patio