
Installation Guide


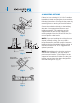

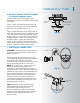
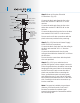
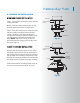
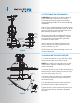

Fig. 15
8
Hatteras Bay
TM
Patio
Fig. 14
Outlet box
Ceiling mounting
bracket
Canopy
Canopy cover
Screws
Outlet box
Ceiling mounting
bracket
Canopy
Screws
Decorative
mounting
screw cover
CLOSE-TO-CEILING INSTALLATION
CLOSE-TO-CEILING INSTALLATION
Remove the fan from the hook on the ceiling
mounting bracket. Attach the fan assembly to
the ceiling mounting bracket using 4 screws at
the top edge of the canopy. Insert each screw
through the canopy mounting hole and into the
mounting bracket. Tighten all screws securely.
Slide the decorative mounting screw cover up
to cover the mount screw heads. (Fig. 15)
8. FINISHING THE INSTALLATION
STANTARD CEILING INSTALLATION
STANTARD CEILING INSTALLATION
Step 1. Tuck all the connections neatly into the
ceiling outlet box.
MAKE SURE the Black Antenna wire on the
receiver remains free from all other wires.
Step 2. Slide the canopy up to ceiling and over
the two screws on hanger bracket. Rotate
canopy clockwise, next, while holding the
canopy with one hand, slide the canopy cover
over the screws and rotate clockwise until
tight. NOTE: Adjust the canopy screws as
necessary until the canopy and canopy cover
are snug. (Fig.14)