
Instructions / Assembly


4
42" Bowen
REMEMBER to turn off the power before you
begin.
To properly install your ceiling fan, follow the
steps below.
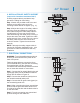
Step 1. Remove the decorative canopy
bottom cover from the canopy by turning the
cover counter clockwise. (Fig. 5)
Step 2. Remove the ceiling mounting bracket
from the canopy by removing (and save one
of the two screws. Loosen the remaining
screw by a half turn. (Fig. 5)
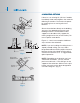
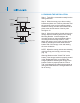
Step 3. Pass the 120 volt supply wires from
the ceiling outlet box through the center of the
ceiling mounting bracket. (Fig.6)
Step 4. Attach the ceiling mounting bracket to
the outlet box using the screws and washers
included with the outlet box. (Fig. 6)
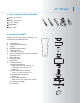
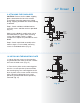
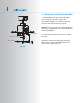
Step 5. Remove the hanger ball from the
downrod assembly by loosening the set
screw, unscrewing and removing removing
the cross pin and unscrewing the ball off the
rod. (Fig.7)
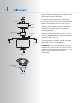
Step 6. Loosen the two set screws and
remove the hitch pin and retaining clip from
the coupling on top of the motor assembly.
(Fig. 8)
Step 7. Carefully feed the electrical lead wires
from the fan up through the downrod. Thread
the downrod into the coupling until the Hitch
pin holes are aligned.
Next, replace the hitch pin and retaining clip.
Tighten both set screws. (Fig. 8)
5. HANGING THE FAN
Fig. 6
Fig. 7
Fig. 8
Mounting screws
(supplied with
electrical box)
Hook
Ceiling
mounting
bracket
CUL Listed
electrial
box
120V Wires
Washers
Downrod
Cross pin
Hanger
ball
Set screw
Supply wires
Downrod
Hitch pin
Retaining clip
Set screws
Set screws
Fig. 5
Hanger bracket
Ceiling
canopy
Canopy
cover