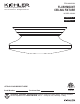
ITEM #0806026 FLUSHMOUNT CEILING FIXTURE Kichler® is a registered trademark of The L.D. Kichler Co. All Rights Reserved. MODEL #38209 Français p. 9 Español p. 17 ATTACH YOUR RECEIPT HERE Serial Number Purchase Date Questions, problems, missing parts? Before returning to your retailer, call our customer service department at 1-800-554-6504, 8 a.m. - 4:30 p.m, EST, Monday - Friday.
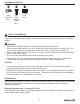
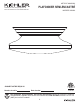
PACKAGE CONTENTS B G F A C E D PART A B C D DESCRIPTION Pan Mounting Bracket Shade Housing Shade QTY 1 1 1 1 PART E F G 2 DESCRIPTION Socket Threaded Nipple Hex Nut QTY 2 1 2
HARDWARE CONTENTS AA Wire Connector Qty: 3 BB Short Machine Screw Qty: 2 CC Threaded Cap Qty: 2 SAFETY INFORMATION Please read and understand this entire manual before attempting to assemble, operate or install the product. • • • • • WARNING IMPORTANT: NEVER attempt any work without shutting off the electricity. Place the main power switch in the “OFF” position and unscrew the fuse(s), or switch “OFF” the circuit breaker switch(es), that control the power to the fixture or room you are working in.
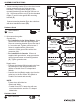
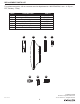
ASSEMBLY INSTRUCTIONS 1. Orient mounting bracket (B) so the raised center portion protrudes into the outlet box (not included). Screw threaded nipple (F) into mounting bracket (B) and through first hex nut (G). Screw second hex nut (G) up the threaded nipple (F) until it locks against the mounting bracket (B). 1 Outlet Box B Connect mounting bracket (B) to the outlet box with short machine screws (BB). F G Hardware Used Short Machine BB Screw x2 2.
ASSEMBLY INSTRUCTIONS 3. Pass canopy (A) over the threaded nipple (F) protruding from mounting bracket (B) and secure with threaded cap (CC). 3 B Hardware Used CC Threaded Cap F x1 CC 4. Insert bulb (included) into socket (E). Use 60-watts max. medium-base bulb or CFL/LED equivalent. 4 E 5. Screw shade (D) onto shade housing (C).
CARE AND MAINTENANCE • Always be certain that electric current is turned off before cleaning this item. • Use a soft, moist cloth with mild non-abrasive soap to clean fixture. Never use glass cleaner on fixture, as it will damage the metal finish. • All glass shades may be washed in a towel-lined sink with warm water and mild soap. Do not wash shades in an automatic dishwasher. TROUBLESHOOTING PROBLEM POSSIBLE CAUSE 1.CORRECTIVE Check wiring. ACTION Fixture does not light. 1.
WARRANTY (continued) This warranty does not apply to any products that have been subjected to misuse, mishandling, misapplication, connected to voltage at more than 5% above standard North American voltage, unusual use (including but not limited to use in an environment where the annual average ambient operating temperature is below 27 or above 95 degrees Fahrenheit), neglect (including but not limited to improper maintenance), accident, acts of god such as high winds, improper installation or care, failure
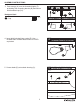
REPLACEMENT PARTS LIST For replacement parts, call our customer service department at 1-800-554-6504, 8 a.m. - 4:30 p.m., EST, Monday - Friday. PART B D F G AA BB CC DESCRIPTION Mounting Bracket Shade Threaded Nipple Hex Nut Wire Connector Short Machine Screw Threaded Cap B PART # XBAR01 G38209 TN18200 NUT18 WC001 SCR832X050 TCAP38209 D AA F BB G CC Printed in China Kichler® is a registered trademark of The L.D. Kichler Co. All Rights Reserved Rev.
ARTICLE #0806026 Kichler® est une marque déposée de The L.D. Kichler Co. Tous droits réservés. PLAFONNIER SEMI-ENCASTRÉ MODÈLE #38209 JOIGNEZ VOTRE REÇU ICI Numéro de série Date d’achat Des questions, des problèmes, des pièces manquantes? Avant de retourner le produit à votre détaillant, appelez notre service à la clientèle au 1-800-554-6504, entre 8 h et 16 h 30 (HNE) du lundi au vendredi.
CONTENU DE L’EMBALLAGE B G F A C E D PIÈCE A B C D DESCRIPTION Pavillon Support de fixation Corps de l'abat-jour Abat-jour QTÉ. 1 1 1 1 PIÈCE E F G 10 DESCRIPTION Douille Raccord fileté Écrou hexagonal QTÉ.
QUINCAILLERIE INCLUSE AA BB Capuchon de connexion Vis à métaux Qté : 3 courte CC Capuchon fileté Qté : 2 Qté : 2 CONSIGNES DE SÉCURITÉ Veuillez vous assurer de lire et de comprendre l’intégralité du présent guide avant d’assembler, d’utiliser ou d’installer ce produit. AVERTISSEMENT • IMPORTANT : Coupez l’électricité avant TOUTE manipulation. • Accédez au panneau central de disjoncteurs ou de fusibles de votre demeure et placez l’interrupteur principal en position d’arrêt (« OFF »).
INSTRUCTIONS POUR L'ASSEMBLAGE 1. Orientez le support de fixation (B) de sorte que la partie centrale surélevée fasse saillie dans la boîte de sortie (non fournie). Vissez le raccord fileté (F) dans le support de fixation (B) et à travers le premier écrou hexagonal (G). Vissez le second écrou hexagonal (G) le long du raccord fileté (F) jusqu'à ce qu'il repose contre le support de fixation (B). 1 Boîte de sortie Fixez le support de fixation (B) à la boîte de sortie à l'aide des vis à métaux courtes (BB).
INSTRUCTIONS POUR L'ASSEMBLAGE 3. Enfilez le pavillon (A) sur le raccord fileté (F) sortant du support de fixation (B) et fixez-le à l'aide du capuchon fileté (CC). 3 B Quincaillerie utilisée CC Capuchon fileté F x1 CC 4. Insérez l'ampoule (fournie) dans la douille (E). Utilisez des ampoules à culot moyen de 60 watts max. ou un équivalent LFC/DEL. 4 E 5. Vissez l'abat-jour (D) sur le corps de l'abat-jour (C).
ENTRETIEN • Vérifiez toujours que le courant est coupé avant de nettoyer le luminaire. • Utilisez un linge doux et humide ainsi qu’un savon non abrasif. N’utilisez jamais de nettoyants pour vitres; vous risqueriez d’endommager le fini métallique du luminaire. • Les abat-jour en verre peuvent être nettoyés dans un évier couvert de serviettes, à l’aide d’eau tiède et de savon doux. Ne nettoyez pas les abat-jour dans un lave-vaisselle. DÉPANNAGE PROBLÈME Le luminaire ne s’allume pas. CAUSE POSSIBLE 1.
GARANTIE (suite) Cette garantie ne s'applique pas aux produits qui ont été soumis à un usage abusif, une manipulation inadéquate, un usage impropre, qui ont été connectés à un voltage de plus de 5 % supérieur au voltage nord américain, qui ont subi un usage inhabituel (y compris mais sans s'y limiter un usage dans un environnement où la température ambiante moyenne annuelle est inférieure à 27 °F [-2,8 °C] ou supérieure à 95 °F [35 °C]), la négligence (y compris mais sans s'y limiter un mauvais entretien),
LISTE DES PIÈCES DE RECHANGE Pour obtenir des pièces de rechange, appelez notre service à la clientèle au 1-800-554-6504, entre 8 h et 16 h 30 (HNE), du lundi au vendredi. PIÈCE B D F G AA BB CC DESCRIPTION Support de fixation Abat-jour Raccord fileté Écrou hexagonal Capuchon de connexion Vis à métaux courte Capuchon fileté B Nº DE PIÈCE XBAR01 G38209 TN18200 NUT18 WC001 SCR832X050 TCAP38209 D AA F BB G CC Imprimé en Chine Kichler® est une marque déposée de The L.D. Kichler Co.
ARTÍCULO #0806026 Kichler® es una marca registrada de The L.D. Kichler Co. Todos los derechos reservados. LÁMPARA DE TECHO SEMI EMPOTRADA MODELO #38209 ADJUNTE SU RECIBO AQUÍ Número de serie Fecha de compra ¿Preguntas, problemas, piezas faltantes? Antes de devolverlo a la tienda, llame a nuestro departamento de servicio al cliente al 1-800-554-6504, de 8:00 a.m. a 4:30 p.m. hora del Este (EST), de lunes a viernes.
CONTENIDO DEL PAQUETE B G F A C E D PIEZA A B C D DESCRIPCIÓN Placa de montaje Soporte de montaje Alojamiento de la pantalla Pantalla CANT. 1 1 1 1 PIEZA E F G 18 DESCRIPCIÓN Portalámparas Manguito roscado Tuerca hexagonal CANT.
ADITAMENTOS AA Conectores de cables Cant.: 3 BB Tornillos para metales cortos Cant.: 2 CC Tapa roscada Cant.: 2 INFORMACIÓN DE SEGURIDAD Lea y comprenda completamente este manual antes de intentar ensamblar, usar o instalar el producto. • • • • • ADVERTENCIA IMPORTANTE: NUNCA intente hacer trabajos sin desconectar el suministro eléctrico. Coloque el interruptor de alimentación principal en la posición “OFF” (APAGADO). Coloque el interruptor de la pared en la posición “OFF” (APAGADO).
INSTRUCCIONES DE ENSAMBLAJE 1. Oriente el soporte de montaje (B) de modo que la parte central elevada sobresalga en la caja eléctrica (no se incluye). Atornille el manguito roscado (F) en el soporte de montaje (B) y a través de la primera tuerca hexagonal (G). Atornille la segunda tuerca hexagonal (G) hacia arriba en el manguito roscado (F) hasta que se fije contra el soporte de montaje (B). 1 Caja de salida Conecte el soporte de montaje (B) a la caja eléctrica con los tornillos cortos para metal (BB).
INSTRUCCIONES DE ENSAMBLAJE 3. Pase la cubierta (A) sobre el manguito roscado (F) que sobresale del soporte de montaje (B) y asegúrela con la tapa roscada (CC). 3 B Aditamentos utilizados CC Tapa roscada F x1 CC 4. Inserte el foco (incluye) en el portalámparas (E). Use un foco de base media de máximo 60 W o el equivalente CFL/LED. 4 E 5. Atornille la pantalla (D) al alojamiento de la pantalla (C).
CUIDADO Y MANTENIMIENTO • Siempre asegúrese de que la corriente eléctrica esté desconectada antes de limpiar. • Utilice un paño húmedo suave y jabón suave no abrasivo para limpiar la lámpara. Nunca utilice un limpiador para vidrio en la lámpara, porque éste dañará el acabado metálico. • Las pantallas de vidrio se pueden lavar dentro de un lavabo recubierto con toallas usando agua tibia y jabón suave. No lave las pantallas en un lavaplatos automático. SOLUCIÓN DE PROBLEMAS PROBLEMA La lámpara no se enciende.
GARANTÍA (continuación) Esta garantía no aplica a ningún producto que haya sido objeto de uso indebido, manipulación indebida, aplicación indebida, conectado a voltaje superior al 5 % del voltaje norteamericano estándar, uso inusual (incluyendo sin limitación el uso en un ambiente donde la temperatura promedio anual de operación sea inferior a 27 oF [-2.
LISTA DE PIEZAS DE REPUESTO Para repuestos, llame a nuestro departamento de servicio al cliente al 1-800-554-6504, de 8:00 a.m. a 4:30 p.m. hora del Este (EST), de lunes a viernes. PIEZA B D F G AA BB CC DESCRIPCIÓN Soporte de montaje Pantalla Manguito roscado Tuerca hexagonal Conectores de cables Tornillos para metales cortos Tapa roscada B PIEZA # XBAR01 G38209 TN18200 NUT18 WC001 SCR832X050 TCAP38209 D AA F BB G CC Impreso en China Kichler® es una marca registrada de The L.D. Kichler Co.