
Owner's Manual


Start by inserting two stainless socket-head
cap
screws through the lower mounting bracket, through the
enclosure mounting holes, and into the threaded mounting plate. Leave these screws loose for the moment.
Attach the enclosure to your mounting bar using the upper mounting bracket and two more stainless socket-
head cap screws. While still loosely assembled, visually align your KM Tower Enclosures to the desired angle.
Using tape, a pencil, or some other means, mark the mounting angle of the mounting bracket bottom
in
relation
to the KM Tower Enclosure(s). Remove the enclosures and then
do
final
tightening of the lower mounting
bracket to the enclosure, aligning
it
with the marks you made.
Once
your final adjustments are made do not use
excessive force to further aim the enclosures.
If
your aim
is
off, remove the
KM
Tower Enclosures and loosen the
screws between the enclosure and the lower mounting bracket, then reset the angle.
Loosely
fill
the enclosure with
poly-fil,
the
white protective
layer
in
the packaging.
The KMTED
will
use one
full
sheet,
whereas the KMTES will use one sheet for
a woofer and one-half sheet for a horn.
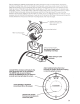
mount speaker to
en<?losure
(recommend
M4
or #8 screws)
remove inner screws
from back of enclosure to
orient back
plate.
stainless steel socket-
head cap screws ( 1
I
4"
Allen wrench)
upper mounting bracket
lower mounting bracket
(set desired
angle
before
completing mounting)
attach wiring to outer
terminals
attach soldered wiring from inner
terminals to speaker terminals, keeping
in
mind the polarity of each.
•
•
K(}~
•
3