
Owner Manual

STAINING OR CLEAR FINISHING - UNFINISHED INTERIOR PINE DOORS (Cont.)
Once sanding sealer has fully dried (follow manufacturer’s recommendations), nish the door with
good quality oil-based or very low water-based polyurethane stain. Note: If a pre-stain sealer was not
used, water-based nishes increase the potential of veneer splits, highlighted joints, grain raise and
volume. Natural grain and color variations are normal and not considered manufacturing defects.
PAINTING - UNFINISHED OR PRIMED INTERIOR PINE DOORS:
• To Paint Unnished Doors: Seal the door with a quality primer and allow to fully dry. Next, sand the
surface using #400 grit sandpaper. Sand front and back faces, left and right edges and louvers
(if door has louvers). See important note* (on page one) regarding sanding of top and
bottom edges (for paint applications) to comply with warranty. Next, apply two applications
(top coats) using a high-quality nish. Allow rst coat to fully dry before applying second coat.
Avoid excessive application. Multiple thin coats provide best results. Follow paint manufacturer’s
recommendations for product you choose.
• To Paint Primed Doors: Sand door with #400 grit sandpaper. Sand front and back faces, left and
right edges and louvers (if door has louvers). See important note* (on page one) regarding
sanding of top and bottom edges (for paint applications) to comply with warranty. Next,
apply two applications (top coats) using a high-quality nish. Allow rst coat to fully dry before
applying second coat. Avoid excessive application. Multiple thin coats provide best results. Follow
paint manufacturer’s recommendations for product you choose.
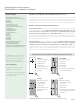
Finishing Instructions for Interior
Pine Wood Doors - Unnished or Primed
FOR BEST RESULTS FOLLOW SEQUENCE SHOWN BELOW FOR EACH DOOR TYPE.
*
SEE IMPORTANT NOTE ON PAGE 1 - for nishing top and bottom rails when painting or staining
Page 2
FRENCH
Paint / Stain in this order:
1. Grilles or muntins
2. Horizontal rails
3. Vertical stiles
4. Finish all surfaces, front
and back faces, left and
right edges *
LOUVER
Paint / Stain in this order:
1. Start with louvers
2. Horizontal rails
3. Vertical stiles
4. Finish all surfaces, front
and back faces, left and
right edges *
WOOD PANEL
Paint / Stain in this order:
1. Door panels
2. Center stiles
3. Horizontal rails
4. Vertical stiles
5. Finish all surfaces, front and back
faces, left and right edges *
BIFOLD
Paint / Stain in this order:
1. Panels (and louvers if door
has louvers)
2. Horizontal rails
3. Vertical stiles
4. Finish all surfaces, front and back
faces, left and right edges of each
bifold panel *
1
1
1
1
2
2
2 2
3
3
3
4
3
4 5
4 4
MATERIALS NEEDED
• Protective gloves (rubber/latex)
• Personal protection for eyes and breathing
(ventilator)
• Drop cloth
• Paper towels
• Clean wiping “tack” cloth
• #320 grit sandpaper and/or
#400 grit when sanding primed doors
• Sanding block
• Painter’s (masking) tape
• 1” high-quality brush
• 3”-4” high-quality brush
• Stir sticks
• Scraper
• Putty knife
• Utility knife
• Wood ller
• Sawhorses
• Wood conditioner / sanding sealer
• Quality stain if staining door
• Quality paint if painting door
• Quality clear-coat if coating unnished doors
• Quality primer if painting unnished doors
Your FRAMEPORT door has been crafted to
last for years to come. To keep your door in
the highest standard of condition requires
periodic maintenance to maintain its
performance and long-lasting appearance.
CARE & MAINTENANCE
• Periodically inspect all doors for wear,
damage and natural deterioration.
• Periodically inspect and adjust all hardware
to ensure that it continues to function as it
was originally intended.