
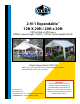
Installation & Assembly

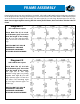

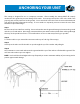


Step 1
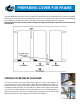
When the cover has been assembled the leg skirts should be at each corner. The ared leg skirts should be
over each of the corner slip-in ttings where the legs will be inserted. (Attachment of these valances will be
discussed later). Fold the leg skirts and A-frame ends of the cover back over the top and begin attaching the
cover with the elastic ball straps.
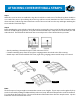
Step 2
Begin attaching the cover with the elastic ball straps by inserting the elastic cord of the ball strap underneath
the cover and through the grommet. Then pull cord taut until ball stops. Wrap the cord around the pole and
under the ball. This will hide the ball under the cover and provide a more nished look to your unit.
• Start by attaching 2 elastic ball straps at each of the four corners
• Continue attaching straps from left to right in a zigzag pattern down both sides of the canopy
• Attach straps at the front and back of the unit, again using a zigzag pattern until all straps are secured
Note:
The ball straps are long enough to accommodate various cover lengths. If your straps need a tighter t, they
can be shortened by making an additional knot in the cord strap. Slide the ball upward to reveal the tied knot.
Tie a new knot above the old one. The size of the knot will determine how short the strap becomes. Slip the
ball down over the new knot and secure.
ATTACHING COVER WITH BALL STRAPS
Start at corners
Go left to right
Go front to back
End here