
Installation & Assembly

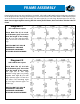


LEGS ASSEMBLY
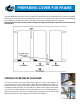
NOW, CONNECT THE LEG POLES TO THE ROOF ASSEMBLY WITH THE COVER ALREADY POSITIONED ON
TOP OF THE UNIT. (The diagram below illustrate the underside of cover with the grommet holes. The
leg valances and A-Frame ends are not shown in illustration.)
Step A: First insert the pipes for the middle poles into the 3- and 4-way connectors, and then connect the end
leg pipes in the same way. (See illustration) The leg pipes are the (A) 75.25in pipe with single swedge end.
Step B: Push the eight foot pads onto the bottom of each leg.
NOTE: the foot pads are NOT for anchoring the canopy!
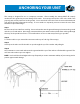
IMPORTANT! Once the legs and cover are assembled, your canopy will act like a kite in the wind. It is
imperative that the canopy anchors be installed NOW!
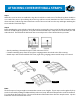
ATTACHING LEG SKIRTS TO FOOT PADS
Your Expandable Canopy has leg skirts for corner legs. Make sure the
footpads have been inserted on the leg pipes and hook part is turned
out. Attach the ring at the bottom of the skirt over the hook on the
footpad. Pull the adjustment strap to tighten. CAUTION: Do not over-
tighten strap or you could damage hooks and leg skirt. (See Picture
to right)
The center legs have leg straps only. They connect to a grommet hole in
the top cover and attach to the foot pads same as the corner leg skirts.
The straps will keep the cover from apping in the wind.
NOTE: The canopy footpads are not intended for anchoring. You
may insert large nails through the holes into the ground to keep
the legs from sliding.