
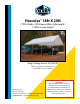
Owner Manual

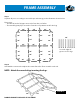


LEGS ASSEMBLY
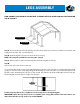
NOW, CONNECT THE LEG POLES TO THE ROOF ASSEMBLY WITH THE COVER ALREADY POSITIONED ON
TOP OF THE UNIT.
Step A: First insert the pipes for the middle poles into the 3- and 4-way connectors, and then connect the end
leg pipes in the same way. (See illustration)
Step B: Push the eight foot pads onto the bottom of each leg.
NOTE: the foot pads are NOT for anchoring the canopy!
Step C: Connect the hook & loop fastening strips down the length of each leg.
Step D:
Slip one clip onto each of the corner legs.
To secure the clips on the corner legs use the drawstring sewn into each end of the cover. Adjust the drawstring
evenly on each side of the canopy by pulling the drawstrings on each end of the cover at the same time. Insert
the ball on the drawstring into the slot on the curtain clip. Pull the clip down until tight. Pressure from the
drawstring will cause the clip to wedge onto the pipe.
Curtain clips may have to be re-tightened occaisonally due to strong wind gusts.
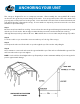
IMPORTANT! Once the legs and cover are assembled, your canopy will act like a kite in the wind. It is
imperative that the canopy anchors be installed NOW!
Insert Second
Insert First