Advanced Integrated Reception Automatic Satellite System with built-in digital off-air antenna KD-2200 Stationary KD-3200 In-Motion Installation and Operating Instructions ® Digital TV Solutions for Mobile Markets 11200 Hampshire Avenue South, Bloomington, MN 55438-2453 Phone: (800) 982-9920 Fax: (952) 922-8424 www.kingcontrols.
IMPORTANT! The TV market is expanding and changing. The information in this manual was accurate at the time of printing. If your King-DomeAIR does not operate as outlined in this manual please call King Controls at (800) 982-9920 or visit our website at www.kingcontrols.com. The King-DomeAIR is factory pre-set for DIRECTV® standard digital programming broadcast from the 101° W satellite.
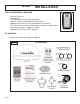
SECTION 1 INTRODUCTION The King-DomeAIR 2200 and 3200 Satellite Systems include 2 main components (Fig. 1). Dome (Antenna) Unit Located on the roof of the vehicle. The satellite dish, off-air antenna and electronics are covered by a protective dome that keeps operational components free from the elements. Controller Located in the vehicle. Activates the search mode and provides limited diagnostic functions using the status light.
SECTION 2 DEFINITION OF TERMS AZIMUTH: Circular rotation around the vehicle. Using the clock as a reference, the front of the vehicle is 12:00, and the rear is 6:00 (Fig. 2). Fig. 2 ELEVATION: Angle in degrees measured from a level plane (Fig. 3). Fig. 3 SIGNAL STRENGTH: Intensity of signal received from the satellite or off-air transmission.
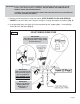
SECTION 3 INSTALLATION TOOLS AND MATERIALS REQUIRED • • • • • • • • drill and drill bit set tape measure 7/16” open end wrench (coax connections) adhesive sealant (compatible with roof material) appropriate fasteners to install all components and wiring 5/32” allen wrench, channel lock or pliers (to remove shipping bolts) wire cutter (to remove shipping tie strap) Optional: #1844 King Controls Keypad KIT CONTENTS 1. Unpack and identify all components (Fig. 4). Fig.
IMPORTANT! The tie strap and spacer, and the shipping bolts and washers must be removed from the bottom of the dome unit prior to installation. DO NOT REMOVE THE DOME COVER TO REMOVE THESE SHIPPING RESTRAINTS. YOU MUST PLUG THE SHIPPING BOLT HOLES WITH THE SUPPLIED PLUGS (ATTACHED TO TIE STRAP SHIPPING RESTRAINT). 2. Remove and discard the tie strap and spacer (KEEP RUBBER PLUGS AND GREASE PACKET), and the 2 bolts and 2 washers that pass through the bottom of the base (Fig. 5). 3.
DOME LOCATION 4. Select an area on the roof for the dome unit and the location where the wiring will enter the vehicle through the roof to the satellite receiver, controller, combiner, diplexer, and 12 volt power source inside, using the following criteria: a) The dome unit should be mounted as far away as possible from the existing off-air antenna if the antenna signals will be combined. b) A shorter distance between the dome unit and the satellite receiver is most desirable.
DOME INSTALLATION IMPORTANT! Make sure shipping restraints are removed from bottom of dome unit and plugs are inserted in holes (Fig. 5, Page 5). Cable connections must ALWAYS be positioned facing the rear of vehicle. 5. Place dome unit on installation location chosen using the criteria discussed in the previous section. Shipping restraints must be removed, plugs must be inserted in holes (Fig. 5, Page 5), and cable connections must be positioned facing rear of vehicle. 6.
EXTERNAL WIRING 9. Plug external wire harness into wiring port on back of dome unit and tighten connection until it clicks past the detent lock (Fig. 8). Note: The King-DomeAIR is wired for multiple receiver support. There are two coax ports on the back of the dome unit. The one labeled “MAIN” MUST be connected thru the diplexer to the main receiver in vehicle. This is the receiver that will control automatic satellite switching if applicable. The one labeled “AUX” can be used for an additional receiver.
. Run wiring from the back of the dome unit to the roof edge, then along edge to location where wiring will be fed into the vehicle. (If installing an optional auxiliary receiver, run auxiliary coax (not supplied) to location where it will enter the vehicle.) Secure wiring to roof every 12-18 inches (Fig. 9). IMPORTANT! Installer is responsible for determining proper roof compatible fasteners for cable entry cover. Roof hole for wiring must be sealed so it is completely waterproof.
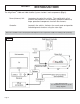
INTERNAL WIRING Note: Using multiple receivers is not recommended for multi-satellite services where automatic satellite switching is desired. Components and wiring supplied with the KD-2200/KD-3200 are shown in black. Existing components and wiring or those sold separately are shown in gray. 15. Choose your desired wiring configuration: Wall Plate Amplifier with single off-air output Fig. 10, Page 11 A/V Distribution Box with built-in Amplifier, single off-air output Fig.
Fig. 10 King-DomeAIR Series 2200 and 3200 Wiring Diagram Wall Plate Amplifier, single off-air output Note: Using multiple receivers is not recommended for multi-satellite services where automatic satellite switching is desired.
Fig. 11 King-DomeAIR Series 2200 and 3200 Wiring Diagram A/V Distribution box w/built-in Amplifier, single off-air output Note: Using multiple receivers is not recommended for multi-satellite services where automatic satellite switching is desired.
Fig. 12 King-DomeAIR Series 2200 and 3200 Wiring Diagram A/V Distribution box w/built-in Amplifier, multiple off-air outputs Note: Using multiple receivers is not recommended for multi-satellite services where automatic satellite switching is desired.
This page intentionally left blank.
SECTION 4 ANTENNA CONFIGURATION The King-DomeAIR is factory pre-set for DIRECTV standard digital programming broadcast from the 101° W satellite. If you also receive your local channels from DIRECTV’s 119 satellite or if you subscribe to Dish Network or Bell TV programming, you must re-configure the antenna to work with your satellite service.
STEP 1: SATELLITE SERVICE OPTIONS DIRECTV Single Satellite 101 Receive standard digital programming from the DIRECTV 101 satellite only. DIRECTV Plus: 101, 119 Receive standard digital programming from the 101, and locals from the 119, and automatically switch between the two. IMPORTANT! The King-DomeAIR can receive available HDTV programming from DIRECTV Ku band satellites at 101° and 119°. It will not receive channels broadcast from DIRECTV’s Ka band satellites at 99° and 103°.
DISH NETWORK Dish 500 Automatically switch between the 110 and 119 satellites for Dish Network Standard Digital Service by simply changing channels with the receiver’s remote control. Dish HD Eastern Arc Automatically switch between the 61.5 and 72 satellites for Dish Network by simply changing channels with the receiver’s remote control.
STEP 2-A: ANTENNA CONFIGURATION USING WALL MOUNT CONTROLLER Note: If you are using the keypad for programming, go to page 25. On pages 19-23, find your service and follow the instructions in the box. DIRECTV Single Satellite 101 (Factory Pre-set) . . . . . . . .Page 19 DIRECTV Plus . . . . . . . . . . . . . . . . . . . . . . . . . .Page 19 Dish Network Dish 500 . . . . . . . . . . . . . . . . . . . . . . . . . . . . . . .Page 20 Dish HD Eastern Arc . . . . . . . . . . . . . . . . . . . . .
DIRECTV ANTENNA CONFIGURATION Single Satellite 101 The King-DomeAIR is factory pre-set for the DIRECTV 101 satellite. Unless the antenna has been configured for another option since leaving the factory, PERFORM STEP 5 ONLY. 1. On the King-Dome controller, press and release the ON button. Wait for the status light to flash orange, and then WAIT 4 MORE SECONDS. 2. Press and release the ON button 16 times. The status light starts rapidly flashing green and red. 3. Press and hold the button for 4 seconds.
DISH NETWORK ANTENNA CONFIGURATION DISH 500 (satellites 110, 119) 1. On the King-Dome controller, press and release the ON button. Wait for the status light to flash orange, and then WAIT 4 MORE SECONDS. 2. Press and release the ON button 12 times. The status light starts rapidly flashing green and red. 3. Press and hold the button for 4 seconds. The status light will turn orange for 1 second, and then start flashing green or red. 4. Press OFF. 5.
DISH HD Western Arc with Locals (satellites 110, 119, 129) 1. On the King-Dome controller, press and release the ON button. Wait for the status light to flash orange, and then WAIT 4 MORE SECONDS. 2. Press and release the ON button 20 times. The status light starts rapidly flashing green and red. 3. Press and hold the button for 4 seconds. The status light will turn orange for 1 second, and then start flashing green or red. 4. Press OFF. 5.
DISH HD Alternate with Locals (satellites 61.5, 110, 119) 1. On the King-Dome controller, press and release the ON button. Wait for the status light to flash orange, and then WAIT 4 MORE SECONDS. 2. Press and release the ON button 16 times. The status light starts rapidly flashing green and red. 3. Press and hold the button for 4 seconds. The status light will turn orange for 1 second, and then start flashing green or red. 4. Press OFF. 5.
Bell TV HDTV 82/91 (satellites 82, 91) 1. On the King-Dome controller, press and release the ON button. Wait for the status light to flash orange, and then WAIT 4 MORE SECONDS. 2. Press and release the ON button 32 times. The status light starts rapidly flashing green and red. 3. Press and hold the ON button for 4 seconds. The status light will turn orange for 1 second, and then start flashing green or red. 4. Press OFF. 5.
This page intentionally left blank.
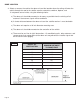
STEP 2-B: ANTENNA CONFIGURATION USING #1844 KEYPAD Note: If you are using the wall mount controller for programming, go to page 18. Find your service in the chart below. Determine your Switching Mode and Provider Code, and then go to page 26. SWITCHING MODE AND PROVIDER CODE CHART Satellites Switching Mode Provider Code 101 02 01 101, 119 16 01 Dish 500 (SW21 Switch) 110, 119 26 10 Dish HD Eastern Arc (SW21 Switch) 61.
Perform the programming on these two pages using the codes determined from the chart on page 25 (EXCEPT DIRECTV 101 SERVICE). If you have DIRECTV 101 Service, set your receiver for round dish-1 satellite (do this through the receiver’s satellite set-up menu screens), and then go to page 32, OPERATION). SET SATELLITE SWITCHING MODE 1. Unplug the controller and plug in the Keypad. 2. Press ON. 3. Press * 46 # to display the current satellite switching mode (see chart on page 25). 4.
SET SATELLITE PROVIDER CODE 1. Press * 24 # to display the current service provider (see chart on page 25). 2. To change the current service provider, press * 96 # * 66 # * 88 # 3. Press the UP and DOWN arrows (2 and 8 keys) to choose your desired service provider from the chart on page 25. 4. Press * 25 # to lock in setting. 5. Turn unit OFF and back ON to save setting. 6. Press * 24 # to display and verify code for new service provider. 7. Press OFF. 8. Unplug the Keypad and plug the controller back in.
This page intentionally left blank.
STEP 3: DISH AND BELL TV CHECK SWITCH PROCEDURE IMPORTANT! YOU MUST HAVE COMPLETED THE ANTENNA CONFIGURATION (STEP 2-A, PAGE 18 OR STEP 2-B, PAGE 25) AND PERFORMED A SUCCESSFUL SEARCH (STEP 2 BELOW) BEFORE RUNNING THE CHECK SWITCH (STEP 3 BELOW).
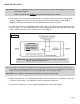
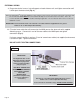
Note: Not all receivers will display a screen with options that include superdish and alternate boxes. 5. Make sure Superdish and Alternate boxes are NOT selected. 6. Highlight Test and press Select. Screen graphics may vary. The unit will perform a check switch test, and the dish will periodically move back and forth. (This process will take several minutes.) 7. When test is complete, a screen similar to one below or on the next page should appear.
Dish HD Alternate with Locals NO “X”s MUST SHOW “SW64” Bell TV 91 “NO SWITCH DETECTED” or “INSTALLED DEVICE UNKNOWN” or similar Bell TV HDTV 82/91 Bell TV HDTV 82/91 Alternate MUST SHOW “SW21” NO “X”s If indicated results are not obtained, go back to Step 3 and run test again. Contact King Controls if the check switch fails to load after 4 attempts. 8. Save the settings, exit to the main menu screen and wait for programming to download. 9.
SECTION 5 SATELLITE ANTENNA OPERATION IMPORTANT: There must be a clear “line of sight” to the southern sky. Mountains, buildings, trees, telephone poles, etc. can all block the satellite signal from reaching the dish. The distance driven since last performing a search may affect how long it takes for the King-DomeAIR to find the satellite. The King-DomeAIR can receive available HDTV programming from DIRECTV Ku band satellites at 101° and 119°.
AUTOMATIC SATELLITE SWITCHING 1. After you have properly configured the King-DomeAIR antenna and your satellite receiver, the dish will automatically switch between satellites by simply selecting your desired channel using the receiver’s remote control. Note: For better performance when using the automatic satellite switching feature, change channels by selecting your program from the channel guide rather than channel surfing.
DISH NETWORK HDTV: Changing the Satellite Trio Dish HD Western and Eastern Arc with Locals IMPORTANT! Perform this procedure only if you are unable to receive all of your HD programming in a particular area of the country. You cannot use this method to change trios if the antenna has not been initially configured for Dish HD Western Arc with Locals or Dish HD Eastern Arc with Locals (see ANTENNA CONFIGURATION section).
1. Press ON. Wait for the Status Light to flash orange, and then wait 4 more seconds. 2. Click ON 4 times. Status Light starts rapidly flashing green and red. 3. Select the trio you want to change to: Dish HD Eastern Arc Trio 61.5, 72, 77 Press and hold for 4 seconds. The Status Light turns orange for 1 second and then starts flashing green or red. Dish HD Western Arc Trio 110, 119, 129 Press and hold for 4 seconds. The Status Light turns orange for 1 second and then starts flashing green or red. 4.
SECTION 6 OFF-AIR ANTENNA OPERATION IMPORTANT!: There is no guarantee you will receive off-air digital programming in a given area. Weather, terrain, buildings, excessive signal reflections (ghosting), proximity to the transmission towers, transmission strength, etc. can all affect your ability to receive off-air programming. Note: Digital programming received via your off-air antenna is transmitted from land based towers.
King-DomeAIR Off-Air Antenna Only 1. Turn the King-DomeAIR off (press OFF). 2. Press and release ON. Wait for the Status Light to flash orange, and then wait 2 more seconds. 3. Press and release . The Status light will flash a variety of colors and then turn steady green. When both lights are steady green the off-air antenna pointing feature is active. Note: Performing a channel scan in steps 4 and 7 will erase channels from your previous scan.
King-DomeAIR Off-Air Antenna and Existing Off-Air Antenna 1. Lock on your satellite with the King-DomeAIR (see instructions on page 32). 2. Raise or turn on the other off-air antenna (not the King-DomeAIR). Note: Performing a channel scan in steps 3 and 5 will erase channels from your previous scan. If you wish to keep previous channels, you may have an “Update” or “Edit” feature on your digital TV or converter box. See your TV or converter box owner’s manual for details. 3.
SECTION 7 SYMPTOM TROUBLESHOOTING POSSIBLE REASON COURSE OF ACTION STATIONARY Unit does not find satellite. (STATUS light flashes red or green.) Did not hold ON/SEARCH button for 3 FULL SECONDS. Hold ON/SEARCH button for 3 FULL SECONDS. STATUS light flashes orange. Before search: bad coax connection. Call King Controls. After unsuccessful search (approximately 25 minutes): obstruction in line of sight between dome and satellite. Move vehicle to have unobstructed view of southern sky.
SECTION 8 MAINTENANCE The King-DomeAIR Satellite System has been designed to be maintenance and trouble free. For optimum signal strength, keep the dome clean from dirt, bugs, and other debris. Periodic washing of the dome with mild soap and water is recommended. IMPORTANT! Do not power wash the King-DomeAIR. If you plan on storing your vehicle for long periods of time, it is recommended that the system be put through a search procedure on a quarterly basis to keep all moving parts in good working order.
SECTION 9 LIMITED WARRANTY Every new King-Dome Satellite System is thoroughly inspected and tested before leaving the factory, and is covered by the following two year parts and one year labor limited warranty from the date of original purchase: • Two year parts warranty: The customer is not responsible for the cost of replacement parts if the original part is determined to be defective under the terms of the warranty. The customer is responsible for the cost of replacement parts after two years.
Notes: Page 42
Notes: Page 43
Notes: Page 44
11200 Hampshire Avenue South, Bloomington, MN 55438-2453 Phone: (800) 982-9920 Fax: (952) 922-8424 www.kingcontrols.