OWNER’S MANUAL BY CHAR-GRILLER® SMOKIN’ ACE ™ Model #3018 Keep your receipt with this manual for Warranty. CUSTOMER SERVICE 1-912-638-4724 Service@CharGriller.com Contents of this manual are Trademarked and Copyrighted by Char-Griller® | A&J Manufacturing Using the information contained in this manual without consent of Char-Griller® and/or A&J Manufacturing is strictly prohibited. OM_3018_ED_ A.
BY CHAR-GRILLER® TABLE OF CONTENTS Safety Warnings & Warranty............................... A-1 Assembly Instructions ..................................... B-1 Product Usage .................................................. C-1 Recipes .............................................................. D-1 Accessories .......................................................
IMPORTANT SAFETY WARNINGS READ ALL SAFETY WARNINGS AND INSTRUCTIONS CAREFULLY BEFORE ASSEMBLING AND OPERATING YOUR GRILL Read the following instructions carefully and be sure your appliance is properly assembled, installed, and maintained. Failure to follow these instructions may result in serious bodily injury and/or property damage. If you have any questions concerning assembly or operation, call 912-638-4724. • Grill is for use outdoors and in well-ventilated areas, only.
BY CHAR-GRILLER® IMPORTANT SAFETY WARNINGS (Continued) • When opening lid, make sure it is pushed all the way back so it rests against the lid support brackets. Use extreme caution as hood could fall back to a closed position and cause bodily injury. • Close lid and all dampers to help suffocate flame. • Always hold an open lid from the handle to prevent it from closing unexpectedly. • Never leave coals and ashes unattended. Before grill can be left unattended, coals and ashes must be removed.
STOP! CALL BY CHAR-GRILLER® FIRST! Do NOT Return Product to Store. This grill has been made according to the highest of quality standards. If you have any questions that are not addressed in this manual or if you need parts please call our Customer Service Department at 1-912-638-4724 (USA) or email Char-Griller at: Service@CharGriller.com and have your serial number handy.
BY CHAR-GRILLER® WARRANTY INFORMATION A COPY OF THE DATED PROOF OF PURCHASE (RECEIPT) IS REQUIRED WHEN REGISTERING OR SUBMITTING A WARRANTY* CLAIM. PLEASE RETAIN A COPY OF THE RECEIPT FOR YOUR RECORDS. Char-Griller will replace any defective part of its grillers/smokers, under warranty, as outlined below. PLEASE READ THIS INFORMATION IN DETAIL AND IF YOU HAVE ANY QUESTIONS CONTACT CUSTOMER SERVICE AT 912-638-4724 OR SERVICE@CHARGRILLER.COM.
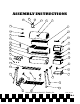
ASSEMBLY INSTRUCTIONS 34 35 36 1 2 3 33 4 32 5 5 6 31 30 7 29 28 8 27 9 26 10 25 24 11 23 12 13 22 19 18 17 14 15 16 21 20 Sold under license from W.C. Bradley Co. 3018_OM_A.
BY CHAR-GRILLER® PARTS LIST Item QTY 1 1 SMOKESTACK 2 1 GRILL HOOD 3 1 LOGO PLATE 4 1 WARMING RACK 5 2 HOOD HANDLE 6 1 SIDE HANDLE 7 1 SIDE FIRE BOX TOP HALF 8 2 SIDE FIRE BOX COOKING GRATE 9 1 SIDE FIRE BOX CHARCOAL GRATE 10 1 SIDE FIRE BOX BOTTOM HALF 11 1 DRAWER HANDLE 12 1 DRAWER DAMPER 13 1 DRAWER 14 1 SIDE FIRE BOX SUPPORT BRACKET 15 1 REAR LONG LEG 16 1 FRONT LONG LEG 17 1 FRONT SHELF RIGHT SUPPORT BRACKET 18 1 GREASE CUP CLIP 19 1 FRONT SHEL
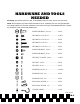
HARDWARE AND TOOLS NEEDED Assembly: Get another person to help. Tools Needed: Hammer, Pliers, and a 7/16” Nut Driver. NOTE: Do Not tighten any bolts unless instructed to do so. Tightening too soon may prohibit parts from fitting together. All Hex Nuts should be on the inside of the grill unless stated otherwise. Unpack all contents in a well cleared and padded area. SHOULDER BOLT, 5/16-18…………...2 PCS HEX BOLT 1/4-20 X 1/2”………….…..36 PCS HEX BOLT 1/4-20 X 3/4”……………...4 PCS HEX BOLT 1/4-20 X 1”…............
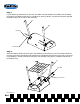
BY CHAR-GRILLER® Step 1 Lay the Grill Body upside down on the floor, and attach the legs labeled (LR and RR) to the Grill Body using three Lock Washers and three ½” Hex Bolts on each leg. NOTE: Leg with the Axle goes opposite the Side Fire Box cut out hole on the Grill Body. LR RR Hex Bolt Lock Washer Step 2 Attach the Bottom Shelf and Front Legs to the Grill Body.
Step 3 Attach Wheels onto wheel Axle. Slide 2/5” Flat Washer, Wheel, and another 2/5” Flat Washer through Axle then slide Large Cotter Pin through the hole at the end of the Axle. Large Cotter Pin 2/5” Flat Washer Wheel DETAIL A SCALE 1 : 4 A Step 4 Attach Grill Hood to Grill Body using two Hood Hinge Pins and two Small Cotter Pins. Hood Hinge Pin Small Cotter Pin DETAIL A SCALE 1 : 4 A A DETAIL A SCALE 1 : 3 3018_OM_A.
BY CHAR-GRILLER® Step 5: Insert Thermometer through hole in Bezel and Grill Hood (from outside), through Flat Washer and secure with Wing Nut. Then attach Hood Handle to the Grill Hood with two ½” Hex Bolts, two Lock Washers, and two Hex Flange Nuts. Note: Hardware for Thermometer came attached with Thermometer.
Step 7: Attach Side Shelf to Grill Body with four ¾” Hex Bolts and four Hex Flange Nuts. Hex Flange Nut Side Shelf Hex Bolt Step 8 Assemble the Front Shelf together using four ½” Hex Bolts then attach the Front Shelf to the Grill Body using four ¼”-20 Shoulder Bolts and four Hex Flange Nuts. Hex Bolt Shoulder Bolt Hex Flange Nut Front Shelf 3018_OM_A.
DETAIL A A SCALE 1 : 3 BY CHAR-GRILLER® Step 9: Attach Warming Rack onto the Grill. First attach two 1 ½” Hex Bolts and two Hex Flange Nuts onto Grill Hood. Second attach two 1” Hex Bolts, two Hex Nuts and two Hex Flange Nuts onto Grill Body. Then position the Warming Rack onto the Hex Bolts. Hex Bolt Hex Flange Nut Hex Bolt Warming Rack Hex Nut Hex Flange Nut Step 10: Attach Side Fire Box Support Bracket to Grill Legs using four 1 ½” Hex Bolts and four Hex Flange Nuts.
Step 11 Assemble Side Fire Box Top Half to Side Fire Box Bottom Half using four ½” Hex Bolts, four Lock Washers, and four ¼” Flat Washers. Hex Bolt Lock Washer Flat Washer Step 12 Attach Side Fire Box to Grill Body using eight ½” Hex Bolts and six Hex Flange Nuts. Hex Flange Nut Hex Bolt 3018_OM_A.
BY CHAR-GRILLER® Step 13: Attach Side Fire Box Hood Handle using two ½” Hex Bolts, two Hex Flange Nuts, and two Lock Washers. Hex Bolt Lock Washer Hex Flange Nut Step 14 Attach Side Fire Box Side Handle using two ½” Hex Bolts and two Hex Flange Nuts. B 3018_OM_A.
Step 15 Attach Damper to the Drawer using four #8-36 Shoulder Bolts and four #8-36 Hex Nuts. Then attach Drawer Handle to Drawer using two Hex Flange Nuts. Hex Flange Nut Drawer Handle Ashpan Damper Hex Nut Shoulder Bolt Ashpan Drawer Step 16 Place Side Fire Box Charcoal Grate inside Drawer and slide Drawer into Side Fire Box Body. Ashpan Drawer Side Fire Box Charcoal Grate 3018_OM_A.
BY CHAR-GRILLER® Step 17 Place Ashpan and Ashpan Hanger onto Grill Body. Ashpan Hanger Ashpan Step 18 Place Cooking Grates onto Grill Body then install the Utensil Hooks underneath each Side Shelf slab at the front of the Grill. Install the Grease Cup Holder underneath Grill Body. Utensil Hook Grease Cup Holder 3018_OM_A.
Fully Assembled 3018_OM_A.
OPERATING INSTRUCTIONS Setting Up Set grill up on solid, flat surface with adequate wind shelter. Do not move grill while hot, and do not leave unattended during operation. This appliance is designed for use outdoors, away from any flammable materials. It is important that there are no overhead obstructions and that there is a minimum distance of 12 feet (366 cm) from the side or rear of the appliance. It is important that the ventilation openings of the appliance are not obstructed.
BY CHAR-GRILLER® Lighting Instructions 1. To start a charcoal fire, stack 50-60 briquettes in a pyramid and saturate with lighter fluid. NOTE: Do not use gasoline, kerosene or alcohol for lighting charcoal. Use of any of these or similar products could cause an explosion possibly leading to severe bodily injury. 2. Light coals in several places 3. After briquettes ash over or turn gray, spread them out and start cooking 4.
Finishing Up When your are finished grilling you can shut down your grill by closing both dampers and allowing the fire to suffocate. Be patient. This may take an hour or more. Emptying the Ashes & Ash Pan: ** ONLY EMPTY ASHES WHILE GRILL IS NOT IS USE ** After the fire is completely extinguished you should wait several hours before emptying the ashes to ensure they are not still hot and a burn hazard. 1. Knock any ashes that did not fall into the ash pan from the fire grate.
GRILLING RECIPES • • • Cooking with a MEAT THERMOMETER ensures food is fully cooked. Insert thermometer into the thickest part of the meat, not touching bone, and allow 1 to 1 1/2 minutes to register temperature. USDA Safe Minimal Temperature is 165°F for chicken / poultry. USDA Safe Minimal Temperature is 145°F for Beef, Pork, Veal & Lamb (Steaks, chops, roasts).
BY CHAR-GRILLER® QUICK AND EASY GRILLED PORK TENDERLOIN Need dinner in a hurry? This quick and easy pork tenderloin recipe is a crowd pleaser. Pair with grilled red potatoes and asparagus for a simple but flavorful dinner! Ingredients: 2 Pork Tenderloins 2 tsp Paprika 1 tsp Garlic Powder 1 tsp Cilantro 1 tsp Oregano Salt and Pepper to Taste Olive Oil Instructions: 1. 2. 3. 4. Blend spices together in a bowl. Rub pork with olive oil and then season liberally on both sides with spice blend.
JALAPEÑO BACON BLANKET POPPERS Need and easy to make snack for this big game? These Jalapeno Bacon Blanket Poppers are a crowd pleaser and are super easy to whip up on the grill. The bacon gets crispy quickly and doesn’t burn easily since it’s just sitting on top of the cream cheese filling.
BY CHAR-GRILLER® GARLIC PARMESAN CHICKEN WINGS Replicate the signature flavors of your favorite wing spot with this marinated Garlic Parmesan Recipe. Ingredients: 4 lbs. of Chicken Wings 16 oz. Bottle Italian dressing 1 Cup of Shredded Parmesan Cheese 1/2 Tbsp. Onion Salt 1/2 Tbsp. Black Pepper 1 Cup of Butter 1 Tbsp. Oregano 2 Tbsp. Garlic Powder A pinch of rosemary 5. 6. 7. 8. 9. Once charcoal is lit, turn off gas burners and allow to fully ash over Rub salmon on both sides with olive oil.
Smoking Recipes “CERTIFIED” PORK BUTT A great pork butt recipe perfect for beginners and pitmasters alike. This slow smoked pork butt recipe is great shredded and piled high with coleslaw for a sandwich or eaten on it’s own straight out of the pan! Ingredients: 2 Pork Butts (6-10 lbs. each) Apple juice Your favorite rub/seasoning Mustard Preparing the Meat: 1. Remove the pork butt from the plastic wrap & pat dry using a paper towel. Tip: Choose a pork butt with a full fat cap.
BY CHAR-GRILLER® 3-2-1 RIBS The 3-2-1 rib method might be something you have seen thrown around on social media. It’s a popular technique for smoking ribs that are tender, juicy, and come clean off the bone. Simple and easy to follow, this is a surefire way to guarantee your ribs are finger lickin’ good. The 3-2-1 Method is a process that involves smoking the ribs for three hours, wrapping them in foil and braising for two hours, and the smoking unwrapped for one hour.
SMOKED MAC AND CHEESE An all-time family favorite, this Smoked Mac & Cheese recipe elevates stovetop or oven baked mac & cheese with flavors sure to keep your smoker fired up Ingredients: 1 Package of Elbow Macaroni ½ Stick of Butter ¼ Cup of All Purpose Flour 1 Cup of Heavy Cream 1 Cup of Milk 2 Cups of Cheddar Cheese (Shredded) 1 Cup of Gouda Cheese (Shredded) 1 Cup of Colby Jack Cheese (Shredded) ½ Cup of Cream Cheese 2 Tbsp of Black Pepper 1 Tsp of Cayenne Pepper 1 Large Cast Iron Skillet SMOKED CHICKE
BY CHAR-GRILLER® SMOKED TURKEY Instructions: 1. 2. 3. 4. 5. Empty cavity rinse and pat dry with paper towel. Tuck wing tips under the back and tie legs together. Place in center of cooking grate directly above foil drip pan of water. Smoke for 12 minutes per pound. Allow several extra minutes per pound if stuffed to allow for expansion. Use a meat thermometer for best results (190°F internal).
ACCESSORIES Warming Rack Increase Grill Area Keeps Food Warm Cover Custom Fit Weather Resistant Protects Grill Finish Cover Accommodates Side Shelf or Side Fire Box Charcoal Basket Confines Coals to One Side for Smoking Indirect Cooking Rotisserie Excellent for Effortless Grilling Universal Fit for Any Grill Quick Release Chimney Starter E-Z starter with patented Trigger release ABS handle with heat shield Zinc coated galvanized steel Makes starting charcoal grill fast and easy Apron Machine Washable Tw
BY CHAR-GRILLER® P.O. Box 30864 Sea Island, GA 31561 912-638-4724 www.CharGriller.com Service@CharGriller.
MANUAL DEL USUARIO BY CHAR-GRILLER® SMOKIN’ ACE Modelo #3018 MANTENGA SU RECIBO JUNTO CON ESTE MANUAL PARA FINES DE LA GARANTÍA. SERVICIO AL CLIENTE 1-912-638-4724 SERVICE@CHARGRILLER.COM El contenido de este manual está registrado y los derechos de autor son propiedad de Char-Griller® | A&J Manufacturing. El uso de la información contenida en este manual sin el consentimiento de Char-Griller® y/o A&J Manufacturing está estrictamente prohibido. OM_3018_SPA_ A.
BY CHAR-GRILLER® TABLA DE CONTENIDO Advertencias De Seguridad.............................. A-1 Instrucciones de Ensamblado.......................... B-1 Instrucciones Operativas ................................. C-1 Recetas Para La Parrilla .................................... D-1 Accesorios .........................................................
BY CHAR-GRILLER® ADVERTENCIAS DE SEGURIDAD LEA TODAS LAS INSTRUCCIONES Y ADVERTENCIAS DE SEGURIDAD CUIDADOSAMENTE ANTES DE ENSAMBLAR Y OPERAR SU PARRILLERA Lea todas las instrucciones cuidadosamente y asegúrese de que su parrillera esté ensamblada, instalada y reciba mantenimiento apropiadamente. El incumplimiento de estas instrucciones puede causar daños a la propiedad y/o lesiones severas. Si tiene alguna pregunta relacionada con la instalación u operación, llame al 912-638-4724.
ADVERTENCIAS DE SEGURIDAD (Continuación) • No exceda una temperatura de 400°F (205°C). • No permita que el carbón y/o leña repose en las paredes de la parrillera. Esto reduciría considerablemente la vida útil de la parrillera. • Siempre utilice agarradores de horno para proteger las manos de quemaduras. Evite tocar superficies calientes. • PRECAUCIÓN: Las compuertas de metal expuestas en los ductos de aire y/o manillas de metal se calientan durante el uso de la parrillera.
BY CHAR-GRILLER® REGISTRE SU PARRILLERA: Para aprovechar al máximo la garantía de Char-Griller, registre su parrillera a través de la página web www.CharGriller.com/Register o llamando a Servicio al Cliente al 1-912-638-4724. Registrarse le otorga protecciones importantes: 1. En el caso extremo del retiro de un producto, Char-Griller podrá contactarle y solucionar el problema rápidamente. 2.
INFORMACIÓN DE GARANTÍA DURANTE EL REGISTRO O INTRODUCCIÓN DE UN RECLAMO DE GARANTÍA* DEBERÁ PRESENTAR COPIA DE LA PRUEBA DE COMPRA FECHADA (RECIBO). POR FAVOR, GUARDE UNA COPIA DEL RECIBO PARA SUS REGISTROS. Char-Griller reemplazará cualquier pieza defectuosa de sus parrilleras/ahumadores, sujetos a garantía, como se establece a continuación. POR FAVOR LEA ESTA INFORMACIÓN DETALLADAMENTE Y EN CASO DE TENER ALGUNA PREGUNTA, CONTACTE A SERVICIO AL CLIENTE A TRAVÉS DEL 912-638-4724.
LISTA DE PARTES 34 35 36 1 2 3 33 4 32 5 5 6 31 30 7 29 28 8 27 9 26 10 25 24 11 23 12 13 22 19 18 17 14 15 16 21 20 Vendido bajo licencia de W.C. Bradley Co.
BY CHAR-GRILLER® LISTA DE PARTES Artículo B-2 Cantidad Nombre de Parte 1 1 CHIMENEA 2 1 CAMPANA DE LA PARRILLA 3 1 PLACA CON EL LOGOTIPO 4 1 REJILLA PARA CALENTAR 5 2 MANIJA DE LA CAMPANA 6 1 MANIJA LATERAL 7 1 PARTE SUPERIOR DE LA CÁMARA DE COMBUSTIÓN LATERAL 8 2 REJILLA PARA CONCINAR DE LA CÁMARA DE COMBUSTIÓN LATERAL 9 1 REJILLA PARA EL CARBÓN DE LA CÁMARA DE COMBUSTIÓN LATERAL 10 1 PARTE INFERIOR DE LA CÁMARA DE COMBUSTIÓN LATERAL 11 1 MANIJA DEL CAJÓN 12 1 REGULAD
EQUIPO Y HERRAMIENTAS NECESARIAS Ensamblaje: Requiere 2 personas. Busque a otra persona para que le ayude. Herramientas necesarias: Martillo, Alicate y una Llave de Tuercas de 7/16”. NOTA: No apriete ningún tornillo o perno a menos que se indique explícitamente. Apretar antes de tiempo puede impedir que las partes encajen. Todas las Tuercas Hexagonales deben ir en la parte interna de la parrillera a menos que se indique lo contrario. Desempaque todo el contenido en un área despejada y acolchada.
BY CHAR-GRILLER® Paso 1 Coloque el cuerpo de la parrilla boca abajo en el suelo e instale las patas LR y RR en el cuerpo de la parrilla con tres arandelas de seguridad y tres pernos hexagonales de ½” en cada pata. NOTA: La pata con el eje va enfrente del agujero de la caja de fuego lateral en el cuerpo de la parrilla. LR RR Perno Hexagonal Arandela Paso 2 Conecte el estante inferior y las patas delanteras al cuerpo de la parrilla.
Paso 3 Conecte las ruedas en el eje de las ruedas. Deslice una arandela plana de 2/5”, la rueda, y otra arandela plana de 2/5” por el eje y después deslice el pasador de chaveta grande por el agujero al final del eje. Pasador De Chaveta Grande Arandela de 2/5” Rueda DETAIL A SCALE 1 : 4 A Paso 4 Conecte la campana de la parrilla al cuerpo de la parrilla usando dos pasadores de bisagra para la campana y dos pasadores de chaveta pequeños.
BY CHAR-GRILLER® Paso 5: Inserte el termómetro por el agujero en el bisel en la campana de la parrilla (desde afuera), a través de la arandela plana y asegúrelo con la tuerca alada. Liego, conecte la manija de la campana a la campana de la parrilla con dos pernos hexagonales de ½”, dos arandelas de fijación y dos tuercas hexagonales con reborde. Nota: las piezas para el termómetro venían conectadas al termómetro.
Paso 7: Conecte la repisa lateral al cuerpo de la parrilla con cuatro pernos hexagonales de ¾” y cuatro tuercas hexagonales con reborde. Tuerca Hexagonal Repisa Lateral Perno Hexagonal Paso 8 Ensamble la repisa frontal usando cuatro pernos hexagonales de ½” y luego fíjela al cuerpo de la parrilla usando cuatro pernos de tope de ¼”-20 y cuatro tuercas hexagonales con reborde.
DETAIL A A SCALE 1 : 3 BY CHAR-GRILLER® Step 9: Conecte la repisa de calentamiento a la parrilla. Primero conecte dos pernos hexagonales de 1 ½” y dos tuercas hexagonales con reborde en la campana de la parrilla. Luego, conecte dos pernos hexagonales de 1”, dos tuercas hexagonales y dos tuercas hexagonales con reborde al cuerpo de la parrilla. Después, coloque la repisa de calentamiento en los pernos hexagonales.
Paso 11 Ensamble la parte superior de la cámara de combustión lateral con la parte inferior de la misma usando cuatro pernos hexagonales de ½”, cuatro arandelas de fijación y cuatro arandelas planas de ¼”. Perno Hexagonal Arandela Arandela Plana Paso 12 Conecte la cámara de combustión lateral al cuerpo de la parrilla usando ocho pernos hexagonales de ½” y seis tuercas hexagonales con reborde.
BY CHAR-GRILLER® Paso 13: Conecte la manija de la campana de la cámara de combustión lateral usando dos pernos hexagonales de ½”, dos tuercas hexagonales con reborde, y dos arandelas de fijación. Perno Hexagonal Arandela Tuerca Hexagonal Paso 14 Conecte la manija lateral de la cámara de combustión lateral usando dos pernos hexagonales de ½” y dos tuercas hexagonales con reborde.
Paso 15 Conecte el regulador de tiro al cajón usando cuatro pernos de tope del #8-36 y cuatro tuercas hexagonales del #8-36. Luego conecte la manija del cajón al mismo usando dos tuercas hexagonales con reborde. Tuerca Hexagonal Manija Del Cajón Regulador De Tiro Al Cajón Tuerca Hexagonal de #8-36 Perno De Tope de #8-36 Cajón Paso 16 Coloque la rejilla para carbón de la cámara de combustión lateral dentro del cajón y deslice el cajón dentro del cuerpo de la cámara de combustión lateral.
BY CHAR-GRILLER® Paso 17 Coloque la bandeja para cenizas y el colgador de la bandeja para cenizas en el cuerpo de la parrilla. Colgador De Bandeja Para Cenizas Bandeja Para Cenizas Paso 18 Coloque las rejillas para cocinar en el cuerpo de la parrilla y luego instale los ganchos para utensilios debajo de cada losa de la repisa lateral en la parte frontal de la parrilla. Instale el soporte del depósito para grasa debajo del cuerpo de la parrilla.
Totalmente Ensamblada B-13
INSTRUCCIONES OPERATIVAS Instalación del Equipo Coloque la parrillera en una superficie plana y sólida, resguardada del viento. No mueva la parrillera mientras esté caliente y no la deje sin supervisión durante su operación. Este equipo está diseñado para ser utilizado al aire libre, lejos de cualquier material inflamable. Es importante que no existan obstrucciones superiores y que haya una distancia mínima de 12 pies (366 cm) desde la parte lateral o trasera del equipo.
BY CHAR-GRILLER® Instrucciones de Encendido 1. Para comenzar un fuego a carbón, apile de 50-60 briquetas en forma de pirámide y sature con fluido de encendido. NOTA: No use gasolina, querosén o alcohol para encender el carbón. El uso de cualquiera de estos productos, o de similares, puede causar una explosión que posiblemente conlleve a graves lesiones. 2. Encienda los carbones en distintos lugares. 3. Luego de que las briquetas se cubran de cenizas o se pongan grises, distribúyalas y comience a cocinar.
Luego de que el fuego esté completamente apagado, deberá esperar varias horas para vaciar las cenizas, asegurando que ya no están calientes y no existe peligro de quemaduras. 1. Tumbe cualquier ceniza que no haya caído al recipiente de cenizas de la rejilla de combustible. (Si encuentra pedazos de carbón parcialmente quemados en la rejilla para combustible, puede guardarlos para la próxima vez. Todavía funcionan). 2. Golpee los lados del recipiente para soltar cualquier ceniza que pueda estar en los lados.
RECETAS PARA LA PARRILLA • • • Usar un TERMÓMETRO DE CARNE al cocinar garantiza que las comidas estén completamente cocidas. Inserte el termómetro en la parte más gruesa de la carne, sin tocar el hueso, y espere de 1 a 1 minuto y ½ para que registre la temperatura. La temperatura mínima segura del USDA es de 165 ° F para pollos / aves de corral. La temperatura mínima segura del USDA es de 145 ° F para carne de res, cerdo, ternera y cordero (filetes, chuletas, asados).
BY CHAR-GRILLER® SOLOMILLO DE CERDO A LA PARRILLA FÁCIL Y RÁPIDO HAMBURGUESAS JUGOSAS DE LUCY ¿Necesitas preparar una cena rápida? Esta receta de solomillo de cerdo a la parrilla es fácil y rápida, y hará las delicias de tus comensales. ¡Acompáñalo de patatas rojas a la parrilla y espárragos para una cena simple y sabrosa!\ Si crees que es imposible mejorar la hamburguesa clásica, espera a probar las jugosas hamburguesas a la parrilla de Lucy.
MILHOJAS DE JALAPEÑO Y BEICON ¿Necesitas una merienda fácil y fácil para este gran juego? Estos Jalapeno Bacon Blanket Poppers son un placer para la multitud y son súper fáciles de preparar en la parrilla. El tocino se pone crujiente rápidamente y no se quema fácilmente, ya que se encuentra encima del relleno de queso crema.
BY CHAR-GRILLER® ALITAS DE POLLO CON PARMESANO Y AJO Reproduce los sabores de tu sitio favorito de alitas con esta receta de marinada de parmesano y ajo. Ingredientes: 1.8 Kg. de alitas de pollo ½ litro de adrezo italiano en bote 1 vaso de queso parmesano rallado 1/2 cucharada de sal de cebolla 1/2 cucharada de pimienta negra 1 vaso de mantequilla 1 cuchara de orégano 2 cucharada de ajo en polvo Una pizca de romero Instrucciones: 1. 2. 3. 4. 5. 6. 7.
Recetas De Ahumado TRASERO DE CERDO “CERTIFICADO” Nuestro veterano embajador Certified Creole BBQ, lo ha vuelto a hacer con su receta de trasero de cerdo certificado. Ahumado lentamente, condimentado generosamente y desmigado, esta receta de cerdo es perfecta para usarla en platos sin fin. Desde sándwich de cerdo desmigado, hasta acompañamiento para huevos o disfrutado con verduras, esta receta seguro hará las delicias de tus comensales.
BY CHAR-GRILLER® 3-2-1 COSTILLAS Puede que hayas oído hablar del método 3-2-1 costillas en las redes sociales. Es una técnica muy popular para ahumar costillas para que queden tiernas, jugosas y donde salen limpias del hueso. Fácil y simple de seguir, este es un método que garantiza que te quedaran unas costillas para chuparse los dedos.
PERRITOS CALIENTES RELLENOS AHUMADOS MACARRONES CON QUESO AHUMADOS 1. 2. 3. Un favorito de todas las familias desde siempre, esta receta de macarrones con queso ahumados suben el listón de los macarrones con queso al horno con sabores que harán que tu ahumador no pare de funcionar. Slit hot dogs lengthwise, within 1/4 inch of each end. Stuff hot dogs with cheese and relish and wrap in bacon. Place on cooking grate over drip pan and smoke 15-20 minutes or until bacon is crisp.
BY CHAR-GRILLER® CARNE DE VENADO AHUMADA CON TOCINO ADOBO PARA CARNE Adobo Para Carne De Venado Ingredientes: 1 taza de vinagre balsámico o de vino tinto 1 taza de aceite de oliva 2 onzas de Worcestershire ½ onza de Tabasco 2 cucharadas de sal condimentada 1 a 2 jalapeños picados 3 onzas de salsa de soja ¼ taza de salsa de soja 2 cebollas grandes 2 dientes de ajo, triturados 2 cucharaditas de sal 2 cucharaditas de pimentón 1 cucharadita de pimienta molida fresca Adobo Para Tocino 1.
ACCESORIOS Cubierta a la Medida Resistente al Clima Protege el Acabado La Cubierta se Adapta al Estante Lateral o la Parrillera Lateral Rejilla de Calentamiento Aumenta el Área de la Parrillera y Mantiene la Comida Caliente Cesta para Carbón Mantiene los Carbones a un Lado para Ahumar Cocción Indirecta Asador Excelente para Asar Fácilmente Puede Ser Utilizada con Cualquier Parrillera Delantal Lavable a Máquina Dos Bolsillos Delanteros Tiras Ajustables Encendedor de Rápida Liberación para Chimeneas Fáci
BY CHAR-GRILLER® P.O. Box 30864 Sea Island, GA 31561 912-638-4724 www.CharGriller.com Service@CharGriller.