
Installation Guide
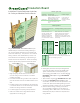


Installation - Exterior Cavity Wall
Insulation
In order to achieve full thermal performance, boards should
be butted securely and, where plumbing, electrical or other
wall penetrations exist, the board should be cut to t tightly
around the penetration. Use caulk, sealant or spray foam to
seal around penetrations.
1. Install insulation board against the masonry wall by
friction, tting boards between masonry wall ties, or using
an adhesive. If an adhesive is used, apply the adhesive
over the board as 1” spots, 3/4” high at 8” to 12” on
center, or as 3/8” parallel beads 12” to 16” the full length
of the board. For a list of compatible adhesives go to
www.kingspaninsulation.us and see Technical Bulletin
#11-
Adhesive, Spray Foam and Primer Compatibility
.
2. Begin by aligning the rst board at a corner of the
structure making sure that the bottom of the board ts all
the way to the ashing at the footer and the full surface
area of the wall is covered by the insulation. Adjacent
insulation board seams must be staggered and all board
edges must be rmly butted together.
3. Install the exterior veneer in accordance with the
manufacturer’s installation instructions.
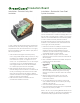
Installation – Residential Paver Roof
System Insulation
This installation is employed to provide insulation outside of
the roof membrane and to a base and drainage plane to the
nal roof nish of at paver blocks or ballast. It is commonly
referred to as a Protected Membrane Roof Assembly (PMRA).
In order to achieve full thermal performance, boards
should be butted securely and, where plumbing, electrical,
ventilation or other penetrations exist, the board should be
cut to t tightly around the penetration.
1. Examine the roof deck for suitability to receive insulation
board. Verify that the roong membrane system is
installed correctly and properly sealed and that the
substrate is dry, clean and free of foreign materials that
may damage insulation or the membrane.
2. Verify that roof drains, scuppers, roof curbs, nailers,
equipment supports, vents and other roof accessories are
secured properly.
3. Start of installation indicates that the installer accepts the
conditions of the roof deck surfaces.
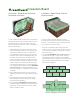
4. Place Kingspan
GreenGuard
®
Type VI
Drainage
Channel Board
with the cut-away channels facing down and the long
dimension of the board in the same direction as intended
drainage.
5. Begin by aligning the rst board at a corner of the
structure making sure that the entire roof surface is
covered with insulation.
6. Do not apply fasteners to the insulation. Install only as
much insulation board as can be covered by the roong
materials in the same day.
7. Cover the insulation board with a lter fabric.
8. Cover the lter fabric with at pavers (do not use pedestal
pavers with this product) or ballast.
Refer to the UL LLC (UL) Roong Materials Guide and the
FM Approvals “RoofNav” for approved roof assemblies that
incorporate extruded polystyrene insulation board (XPS).
Insulation Board