
Manual

3 INSTALLATION
The following sections provide information on the installation of the SOLYS 2.
The installation consists of the following steps which will be explained step by step in the sub chapters:
3.1 Required tools for SOLYS 2 mounting
3.1.1 Required tools for Shading Ball Assembly / sun sensor
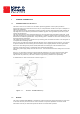
3.2 Minimum operating area / considerations
3.3 Create a firm base to mount the tripod stand with the K&Z logo pointing East
3.4 Mount the tracker on the tripod with the E on the mounting flange pointing East
3.5 Level the SOLYS 2 using the integrated bubble level and tripod feet
3.6 Connecting AC/DC Power
3.7 Alignment of the SOLYS 2
3.8 Fasten tripod feet to the firm base and check alignment.
4.1 Mounting second Side Mounting Plate (optional)
4.5 Attaching Pyrheliometer (optional)
4.6 Mounting Sun sensor (optional)
4.6.1 Alignment of Sun Sensor (optional)
4.7 Shading Ball Assembly (optional)
4.8 Top mounting plate assembly (optional)
4.9 Mounting Kipp radiometers without Ventilation unit (optional)
4.10 Mounting Kipp radiometers with Ventilation unit (optional)
4.11 Mounting Eppley radiometers with/without Ventilation unit (optional)
4.12 Shading ball rods assembly. (optional)
Apart from the creation of the tripod support base and the assembling of the accessories and instruments,
the levelling and the fine adjustment is only a matter of minutes. However a clear sun is required to do
this. It is important that these steps are carried out in this order.
SOLYS 2 has various accessories to enhance and expand its operation, including:
• Top Mounting Plate
• Extra Side Mounting Plate
• Pointing & Shading Ball Assembly:
Including one extra Side Mounting Plate and a Top Mounting Plate.
• Sun Sensor
• Mounting kits for various instruments for direct solar radiation measurement.
• Ventilation units for Pyranometers/Pyrgeometers