KIRKLAND Segregationist" sy Whirlpool UNDER COUNTER DISHWASHER flo BF epee £75 0 Hse & Core Guide Table of Contents o.
TABLE OF CONTENTS DISHWASHER SAFETY Before Using Your Dishwasher PARTS AND FEATURES START-UP GUIDE... Using Your New Dishwasher Stopping Your Dishwasher... LOADING YOUR DISHWASHER Loading Suggestions . Loading the Top Rack Loading the Bottom Rack Loading the Silverware Basket USING YOUR DISHWASHER Detergent Dispenser... How Much Detergent to Use Rinse Aid Dispenser... Dishwasher Efficiency Tips Cycle Selection Chart Canceling a Cycle Changing a Cycle or Setting. Adding terns During a Cycle.
DISHWASHER SAFETY Your safety and the safety of others is very important. We have provided many important safety messages in this manual and on your appliance. Always read and obey all safety messages. This is the safety alert symbol. This symbol alerts you to hazards that can kill or hurt you and others, All safety messages will be preceded by the safety alert symbol and the word “DANGER” or “WARNING.
Tip Over Hazard Do not use dishwasher until completely installed. Do not push down on open door. Doing so can result in serious injury or cuts, WARNING yr” Electrical Shock Hazard Electrically ground dishwasher, Connect ground wire to green ground connector in terminal box. Dio not use an extension cord. Failure to follow these instructions can result in death, fire, or electrical shock, a Install where dishwasher is protected from the elements.
. Third level wash . Top rack . Lower spray arm . Water inlet opening . Bottom rack . Rack bumper NGM SW Nw . Heating element Control Panel PARTS AND FEATURES NOTE: The features on your dishwasher may vary from the drawing shown. Vent 9. Spray tower and protector Model and serial number label Silverware basket Overfill protection float Detergent dispensers Rinse aid dispenser TE some or Apia ony NL Lint sos.
START-UP GUIDE Before using your dishwasher, remove all hang tags, temporary labels, and packaging materials. Read this entire Use ard Care Guide. You will find important safety information and useful operating tips. fay Dish 1. Scrape large food soil and hard items {toothpicks or bones} from dishes. 2. Properly load the dishwasher, (See “Loading Your Dishwasher.”) Make sure nothing prevents the spray arms} from spinning freely. 3. Add detergent and check the rinse aid dispenser, Add rinse aid if needed.
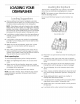
LOADING YOUR DISHWASHER sins > mn Remove leftover food, bones, toothpicks and other hard items from the dishes. ft is not necessary to rinse the dishes before putting them in the dishwasher. NOTE: if hard items such as fruit seeds, nuts, and egg shells enter the wash system, you might hear chopping. grinding, crunching, or buzzing sounds. These sounds are normal.
§ oor ode Hues soviet ray Loading he Bloom The bottom rack is designed for plates, pans, casseroles, and utensils. Items with cooked-on or dried-on food should he loaded with sliced surfaces facing inward to the spray. (See recommended loading patterns shown.) NOTE: The features on your dishwasher rack may vary from the drawings shown. Do not cover spray tower. See arrow. Mixed load =n Do not load glasses, cups, or plastic items in the bottom rack.
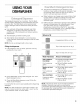
USING YOUR DISHWASHER "Yad 27 # i Deena The detergent dispenser has 2 sections. The Pr-Wash section empties detergent anti the dishwasher when you close the door. The Main Wash section automatically empties detergent into the dishwasher during the wash cycle. =» Use automatic dish washing detergent ably. Other detergents can produce excessive suds that can overflow aut of the dishwasher and reduce washing performance, = Add detergent just before starting cycle.
A rinse aid prevents water from forming droplets that can dry as spots or streaks, It also improves drying by allowing water to drain off of the dishes during the final rinse by releasing a small amount of the rinse aid into the rinse water. Your dishwasher is designed to use a liquid rinse aid, Do not use a solid or bar-type rinse aid. Checking the dispenser Check the center of the Fill Indicator Cap. Clear means it needs filing. Or you can remove the Fill Indicator Cap. visible, the dispenser is empty.
Select the wash cycle. If the door is latched, you will hear the cycles start and stop as the Cycle Control knob passes each cycle mark. This is normal and does not hurt the dishwasher. If you prefer, you can set the Cycle Control nab with the door unlatched. Press the desired cycle. Turn the Cycle Control knob to the desired cycle. To use Rinse Only, press any cycle and turn the Cycle Control knob to Rinse Only. NOTE: Use the Air Dry option with the Rinse & Hold cycle.
Option Selections Select either Air Dry or Heat Dry for each wash cycle, You can change ah option anytime before the selected option begins. For example, you can press an unheated drying option any time before drying begins. Air Dry Select this option to dry dishes without heat and save energy. The dishes take longer to dry and some spotting can occur, For best drying, use a liquid rinse aid. Some items (such as plastics) may need towel drying. Heat Dry Select this option to dry dishes with heated air.
WASHING SPECIAL ITEMS MATERIAL DISHWASHER SAFE?/ COMMENTS Pewter, Brass. No Bronze High water temperatures and detergent can discolor or pit the If you have doubts about washing a particular item, check finish. with the manufacturer to see if it is dishwasher safe. Disposable Ne DISHWASHER SAFE?/ Plastics Cannot withstand high water MATERIAL COMMENTS temperatures and detergents.
CARING FOR YOUR DISHWASHER THs o Cleaning Your Dish Cleaning the exterior In most cases, regular use of a soft, damp cloth or sponge and a mild detergent is all that is necessary to keep the outside of your dishwasher looking nice and clean. Cleaning the interior Hard water minerals can cause a white film to build up on the inside surfaces, especially just beneath the door area. Do not clean the dishwasher interior until it has cooled. Wear rubber gloves.
Storing for the summer Protect your dishwasher during the summer mantes by turning off the water supply and power supply to the dishwasher. Moving or winterizing your dishwasher Protect your dishwasher and home against water damage due to freezing water lines. If your dishwasher is leftist seasonal dwelling or could be exposed to near freezing temperatures, have a qualified person do the following: 1. Disconnect power supply to the dishwasher. 2. Turn off water supply to the dishwasher, 3.
TROUBLESHOOTING First try the solutions suggested here and possibly avoid the cost of a service call... Dishwasher is not operating properly a Dishwasher does not run or stops during a cycle Is the door closed tightly and latched? Is the right cycle selected? Refer fo the “Cycle Selection Chart.” Is there power to the dishwasher? Has a household fuse blown or circuit breaker tripped? Has the motor stopped due to an overload? The motor automatically resets itself within a few minutes.
Did you use the correct amount of effective detergent? Use recommended dishwasher detergents only, Refer to the “Detergent Dispenser” section, Never use less than 1 tablespoon (15 g) per load. Detergent must be fresh to be effective. Store detergent in a cool, dry area. Heavy sail and for hard water generally require extra detergent. Is the home water pressure high enough for proper dishwasher filling? Home water pressure should be 20 to 120 psi {138 to 828 kPa) for proper dishwasher fill.
ASSISTANCE OR SERVICE Before calling for assistance or service, please check “Troubleshooting.” It may save you the cost of a service call. If you still need help, follow the instructions helot When calling, please know the purchase date and the complete model and serial number of your appliance. This information will help us to better respond to your request, if you need replacement parts If you need to order replacement parts, we recommend that you only use Factory Specified Parts.
DISHWASHER WARRANTY KIRKLAND Segregate sy Whirlpool | TWO-YEAR FULL WARRANTY For two years from the date of installation, when this dishwasher is operated and maintained according to instructions attached to or furnished with the product, Whirlpool will pay for Factory Specified Parts and repair labor to correct defects in materials or workmanship. Service must be provided by a Whirlpool designated service company.