
Convection Oven User Manual


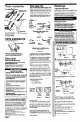


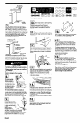

Table Of Contents
- front cover
- cabinet opening dimensions
- countertop preparation
- product dimensions
- anti-tip bracket
- before you start
- tools needed for installation
- parts supplied for installation
- electrical requirements
- electrical connections
- four-wire connection
- now start
- 1 - remove shipping materials
- 2 - lay cardboard corners on floor behind range
- 3 - gently lay range on its back on cardboard
- 4 - remove cardboard bottom and shipping base
- 5 - use an adjustable wrench to loosen leveling legs
- 6 - place cardboard or hardboard in front of range
- 7 - place the anti-tip bracket template on the floor
- 8 - drill proper holes for your type of floor
- 9 - line up anti-tip bracket with holes in floor
- 10 - move range close to cabinet opening
- 11 - remove board from under the range
- 12 - open and remove the storage drawer
- 13 - look to be sure anti-tip bracket is engaged
- 14 - place level on rack in oven
- 15 - replace storage drawer under oven
- 16 - push and turn each surface unit control knob to HI
- 17 - check the operation of the bake element
- 18 - check the operation of the broil element
- if the range does not operate
- for cleaning and maintenance
- accessories
- if you need assistance
- if you need service

HOME APPLIANCES
Part No. 9751596
ALL RANGES CAN TIP
l
INJURY TO PERSONS
COULD RESULT
l
INSTALL ANTI-TIP
DEVICE PACKED
WITH RANGE
l
SEE INSTALLATION
INSTRUCTIONS
IMPORTANT:
Read and save
these instructions.
IMPORTANT:
Installer:
Leave Installation Instructions with the
homeowner.
Homeowner:
Keep Installation Instructions and anti-tip
bracket template for future reference.
Save
Installation Instructions for local electrical
inspector’s use.
30” (76.2 cm)
Electric Slide-in Range
with self-cleaning
thermal/convection oven