
Convection Oven User Manual


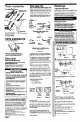


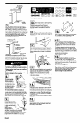

Table Of Contents
- front cover
- cabinet opening dimensions
- countertop preparation
- product dimensions
- anti-tip bracket
- before you start
- tools needed for installation
- parts supplied for installation
- electrical requirements
- electrical connections
- four-wire connection
- now start
- 1 - remove shipping materials
- 2 - lay cardboard corners on floor behind range
- 3 - gently lay range on its back on cardboard
- 4 - remove cardboard bottom and shipping base
- 5 - use an adjustable wrench to loosen leveling legs
- 6 - place cardboard or hardboard in front of range
- 7 - place the anti-tip bracket template on the floor
- 8 - drill proper holes for your type of floor
- 9 - line up anti-tip bracket with holes in floor
- 10 - move range close to cabinet opening
- 11 - remove board from under the range
- 12 - open and remove the storage drawer
- 13 - look to be sure anti-tip bracket is engaged
- 14 - place level on rack in oven
- 15 - replace storage drawer under oven
- 16 - push and turn each surface unit control knob to HI
- 17 - check the operation of the bake element
- 18 - check the operation of the broil element
- if the range does not operate
- for cleaning and maintenance
- accessories
- if you need assistance
- if you need service

7. Using the 3/8” (0.95 cm) brass nuts, attach
the neutral (white) of power supply cable to the
silver-colored center screw of the terminal
block. Place the hook-shaped end of the wire
over the terminal block screw with open side of
the hook facing to the right. Squeeze hook end
of wire together to form a loop.
Connect the other two wires to the outer
terminal block screws. Attach wires using the
same method as the neutral wire (See Figure
nuts on the
Center wire MUST be connected to center
. Reattach terminal block cover.
Now start...
With range in kitchen.
II
W
Remove shipping materials, tape and
protective film from range. Keep
cardboard bottom and shipping base under
range. Remove oven racks and parts package
from inside oven.
h
12
Take 4
. cardboard
corners from
the carton. Stack one
cardboard corner on
top of another.
Repeat with the other
cardboard
corners
two corners. Place
corners lengthwise on
the floor in back of
range so corners will
support outer side
edges of range as
shown.
J
spacers
Personal Injury Hazard
Because of the weight and size of the
range, two or more people are needed to
move and safely install it.
Failure to do so could result in personal
injury.
(3
. Firmly grasp the range and gently lay it
on its back on the cardboard corners.
4
l
Pull cardboard bottom and shipping base
firmly to remove.
El
n
Use an adjustable wrench to
loosen the-leveling legs 1 -l/2 turns.
El
Place cardboard or hardboard in front of
range. Stand range back up onto
. cardboard or hardboard.
Personal Injury Hazard
l
To reduce the risk of tipping of the
appliance, the appliance must be secured
by a properly installed floor-mounted anti-tip
bracket supplied with the range.
l
Save these Installation Instructions. If range
is moved to a new location, the anti-tip
bracket must be removed and reinstalled in
the new location.
Electrical Shock Hazard
‘Take special care when drilling holes into
the floor. Electrical wires or plumbing may
be located beneath floor.
b Locate the electrical circuits that could be
affected by the installation of this bracket
and turn off power to these circuits.
Failure to follow these instructions may result
in electrical shock or other personal injury.
Panel D