
Installation Instructions


ELECTRICAL PREPARATION
A) The switched power outlet for the appliance should be installed in a cabinet or on a wall adjacent to the
under bench space in which the appliance is to be installed. Note: The power outlet must be accessible
after installation.
B) The power outlet should be positioned between 150mm and 450mm from the cavity.
PLUMBING & DRAINAGE PREPARATION
A) A readily accessible valve must be installed in the water supply pipe.
B) If the supply pressure exceeds 1000kPa, then a pressure limiting valve must be used.
C) Review Plumbing Options on pages 4 or 6. Choose a method that best suits your needs.
D) A Drain Hose extension Kit P/N 525798 will extend the drain hose(s) by 3.6m. The kit is available from
the nearest Fisher & Paykel Authorised Service Agent. DO NOT extend beyond this limit.
E) This Dishwasher’s maximum drain height is 950mm.
CAVITY PREPARATION
A) It is required that all cabinetry surrounding the (including underside of the benchtop) is
sealed with an oil based paint or moisture-proof polyurethane to prevent possible steam damage. The
air in the cavity can get very hot and humid (saturated at 50oC)
B) The self-adhesive moisture protection tape must be applied to the underside of the benchtop to
prevent moisture damage, (refer to cavity diagram pg 3 or 5). Ensure surfaces are dry and dust-free
prior to application.
C) Ensure the cavity provides sufficient material to secure the using the mounting tabs (refer to
step 1, page 7). If there is nothing to screw to, add a brace. See page 3 or 5 for screw locations.
D) The services hole MUST be immediately adjacent to the rear lower corner of the cabinetry. If not, the
hoses will prevent the being pushed back into the cavity all the way. The hole can be located
on either side depending on the location of the services.
E) Ensure the cavity sides are plumb (vertical) as this will assist with
levelling the .
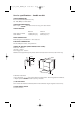
F) Minimum clearances:
R
R
R
R
R
Installation preparation - double & signle models
6
2.5mm
2.5mm
13mm
5019_102_00273_INSTAL_GB 30-05-2007 13:25 Pagina 6