DISHWASHER USER INSTRUCTIONS THANK YOU for purchasing this high-quality product. Register your new dishwasher at www.kitchenaid.com/customer-service/ register-products/. In Canada, register your dishwasher at www.kitchenaid.ca in the Service and Support section. For future reference, please make a note of your product model and serial numbers. These can be located on the label located near the door on the right-hand or left-hand side of the dishwasher interior.
GROUNDING INSTRUCTIONS ■ For a grounded, cord-connected dishwasher: The dishwasher must be grounded. In the event of a malfunction or breakdown, grounding will reduce the risk of electric shock by providing a path of least resistance for electric current. The dishwasher is equipped with a cord having an equipment-grounding conductor and a grounding plug. The plug must be plugged into an appropriate outlet that is installed and grounded in accordance with all local codes and ordinances.
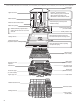
Parts and Features KDTE104E, KDTE204E, KDFE204E, KDTE254E ProScrub ® powerful jets target water toward pots, pans, or casserole dishes loaded in the back of the dishwasher to clean stubborn messes. (on some models) Upper level wash Water feed tube Pressurized spray nozzles provide effective cleaning. Model and serial number label Water inlet opening Lower spray arm Heating element Overfill protection float Rinse aid dispenser reduces spotting and improves drying.
Parts and Features KDTM354E, KDTM384E, KDTM404E, KDTM504E, KDTM704E, KDTM804E Interior lights (on some models) ProScrub ® powerful jets target water toward pots, pans, or casserole dishes loaded in the back of the dishwasher to clean stubborn messes. Upper level wash Water feed tube Pressurized spray nozzles provide effective cleaning. Model and serial number label Water inlet opening Dynamic lower spray arm (on some models) Advanced ProDry™ System uses heating element and a fan to remove moist air.
Start-Up/Quick Reference Drying - Rinse Aid is essential ProScrub® Option to clean baked-on food You must use a drying agent such as a rinse aid for good drying performance (sample included). Rinse aid along with the ProDry™ option will provide best drying and avoid excessive moisture in the dishwasher interior. When the ProScrub® option is selected, it provides a concentrated wash on the back of the lower dish rack for hard-to-clean dishes.
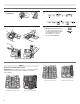
Quick Steps 1 Prepare and load dishwasher. 3 Select a cycle and option. 2 Add detergent for cleaning and rinse aid for drying. 4 Start dishwasher. SLIDE NOTE: If the Start/Resume button is located on the top of the door, ensure the light beside the button is lit and firmly push the door closed within 3 seconds of pressing START/RESUME. SLIDE Dispensers vary by model.
4 4 4 4 4 5 5 STEP 2 1 1 5 1 1 1 1 5 5 5 1 1 2 2 2 2 2 3 2 2 3 3 2 2 5 3 4 Add Detergent 5 6 3 2 4 1 1 4 4 5 5 3 3 3 3 4 10 place load - silverware basket NOTE: If you do not plan to run a wash cycle soon, run a rinse cycle. Do not use detergent. ■ Use automatic dishwasher detergent only. Add powder, liquid or tablet detergent just before starting a cycle.
NOTE: Fill amounts Hard Water shown are for standard Hard Water powdered detergent. Soft Water Soft Water Follow instructions on the package when using gel Main Wash Pre-Wash dishwasher detergents. Premeasured forms are suitable for all hardness and soil levels. Always place premeasured detergents in the main compartment and close the lid. Add Rinse Aid (Dispenser varies by model) ■ Your dishwasher is designed to use rinse aid for good drying performance.
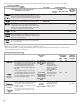
Cycle and Option Descriptions KDTM704E, KDTM804E KDTM504E KDTM404E KDTM354E, KDTM384E KDTE254E KDTE204E KDTE204E Custom door model KDFE204E KDTE104E 9
This information covers several different models. Your dishwasher may not have all of the cycles and options described. CYCLE SELECTIONS CYCLES SOIL LEVEL Dishwasher senses the soil amount and adjusts cycle times. ESTIMATED TIME* (HH:MM) Min Soil Level** The most advanced and versatile cycle. ProWash™ cycle senses the soil amount and toughness of soil to adjust the cycle for improved performance using only the amount of water and energy needed. Includes Heat Dry.
OPTION SELECTIONS OPTIONS CAN BE SELECTED WITH WHAT IT DOES ADDED TIME TO CYCLE*** (HH:MM) MIN MAX ADDED WATER GALLONS (LITERS) Raises the main wash temperature to improve cleaning for loads containing tough, baked-on food. ProWash™ Tough Normal Raises the main wash temperate from 105°F to either 130°F or 140°F (41°C to 55C° or 60C°). :00 :12 0 - 1.5 (0 - 5.
CONTROLS AND CYCLE STATUS CONTROL PURPOSE COMMENTS To start or resume a wash cycle If the door is opened during a cycle for any reason or if the power is interrupted, the Start/Resume indicator flashes. The cycle will not resume until the Start/Resume button is pressed and the door is closed. NOTE: (for models with controls on top of the door) Push door firmly closed within 3 seconds of pressing Start/Resume.
4. Press CANCEL/DRAIN and wait approximately 2 minutes until the machine drains and the Cancel/Drain light turns off. 5. Select new cycles and options. 6. Press START/RESUME. Adding a Dish After Dishwasher Is Started If your dishwasher has an “Add Dish” indicator: 1. Open the door slightly to stop the cycle. Wait for the spraying action to stop and then completely open the door. 2. Add a dish to the load while the indicator is lit. 3. Press the START/RESUME button and close the door.
FLEXI-FOLD DOWN™ Flexible Tines Dynamic Lower Spray Arm (on some models) The row of tines on the left-hand and right-hand sides of the top rack can be adjusted to make room for a variety of dishes. The Dynamic Lower Spray Arm is motor driven and will not spin unless the dishwasher is running. The motor assures just the right spin for thorough and effective cleaning. To adjust the fold-down tines: 1. Grasp the tip of the tine that is in the tine holder. 2. Gently push the tine out of the holder. 3.
Using the Bottle Wash Feature (on some models) When you do not need to wash bottles, flip the nozzles down until they stop. Up to 6 sports bottles, baby bottles or other narrow items may be washed in the upper rack with this feature. Interior Lighting (on some models) To wash bottles: 1. Select BOTTLE WASH on the control panel. 2. Flip up any or all six of the nozzles just far enough to fit inside your particular item. 3. Securely place items over the nozzles.
Cleaning Advanced Racks (on some models) If you would like to clean hard water filming or other soil buildups from the interior surfaces of the dishwasher, we recommend using a monthly maintenance product such as affresh® Dishwasher Cleaner. If you desire routine cleaning, use a soft damp cloth. Drain Air Gap Some state or local plumbing codes require the addition of a drain air gap between a built-in dishwasher and the home drain system. Check the drain air gap when your dishwasher is not draining well.
PROBLEM SOLUTION DISHWASHER DOES NOT RUN NOTE: It is normal for the dishwasher to repeatedly pause several times during a cycle. If the Start/Resume light is blinking, close the door and push START/RESUME. Be sure the door is closed and latched. Be sure you have disabled Sleep Mode by pressing either START/RESUME or CANCEL, or opening and closing the door before selecting your cycle/option.
PROBLEM SOLUTION ODORS NOTE: If the dishwasher is not used daily, you can run a rinse cycle with the partial load until a full load is ready to run, or use the Top Rack Only option (on some models) for partial loads. Run a vinegar rinse through the dishwasher by putting 2 cups (500 mL) of white vinegar in an upright glass measuring cup in the lower rack. Run a normal cycle with the ProDry™ option turned off. Do not use detergent.
PROBLEM SOLUTION CLOUDY OR SPOTTED DISHWARE (AND HARD WATER SOLUTION) NOTES: ■ Liquid rinse aid is necessary for drying and to reduce spotting. Use the correct amount of detergent. Confirm that the cloudiness is removable by soaking the item in white vinegar for 5 minutes. If the cloudiness disappears, it is due to hard water. Adjust the amount of detergent and rinse aid. See “Hard Water (White Residue On Dishwasher Interior Or Glassware)” in the “Troubleshooting” section.
KITCHENAID® DISHWASHER LIMITED WARRANTY ATTACH YOUR RECEIPT HERE. PROOF OF PURCHASE IS REQUIRED TO OBTAIN WARRANTY SERVICE. Please have the following information available when you call the Customer eXperience Center: ■ Name, address and telephone number ■ Model number and serial number ■ A clear, detailed description of the problem ■ Proof of purchase including dealer or retailer name and address IF YOU NEED SERVICE: 1.