
Control Guide
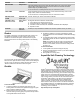
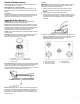
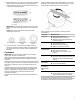
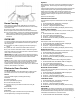
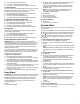
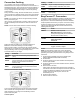
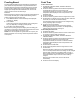
Table Of Contents
- Feature Guide_W11122599
- Grates_W11122565
- Griddle_W11085356
- AquaLift Self-Cleaning Tech_GFSR_CG
- Surface Temperatures_GFSR_CG
- Sealed Surface Burners_W11427482
- Cookware_W11102912
- Home Canning_GFSR_CG
- Oven Use_W11122565
- Electronic Oven Controls_W11122599
- Keep Warm_W11122599
- Sabbath Mode_W11122599
- Racks and Bakeware Positions_W11122599
- Baking and Roasting_W11122568
- Broiling_W11122599
- Convection Cooking_W11122599
- EasyConvect Conversion_GFSR_CG
- Proofing Bread_GDOFSR_CG_W11241795
- Cook Time_W11122599
- Feature Guide_W11122599_FR
- Grates_W11122565_FR
- Griddle_W11085356_FR
- AquaLift Self-Cleaning Tech_GFSR_CG_FR
- Surface Temperatures_GFSR_CG_FR
- Sealed Surface Burners_W11427482_FR
- Cookware_W11102912_FR
- Home Canning_GFSR_CG_FR
- Oven Use_W11122565_FR
- Electronic Oven Controls_W11122599_FR
- Keep Warm_W11122599_FR
- Sabbath Mode_W11122599_FR
- Racks and Bakeware Positions_W11122599_FR
- Baking and Roasting_W11122568_FR
- Broiling_W11122599_FR
- Convection Cooking_W11122599_FR
- EasyConvect Conversion_GFSR_CG_FR
- Proofing Bread_GDOFSR_CG_W11241795_FR
- Cook Time_W11122599_FR

3
KEYPAD FEATURE INSTRUCTIONS
DELAY START Delayed start
The Delay Start keypad is used to enter the starting time for an oven function with a
delayed start. Delay Start should not be used for foods such as breads and cakes
because they may not bake properly.
To set a Cook Time or a Delayed Cook Time, see “Cook Time” section.
COOK TIME Cook time Cook Time allows the oven to be set to turn on at a certain time of day, cook for a set
length of time, and/or shut off automatically.
To set a Cook Time or a Delayed Cook Time, see “Cook Time” section.
AQUALIFT SELF
CLEAN
AquaLift
®®
self-
clean cycle
See the “Clean Cycle” section in the Owner’s Manual.
CONTROL LOCK
hold 3 sec. to lock
Oven control
lockout
No keypads will function with the controls locked.
1. Check that the oven and the Timer are off.
2. Press and hold the “0” keypad for 3 seconds.
3. If enabled, a tone will sound, and “CONTROL LOCKED” will be displayed.
4. Repeat to unlock.
OPTIONS Oven use
functions
Enables you to personalize the audible tones and oven operation to suit your needs.
Grates
The grates on this range cover the full width of the cooktop. The
two grates may interlock (on some models), using the hook
formed into one end of both grates. The flat end of one grate
drops onto the hook on the other grate as shown in the following
illustration.
On some models, the two grates are identical and can be used on
either the left or right side of the cooktop. Grates that are designed
for use on only one side of the cooktop will have either “LEFT” or
“RIGHT” embossed on the bottom side of the grate.
Griddle
Griddle installed on right side of cooktop
To Use the Griddle:
1. Locate the griddle on the right side grate as shown. The
locating feet on the bottom of the griddle will engage the grate
tines to keep the griddle from sliding.
2. Before each use, brush on a thin layer of cooking oil to keep
food from sticking. Cooking sprays may leave a sticky residue
on the griddle that is hard to remove.
3. Preheat the griddle for 5 minutes. Preheating the griddle
slowly will ensure even heat distribution and will avoid warping
the griddle.
4. For preheating and cooking, set the front burner to the lowest
heat setting and the rear burner to Medium-High heat for best
performance.
NOTE: The griddle may also be used on the left side grate.
For best results, the rear burner setting should be set to
Medium-Low or Medium, and the front burner setting should
be set to Low.
To Clean the Griddle:
1. Let the griddle cool, and then empty the drip tray
2. See the “General Cleaning” section of your Owner’s Manual
for cleaning instructions.
3. Store griddle in a cool dry place.
AquaLift
®®
Self-Cleaning Technology
AquaLift
®
Self-Cleaning Technology is a first-of-its-kind cleaning
solution designed to minimize the time, temperature, and odors
that ordinarily come with traditional self-cleaning methods. With
AquaLift
®
Self-Cleaning Technology, an innovative coating on the
interior of the oven is activated with heat and water to release
baked-on soil. To use AquaLift
®
Self-Cleaning Technology, simply
wipe out loose debris, pour water into the oven bottom, and run
the AquaLift
®
Self-Cleaning cycle. When the cycle finishes in
under 1 hour at a lower temperature than in traditional self-
cleaning methods, just wipe out the remaining water and loose
debris. See the “Clean Cycle” section in the Owner’s Manual for
more detailed instructions. For additional information, frequently
asked questions and videos on using AquaLift
®
Self-Cleaning
Technology, visit our website at
http://whirlpoolcorp.com/aqualift.