
Owner's Manual
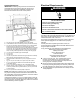
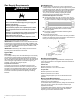
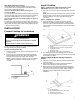

Table Of Contents
- COOKTOP SAFETY
- Cooktop Safety
- COOKTOP MAINTENANCE AND CARE
- General Cleaning
- INSTALLATION INSTRUCTIONS
- REQUIREMENTS
- Tools and Parts
- Location Requirements
- Electrical Requirements
- Gas Supply Requirements
- INSTALLATION
- Prepare Cooktop for Installation
- Install Cooktop
- Make Gas Connection
- Attach Cooktop to Countertop
- Complete Installation
- SÉCURITÉ DE LA TABLE DE CUISSON
- Sécurité de la table de cuisson
- ENTRETIEN ET RÉPARATION DE LA TABLE DE CUISSON
- Nettoyage général
- INSTRUCTIONS D’INSTALLATION
- EXIGENCE
- Outils et pièces
- Exigences d’emplacement
- Spécifications électriques
- Spécifications de l’alimentation en gaz
- INSTALLATION
- Préparation de la table de cuisson pour l’installation
- Installation de la table de cuisson
- Raccordement au gaz
- Fixation de la table de cuisson au plan de travail
- Achever l’installation

9
Gas Supply Pressure Testing
Gas supply pressure for testing regulator must be at least 1"
(2.5 cm) water column pressure above the manifold pressure
shown on the model/serial rating plate.
Line pressure testing above 1/2 psi (3.5 kPa) gauge
14" (35.5 cm) WCP
The cooktop and its individual shutoff valve must be disconnected
from the gas supply piping system during any pressure testing of
that system at test pressures in excess of 1/2 psi (3.5 kPa).
Line pressure testing at 1/2 psi (3.5 kPa) gauge 14" (35.5 cm)
WCP or lower
The cooktop must be isolated from the gas supply piping system
by closing its individual manual shut-off valve during any pressure
testing of the gas supply piping system at test pressures equal to
or less than 1/2 psi (3.5 kPa).
INSTALLATION
Prepare Cooktop for Installation
WARNING
Excessive Weight Hazard
Use two or more people to move and install or uninstall
appliance.
Failure to do so can result in back or other injury.
Decide on the final location for the cooktop. Avoid drilling into or
severing existing wiring during installation.
On Glass Cooktop models only:
1. Using two or more people, place the cooktop upside down on
a covered surface.
2. Remove foam strip from the package containing literature.
Remove backing from foam strip. Apply foam strip adhesive
side down around bottom of cooktop, flush with edge.
NOTE: The foam strip keeps debris away from the underside
of the cooktop and helps the cooktop to sit flat on uneven
counters.
A. Cooktop base
B. Foam strip
C. Cooktop
Install Cooktop
Style 1: Cooktop over undercounter built-in oven
IMPORTANT: Clamping brackets should not be used.
1. Using two or more people, place cooktop right side up into the
cutout.
NOTE: Make sure that the front edge of the cooktop is parallel
to the front edge of the countertop. If repositioning is needed,
lift entire cooktop up from cutout to avoid scratching the
countertop.
Style 2: Cooktop over cabinets
1. Determine whether your cabinet construction provides
clearance for installing clamping brackets at cooktop base
ends. This is the recommended location. Clamping brackets
can be installed on the front and back of cooktop base bottom,
if necessary.
A. Attachment screw holes for optional front and back
location
B. Clamping bracket (end locations recommended)
C. Cooktop base bottom
D. Attachment screw
E. Attachment screw location (recommended)
2. The clamping brackets can be installed before or after the
cooktop is placed into the cutout. Complete the following steps
for the option you choose.
Installing Brackets Before Placing Cooktop in
Cutout
1. Using two or more people, place the cooktop upside down on
a covered surface.
2. Remove the attachment screws for the selected bracket
locations from the bottom of the cooktop base.
3. Select bracket mounting holes that will allow the bracket to
extend far enough out from the cooktop for the installation of
2
1
/
2
" (6.4 cm) clamping screws. See the “Attach Cooktop to
Countertop” section for illustration of clamping screw
installation.
A. Clamping bracket
B. Recommended attachment screw location
C. Clamping screw location
D. Edge of cooktop base bottom