
Control Guide
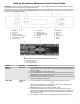
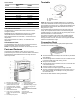
Table Of Contents
- Feature Guide_W10643473
- Electronic Oven Controls_W10643473
- Parts and Features_W10643473
- Turntable_W10643473
- Convection Rack_W10643473
- Crisper Pan and handle_WOBIMW_CG_OLD
- Baking Tray_WOBIMW_CG_OLD
- KA Steamer Vessel_W10643473
- Microwave Oven Use_W10875904
- Food Characteristics_WOBIMW_CG_OLD
- Cooking Guidelines_WOBIMW_CG_OLD
- Cookware and Dinnerware_WOBIMW_CG_OLD
- Microwave Cooking Power_W10643473
- Doneness_W10643473_OLD
- Sensor Cook_W10643473
- Manual Cooking_W10643473_OLD
- Crisper Pan Frying_W10643473_OLD
- Reheat_W10643473
- Defrost_W10643473
- Steam Cooking_W10643473
- Popcorn_W10643473
- Keep Food Warm_W10643473
- Crisp_W10643473
- Soften/Melt_W10643473
- EasyConvect Conversion_W10643473
- Guide des caractéristiques_W10643473
- Commandes électroniques du four_W10643473
- Pièces et caractéristiques_W10643473
- Plateau rotatif_W10643473
- Grille de cuisson_W10643473
- Plat à croustiller et poignée_WOBIMW_CG_OLD
- Plateau de cuisson_WOBIMW_CG_OLD
- Cuiseur-vapeur KA_W10643473
- Utilisation du four à micro-ondes_W10875904
- Caractéristiques des aliments_WOBIMW_CG_OLD
- Guide de cuisson_WOBIMW_CG_OLD
- Ustensiles de cuisine et vaisselle_WOBIMW_CG_OLD
- Puissance de cuisson du four à micro-ondes_W10643473
- Doneness_W10643473_OLD
- Capteur de cuisson_W10643473
- Cuisson manuelle_W10643473_OLD
- Frire au plat à croustiller_W10643473_OLD
- Réchaufer_W10643473
- Décongéler_W10643473
- Cuisson à la vapeur_W10643473
- Popcorn_W10643473
- Garder les aliments au chaud_W10643473
- Croustiller_W10643473
- Ramollir/Fondre_W10643473
- Conversion EasyConvect_W10643473
- Feature Guide_W10643473
- Electronic Oven Controls_W10643473
- Parts and Features_W10643473
- Turntable_W10643473
- Convection Rack_W10643473
- Crisper Pan and handle_WOBIMW_CG_OLD
- Baking Tray_WOBIMW_CG_OLD
- KA Steamer Vessel_W10643473
- Microwave Oven Use_W10875904
- Food Characteristics_WOBIMW_CG_OLD
- Cooking Guidelines_WOBIMW_CG_OLD
- Cookware and Dinnerware_WOBIMW_CG_OLD
- Microwave Cooking Power_W10643473
- Doneness_W10643473_OLD
- Sensor Cook_W10643473
- Manual Cooking_W10643473_OLD
- Crisper Pan Frying_W10643473_OLD
- Reheat_W10643473
- Defrost_W10643473
- Steam Cooking_W10643473
- Popcorn_W10643473
- Keep Food Warm_W10643473
- Crisp_W10643473
- Soften/Melt_W10643473
- EasyConvect Conversion_W10643473
5
Display(s)
When power is first supplied to the oven, the timer display will
flash “12:00,” and “Clock-enter time” will appear on the display.
Enter the time by touching the number keypads. Then touch
START to allow operation. To allow operation without changing
the time, touch STARTor CANCEL.
Lower Oven Display (combination oven models)
When the lower oven is in use, this display shows the oven
temperature, heat source(s) and start time. In addition, during
Timed Cooking, this display shows a time countdown and the stop
time (if entered).
When the lower oven is not in use, this display shows the time of
day or time countdown.
Upper Microwave Oven Display (combination oven models)
When the upper oven is in use, this display shows the upper oven
heat source(s), cooking power, quantities, weights, and/or help
prompts and time countdown.
When the upper oven is not in use, this display is blank.
Time of Day, Timer Display
When the lower oven is not in use, this display shows the time of
day or time countdown.
Number Codes
The oven is preset with shortcut number codes. A number code
includes one or more of the following; food category, cooking
power, cook time, and food quantity or weight. See the code
charts in the “Reheating,” “Defrosting,” “Steam,” “Soften/Melt,”
and “EasyConvect™” sections for additional information.
Control Lock
NOTE: On microwave ovens, the Control lock is locked or
unlocked by touching the “Cancel” key pad. On combination
ovens, the Control lock is locked or unlocked by touching the
lower oven “Start” keypad.
The Control Lock shuts down the control panel keypads to avoid
unintended use of the oven. The Control Lock will remain set after
a power failure, if set before the power failure occurs.
When the control is locked, only the Set/Start, Oven Light, and
Timer Set/Off keypads will function.
The Control Lock is preset unlocked, but can be locked.
To Lock Control: Touch and hold lower oven START (on
combination ovens only) or Cancel (on microwave ovens only) for
approximately 3 seconds, until “Control Locked” appears on the
lower text line and a lock icon appears in the display.
To Unlock Control: Repeat to unlock. “Control Unlocked”
appears on the lower text line and the lock icon will be removed.
Clock
This is a 12-hour clock. Before setting, make sure the oven(s),
Kitchen Timer, and Timed Cooking are off.
To Set:
1. Touch CLOCK/TOOLS.
2. Touch the “1” key.
3. Select Clock, and then touch the number keys to set the time
of day.
4. Touch CLOCK/TOOLS or START.
Tones
Tones are audible signals, indicating the following:
One beep
� Valid key touch
� Function has been entered
One chime
� Preheat cycle has been completed
Three beeps
� Invalid key touch
Three chimes
� End of a cooking cycle
Four chimes
� When timer reaches zero
Includes using the Kitchen Timer for functions other than
cooking.
Tone Volume
The volume is preset at low, but can be changed to high.
To Change: Touch TOOLS or CLOCK/TOOLS depending on you
model, and then “4” to toggle volume between high and low
settings.
All Tones
All tones are preset on, but can be turned off.
To Turn Off/On: Touch TOOLS or CLOCK/TOOLS depending on
you model, and then “3” to toggle tones between on/off settings.
End-of-Cycle and Reminder Tones
The Timed Cooking end-of-cycle and reminder tones are preset
on, but can be turned off. If all tones have been turned off, the
end-of-cycle and reminder tones cannot be independently turned
on.
To Turn Tones Off/On: Touch TOOLS or CLOCK/TOOLS
depending on you model, and then “5” to turn On. Touch TOOLS,
and then “5” to turn Off.
NOTE: Turning off this reminder tone does not turn off the Kitchen
Timer tone.
Tools (Microwave Oven Models)
The Tools selection keypad allows access to some hidden
functions within the Electronic Oven Control.
To Use:
1. Touch CLOCK/TOOLS. The oven display will scroll through
the various options.
You can also touch the Clock/Tools keypad repeatedly to
manually scroll through the list of options.
2. Touch the number keypad for the specific option to toggle the
function setup. Use the following chart as a guide.