
Control Guide
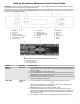
Table Of Contents
- Feature Guide_W10643473
- Electronic Oven Controls_W10643473
- Parts and Features_W10643473
- Turntable_W10643473
- Convection Rack_W10643473
- Crisper Pan and handle_WOBIMW_CG_OLD
- Baking Tray_WOBIMW_CG_OLD
- KA Steamer Vessel_W10643473
- Microwave Oven Use_W10875904
- Food Characteristics_WOBIMW_CG_OLD
- Cooking Guidelines_WOBIMW_CG_OLD
- Cookware and Dinnerware_WOBIMW_CG_OLD
- Microwave Cooking Power_W10643473
- Doneness_W10643473_OLD
- Sensor Cook_W10643473
- Manual Cooking_W10643473_OLD
- Crisper Pan Frying_W10643473_OLD
- Reheat_W10643473
- Defrost_W10643473
- Steam Cooking_W10643473
- Popcorn_W10643473
- Keep Food Warm_W10643473
- Crisp_W10643473
- Soften/Melt_W10643473
- EasyConvect Conversion_W10643473
- Guide des caractéristiques_W10643473
- Commandes électroniques du four_W10643473
- Pièces et caractéristiques_W10643473
- Plateau rotatif_W10643473
- Grille de cuisson_W10643473
- Plat à croustiller et poignée_WOBIMW_CG_OLD
- Plateau de cuisson_WOBIMW_CG_OLD
- Cuiseur-vapeur KA_W10643473
- Utilisation du four à micro-ondes_W10875904
- Caractéristiques des aliments_WOBIMW_CG_OLD
- Guide de cuisson_WOBIMW_CG_OLD
- Ustensiles de cuisine et vaisselle_WOBIMW_CG_OLD
- Puissance de cuisson du four à micro-ondes_W10643473
- Doneness_W10643473_OLD
- Capteur de cuisson_W10643473
- Cuisson manuelle_W10643473_OLD
- Frire au plat à croustiller_W10643473_OLD
- Réchaufer_W10643473
- Décongéler_W10643473
- Cuisson à la vapeur_W10643473
- Popcorn_W10643473
- Garder les aliments au chaud_W10643473
- Croustiller_W10643473
- Ramollir/Fondre_W10643473
- Conversion EasyConvect_W10643473
- Feature Guide_W10643473
- Electronic Oven Controls_W10643473
- Parts and Features_W10643473
- Turntable_W10643473
- Convection Rack_W10643473
- Crisper Pan and handle_WOBIMW_CG_OLD
- Baking Tray_WOBIMW_CG_OLD
- KA Steamer Vessel_W10643473
- Microwave Oven Use_W10875904
- Food Characteristics_WOBIMW_CG_OLD
- Cooking Guidelines_WOBIMW_CG_OLD
- Cookware and Dinnerware_WOBIMW_CG_OLD
- Microwave Cooking Power_W10643473
- Doneness_W10643473_OLD
- Sensor Cook_W10643473
- Manual Cooking_W10643473_OLD
- Crisper Pan Frying_W10643473_OLD
- Reheat_W10643473
- Defrost_W10643473
- Steam Cooking_W10643473
- Popcorn_W10643473
- Keep Food Warm_W10643473
- Crisp_W10643473
- Soften/Melt_W10643473
- EasyConvect Conversion_W10643473

9
PERCENT/
NAME
NUMBER USE
80% 8 Heating rice, pasta, or
casseroles.
Cooking and heating foods that
need a cook power lower than
high. For example, whole fish
and meat loaf.
70%,
Medium-High
7
Reheating a single serving of
food.
60% 6 Cooking sensitive foods such as
cheese and egg dishes,
pudding, and custards.
Cooking non-stirrable
casseroles, such as lasagna.
50%, Medium
5
Cooking ham, whole poultry, and
pot roasts.
Simmering stews.
40% 4 Melting chocolate.
Heating bread, rolls, and
pastries.
30%, Medium-
Low, Defrost
3 Defrosting bread, fish, meats,
poultry, and precooked foods.
20% 2 Softening butter, cheese, and ice
cream.
10%, Low 1 Taking chill out of fruit.
NOTE: A percentage of 0% is also acceptable. This will not heat
up.
To Set a Cooking Power other than 100%:
1. Touch the number keypads to set a length of time to cook.
2. Touch COOK POWER.
3. Using the Microwave Cooking Power chart above, enter the
corresponding number for the desired power level.
4. Touch START.
The display will count down the cook time.
When the stop time is reached, the oven will shut off
automatically and the end screen will appear on the display.
If enabled, end-of-cycle tones will sound, then reminder tones
will sound every minute.
5. Touch CANCEL or open the door to clear the display and/or
stop reminder tones.
Doneness
Doneness is a function used for adjusting the cook time. This
feature is used on all sensor and non-sensor functions with the
exception of Manual Cooking, Popcorn, EasyConvect™, Custom
Reheat (beverage-manual), Defrost (manual), and Steam
(manual).
The 3 Doneness levels are Normal (default), More, or Less and
will appear once activated on the lower text line of the upper oven
display. Doneness can be changed only before starting the cycle.
To Change Doneness Setting:
After setting a function, the Doneness setting can be changed if
desired. This can be done before or after the “Start?” prompt
appears in the display. Touch the COOK POWER keypad
repeatedly to toggle through Doneness options of Normal, More,
or Less.
Sensor Cook
The Sensor Cook function is used in Reheat (meal), Steam
Cooking, and Popcorn.
During the Sensor Cook function a sensor automatically adjusts
for the cook time and power level.
The microwave oven display will show the "Maximum Time
Remaining" prompt and the time countdown once the sensor
identifies the cooking duration.
If the microwave oven door is opened during a sensor function,
the microwave oven will turn off, and any additional operations will
be canceled.
For best cooking performance:
Before using a sensor cook function, make sure power has been
supplied to the microwave oven for at least 2 minutes, the room
temperature is not above 95°F (35°C), and the outside of the
cooking container and the microwave oven cavity are dry.
Manual Cooking
To Use:
1. Touch COOK TIME and then number keypads to set a length
of time to cook.
OR
Touch the number keypads to set a length of time to cook. To
use this feature, the display must be in the time of day
visualization. Time can be set up to 99 minutes and 99
seconds.
If using 100% cook power, skip to Step 3.
2. Touch COOK POWER, and then enter the desired power level.
See the Microwave Cooking Power Chart in the
“Microwave Cooking Power” section.
NOTE: Doneness function is not active for manual cooking.
3. Touch START/ADD 1 MINUTE.
The display will count down the cook time.
Touching Start/Add 1 Minute while the microwave oven is
operating will add cook time to the current cycle by 1 minute.
Multiple minutes can be added by repeatedly touching
Start/Add 1 Minute.
When the stop time is reached, the oven will shut off
automatically and "Cooking Complete" will appear on the oven
display.
If enabled, end-of-cycle tones will sound, and then reminder
tones will sound every minute.
4. Touch CANCEL or open the door to clear the display and/or
stop reminder tones.
Crisper Pan Frying
When the crisper pan is used with microwaves, it is like a frying
pan or griddle, ideal for French toast, burgers, eggs, stir-frying,
and sautéing.
Before using, see "Crisper Pan and Handle" section and the
Crisper Pan Frying Chart.
Always use the turntable "On" option when using the crisper pan
(default setting).
Before Use:
Preheat pan for 3 minutes on 100% power. Use 100% power for
cooking.
Before crisper pan frying, brush crisper pan with 1/2
tsp (3 mL)
of oil or spray with nonstick cooking spray. Arrange food on
crisper pan. Place pan on turntable.