Thank you for Choosing KitchenAid® Appliances. We hold our company to the highest quality standards and it is important to us that you have a positive experience owning a Kitchen Aid” product. For your convenience, we have provided an easy to follow User Instruction Book. These instructions include a “Troubleshooting” section to help you through any problems you may encounter. For additional information, you can visit the Frequently Asked Questions (FAQs) section of our website at www.kitchenaid.com.
op Sakai oy Lately Your safety and the safety of others are very important. We have provided many important safety messages in this manual and on your appliance. Always read and obey all safety messages This is the safety alert symbol. This symbol alerts you to potential hazards that can kill or hurt you and others, All safety messages will follow the safety alert symbol and either the word “DANGER” or “WARNING.
GROUNDING INSTRUCTIONS ® For a grounded, cord-connected dishwasher: Check with a qualified electrician or service representative The dishwasher must be grounded. In the event of a If you are in doubt whether the dishwasher Is properly malfunction or breakdown, grounding will reduce the risk of ~~ grounded, Do not modify the ply provided with the electric shock by providing a path of least resistance for dishwasher; if it will not fit the outlet, have a proper outlet electric current.
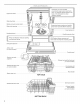
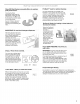
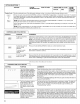
5 ProSerib® fon some models) powerful jets target water toward pots. pans, or casserole dishes loaded in the back of the dishwasher to clean stubborn messes. Upper feel wash a Water feed tube ss , Model and serial number label 1 | Pressurized spray nozzles and variable 1 Weller inlet opening speed motor provide effective cleaning. . Lower spray arm Heating element vb. Overfill protection float : Linseed aid dispenser reduces spotting — EQ Filtration System removes sof : E and improves drying.
Clean EQ Wash System removable filters to maintain peak performance. Cleaning the filters periodically helps keep the dishwasher working at peak performance. The filters can be found at the bottom center of your dishwasher. See the “Filtration System” section for information on removing and maintaining the filters. IMPORTANT: Do not block detergent dispenser. Tall items placed in the lower rack may block the dispenser door.
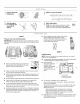
# Prepare and load {dishwasher % Add detergent a Start dishwasher. , . #n for cleaning and "T NOTE: if the Start/Resume button is located (i rinse aid for 3 on the top of door, push door firmly closed or drying. > within 3 seconds of pressing START/RESUME. STEP 1 Prepare and Load the Dishwasher IMPORTANT: Remove leftover food, bones. toothpicks and other hard items from the dishes, Remove labels from containers before washing. Upper rack m Make sure nothing keeps spray arms) from spinning freely.
NOTE: Fill amounts shown are for standard powdered detergent. Follow instructions on the package when using other dishwasher detergent types. Remeasured forms are suitable for all hardness and soil levels. Always place remeasured detergents in the main compartment and close the lid. Add Rinse Aid = Your dishwasher is designed to use rinse aid for good drying performance. Without rinse aid your dishes and dishwasher interior will have excessive moisture.
MIDSECTIONS casserole This information covers several different models. Your dishwasher may not have all of the cycles and options described. CYCLE SELECTIONS CYCLES SOIL LEVEL WASH TIME" (MIND) WATER W/O OPTIONS USAGE i GALLONS Typical** Max {Liters) The most advanced and versatile cycle, ProWash™ Light to Medium 110 150 4.2 (18.1) cycle senses the load size, doll amount, and toughness. of soil, to.adjust the cycle for optimal cleaning Using 128 190 5.0181) only. the amount of water and energy needed.
OPTION SELECTIONS OPTIONS CAN BE WHAT IT DOES ADDED TIME TO CYCLE | ADDED SELECTED WITH WATER TYPICAL MAX GALLONS {LITERS} Sanitizes dishes and Heavy Duty Increased the main 53 73 0-30 ‘glassware in accordance Normal Wash wash temperature 0-112) with National Sanitation from 105°F (41°C) Foundation (Transfuse 10 130°F {34°C} and Standard 184 for: the final rinse from Residential Dishwashers. T40°F (60°C) to Certified residential 156°F dishwashers are not intended for licensed food establishments.
OPTION SELECTIONS OPTIONS CAN BE WHAT IT DOES ADDED TIME TO CYCLE | ADDED SELECTED WITH WATER TYPICAL MAX GALLONS {LITERS} Control Lock | Avoids unintended use of the dishwasher between cycles. or cycle and option changes during a cycle. To turn on Lock, press and hold CONTROL LOCK or 4 HOUR DELAY {depending on model) for 3 seconds. The Control Lock light will stay on for a short time, indicating that it is activated, and all buttons are disabled.
Canceling A Cycle 1. Open the door slightly to stop the cycle. Wait for the spraying action to stop before completely opening the door. 2. Press and hold Cancel/Drain bunion once, The Cancel/Drain fight will light up. 3. Close the door and the dishwasher starts a drain cycle (if water remains in bottom of dishwasher), Let the dishwasher drain completely. The Cancel/Drain light tums off after 2 minutes. Changing A Cycle After Dishwasher Is Started 1.
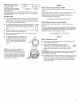
FLEX-FOLD DOWN™ Flexible Tines The row of tines on the left-hand and right-hand sides of the top rack can be adjusted to make room for a variety of dishes. To adjust the fold-down tines: 1. Grasp the lip of the tine that is in the tine holder. 2. Gently push the tine out of the holder. 3. Lay the tines down, toward the center of the rack. NOTE: The bottom rack may also have 1 or 2 rows of flexible tines located in the back of the rack.
> IMPORTANT: When you are using the culinary tool baskets in the Culinary Tool Rack (3rd level rack) down position, the top rack must also be in the lowest position. The culinary tool rack is designed with 2 movable baskets to hold extra silverware, knives and cooking utensils. Install the baskets in this up position when you have extra silverware and flatware to wash.
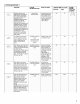
RECOMMENDED TIME INTERVAL TO CLEAN YOUR FILTER Number of Loads | If you wash If you scrape and rinse | If you only scrape If you do not scrape or rinse Per Week before loading before loading before loading” before loading 1-3 Once per year Once per year. Twice per year Every.two months 4-7 Once per year Once per year Twice per year Once per month 8-12 Once pet year: Twice per year. Every.three months Every two weeks.
Dishwasher Care Cleaning Cleaning the exterior In most cases, regular use of a soft, damp cloth or sponge and a mild detergent is all that is necessary to keep the outside of your dishwasher looking nice and clean. if your dishwasher has a stainless steel exterior. a stainless steel cleaner is recommended. Hard water minerals can cause a white film to build up on the inside surfaces, especially just beneath the door area, Do not clean the dishwasher interior until it has cooled.
First try the solutions suggested here or visit our website and reference FAQs {Frequently Asked Questions} to possibly avoid the cost of a service call. In the U.S.A, www.kitchenaid.com In Canada, www.kitchenaid.ca PROBLEM SOLUTION DISHWASHER DOES NOT RUN NOTE: it is normal for the dishwasher to repeatedly pause several times during a cycle. if the Start/Resume light is blinking. close the door and push START/RESUME. Be sure the door is closed and latched.
PROBLEM SOLUTION ODORS NOTE: If the dishwasher is not used daily, you can run a rinse cycle with the partial load daily until a full load is ready to run, or use the Top Rack Only option {on some models) for partial loads. Run a vinegar rinse through the dishwasher by putting 2 cups (500 ml) of white vinegar in an upright glass measuring cup in the lower rack. Run a normal cycle with the Heat Dry option fumed off.
PROBLEM SOLUTION ETCHING (PERMANENT This is an erosion of the surface of the glassware and can be caused by a combination of: water that CLOUDINESS) is too hot, from using too much detergent with soft water or by per-washing. Detergent needs food soil to act upon. If etching has occurred, the glassware is permanently damaged.
If outside the 50 United States and Canada, contact your authorized Kitchen Aid dealer to determine if another warranty applies. if you think you need repair service, first see the “Troubleshooting” section of the Use & Care Guide. If you are unable to resolve the problem after checking “Troubleshooting,” additional help can be found by checking the “Assistance or Service” section or by calling Kitchen Aid. in the U.S.A, call 1-800-422-1230. In Canada, call 1-800-807-6777.