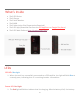
What’s Inside iTrail GPS Device iTrail Charger iTrail Serial Number iTrail IME# iTrail Subscription Plan (Separate but Required) iTrail GPS App (Download free from the iOS App Store or Google Play Store) iTrail GPS Web Platform (http://track.myitrail.com) LEDs GPS LED: Blue Light 1. When the unit has successfully connected to a GPS satellite, the light will blink Blue at a steady pace, indicating that it is receiving location information. Power LED: Red Light 1.
light be a constant glow. 2. When the battery is low, it will blink Red at a steady pace indicating that the battery will need to be charged soon. 3. If the device has not been charged for a long period of time, the Red light may take a few hours to light up and start blinking. If you have not charged the device for a long time and the light does not light up when the device is plugged in, please allow at least 6 hours of charge, and then try to power the device on. Cellular Data Signal LED: Green Light 1.
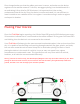
Once charged make sure that the rubber port cover is secure, and make sure the device registers on the satellite network. To do this, we suggest placing it on the dashboard of a car and taking it for a drive for 20-30 minutes. It is important that it has a clear, unobstructed view of the sky. Since the device is motion-activated, it is not sufficient to leave it outside or on a window sill for it to register. It must be moving in order to register and report its location.
*Place in green zones for best results Navigating iTrail Live To log into your iTrail Live tracking account, open a browser window and go to http://track.myitrail.com. Enter your Username and Password provided to you, and click on Login. We strongly suggest you change your Password, as this default Password is not unique to your account. See page 20 for details.
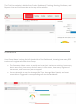
The iTrail Live website is divided into 5 tabs: Dashboard, Tracking, Routing, Geofence, and Reports. You can find these tabs at the top of the website. Dashboard Your Group Name is along the left-hand side of the Dashboard, showing how many GPS trackers are registered under that Group. The Summary allows a user to easily see how their trackers are doing, how many alerts were sent, how many devices were in idle status, how many registered movement, and how many were stopped.
In the upper right-hand corner of the Dashboard, you can see your account name, along with a few icons. o Alerts: the bell icon is for alerts, and will have a red dot when there are unviewed alerts triggered. o Messages: the envelope icon is for the Messaging Center, which can be used to send an email for iTrail Support. o Gear: the Gear icon is for Favorites and Commands. o Account Name: clicking on your Account Name will allow you to log out or change your password.
2. Click the Excessive Speed Selection on the “Select a Trigger” portion of the screen, for example. This will then change the setup values on the remaining tabs, which lets you choose when and where alerts will be sent. Select the device you would like to edit by checking the box next to it. *Please note that you will need to select the device you want the alert attached to if you have multiple devices. 3. On the Configuration and Schedule option, the Threshold is the speed limit you want to set.
To set up a Panic button alert, select the Panic Button from the Alert Trigger options. 1. Select if you want duplicates ignored, and continue to the Display Options. 2. On the Display Options, you can have special icons on the platform to represent your Panic alert on the map. 3. Ender your email address or cell phone number, and click “Save.” To create a Low Battery alert. Click on Low Battery on Alert Trigger. 1.
updates the map with the latest tracker location (does not affect actual GPS update frequency you selected with your data plan). Click the dropdown arrow to select a desired refresh rate. Label: Toggles GPS tracker names given to the units. POI: Toggles Points of Interest (POI) created by the user. Click the dropdown arrow to choose to see the buffer zone surrounding the POI. Geofence: Toggles visibility of created Geofences. Lock: Locks the map in place.
o o o o o Can also filter by start date, end date, or key words. List of trackers available to view. Select or deselect to see what trackers you want. Buttons for Session Info available. When tracker trip is toggled, User can select to see alerts, show or hide trip positions, export to KML file, or can play back the trip and includes Stop, Play, Pause, FF, RW, and Speed controls for playback.
Session Info: When you click on a tracker’s location icon (usually green arrows), either in Live Tracking or History Tracking, the Session Info window will pop up. This will show your tracker’s name, Session, Alerts triggered, Locations the tracker has been, Geofences, Live Tracker, and Status of the device.
and allows you to see past locations. Using the drop-down boxes on the bottom right of the window, you can adjust how often your screen refreshes and how many locations will appear on the screen. The counter on the bottom left of the window displays how long it will be until your screen refreshes. You can email a link to this page, allowing other users to view your tracker’s location by click on the Share This icon in the upper right-hand corner of the window.
Routing The Routing tab allows you get routes and directions to specified locations from all of your trackers. This tool can be very useful, especially for fleet use with multiple service vehicles, as the map will show all of the vehicles’ distances and estimated travel times to a location. Map Tools: Located in the upper right-hand corner of the Route Map. Map Layer: Click to choose between Google Street, Satellite, or Hybrid views of the Tracking Map.
directions, similar to Google Maps or Google Earth directions. Geofence The GeoFence tab allows you to create quick Geofences, based on the location you are currently viewing or route for the device. A Geofence is a virtual barrier. The user can create a Geofence of different shapes around a specific location, and set up alerts to let them know when a tracker enters or exits that created area. Map Tools: Located in the upper right-hand corner of the Geofence Map.
Geofence Tools: Located to the left of the Geofence Map. View Tab: o Search button used to search for an address you want your Geofence to be drawn around. Assign Tab: o Tracker List o Gear icon (next to the tracker name) to assign a Geofence to a tracker o User can search for trackers by name or filter by Group name Create Tab: o Circle Geofence 1. Click on Circle Geofence. 2. You will see a small circle around your mouse arrow.
sending an alert. 5. Check the “Assign to item in groups” box, and use the Action dropdown box to choose if you would like an alert created when the device enters the chosen area, exits the area, or both. 6. When you are finished, click the “Save” button at the bottom to save your new Geofence. Reports To run Reports on your tracking device, click on the Reports tab at the top of the screen.
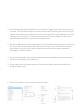
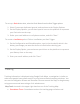
My Reports: Any reports that you may have run in the past will show up under the My Reports tab. Report Templates Tab: To create a new Report, simply click on Report Templates. You can then choose a report you would like to run. When creatinga report for the first time,you will have 4 options you will haveto complete before running the report: 1. Columns: All columns are already pre-selected. You can click “Next” to continue. 2. Filters: Select the date range you want to pull data from.
when you first click the Reports tab from the Menu. Changing Your Password To change your Password, click on the account name, which should appear in the upper right corner of the browser window. Once you enter your new Password, click the “Change Password” button to save your changes. Support To access FAQs, as well as other support materials for your device and the iTrail Live Tracking platform, go to http://myitrail.com/FAQS.