
User Manual


10
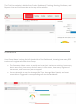
updates the map with the latest tracker location (does not affect actual GPS
update frequency you selected with your data plan). Click the dropdown arrow
to select a desired refresh rate.
Label: Toggles GPS tracker names given to the units.
POI: Toggles Points of Interest (POI) created by the user. Click the dropdown
arrow to choose to see the buffer zone surrounding the POI.
Geofence: Toggles visibility of created Geofences.
Lock: Locks the map in place. The map won’t snap back to the default position
when it refreshes if it is locked.
Print Map: User can print the Live or History tracking map. Included is an image
of the map, along with current info on individual trackers.
Export KML: The user can export the map to a KML format to open separately
in Google Maps or Google Earth.
Show Ruler: User can measure either distances or areas of their choosing on
the map. Click the dropdown arrow to select between area and distance
measurements.
Map Layer: Click to choose between Google Street, Satellite, or Hybrid views of
the Tracking Map.
Zoom Tool: Click the + or – buttons to zoom in and out of the map.
Map Overview: Located in the lower right-hand corner of the Tracking Map, the
Overview is a zoomed out view of the larger area the Tracking Map occupies.
Click on the + or – to hide this Overview Mini Map.
Show/ Hide Arrows: Arrows ( < > ) to the right of the Tracking Tools on the left-
hand side of the page toggle between fullscreen Tracking Tools, both Tracking
Map and Tools, or fullscreen Tracking Map.
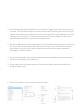
Tracking Tools: Located to the left of the Tracking Map.
Track Tab: Shows live map and locations of trackers.
o User can filter by Group name to find specific trackers
o Can also filter by other options and parameters when clicked.
o List of trackers available to view.
o Select or deselect to see what trackers you want.
o Buttons for Session Info, Alerts, Command Messages, Ping available.
History Tab: Shows history tracking map for GPS units.
o User can filter by Group name to find specific trackers