
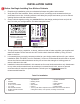
Assembly Instructions


6
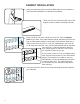
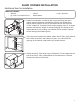
Startwiththecornercabinet.Makesurethecabinetislevel,then
install2cabinetscrewsthroughthetop-fasteningstripintothewall
studs.
Ifyoudonothaveacorner,startwiththe
cabinetclosesttothewall.Cabinetsagainst
wallwillrequireallerstriptobegin.Installller
ontocabinetbeforeinstallingcabinettowall.
See ller installation on page 8.
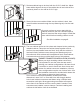
Thenextcabinetwillbesetintoplaceandclampedtothepreviously
installedcabinet.Clampthetwocabinetboxestogethersothat
thefront,topandbottomfacesareush.Verifythatthecabinetis
levelandinstall2cabinetscrewsthroughthefasteningstripinto
thewallstuds.Withcabinetsstillclampedandush,installcabinet
connectorsthroughthepre-drilledshelfholesofthecabinets.
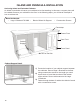
CABINET CONNECTOR INSTALLATION (478-3872)
Before you begin installing cabinet connectors,
it is important to note the holes that are used in
building your cabinet congurations. We have found
it common to use the fourth hole from the top and
bottom for cabinet connector installation, however,
some congurations require use of these holes. Use
the installation instructions included with drawer kits
and hinges to determine hole locations.
Oncecabinetconnectorsinstallationlocationshavebeen
determined,usea3/16"or5mmdrillbittodrillthroughdesired
hole.InsertcabinetconnectorsandfastenusingaPhillipshead
screwdriveruntiltight.Wesuggestusingtwocabinetconnectors
atthefrontofthecabinetandonenearthebackifneeded.Once
connectorsareinstalled,removeclamps.Continueinstallingwall
cabinetsinthisfashionuntilallareinstalled.
8)
9)
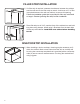
Setbasecabinetlegstobelevelwiththe34-3/4"chalkline.Adjust
basecabinetlegssothetopofthecabinetboxislevelwiththeline
previouslydrawnonthewallat34-3/4"high.
7)