
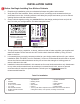
Assembly Instructions


7
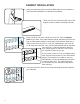
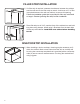
Exposedendsofcabinets(typicallyendofcabinetruns)willrequire
acoverpanel.Placecoverpanelontocabinet,lininguptobeush
tothetopofthecabinetbox,andushtothecabinetdoorordrawer
frontandsecurewithclamp.Fastenwith1-1/4"(included)screws
throughthepre-drilledshelfholesofthecabinetintothecoverpanel.
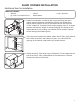
Note: In some applications, you may need to trim panel down. Some
cover panels are required in-between cabinets during the cabinet
installation process. All cover panels are called out on your oor plan
and elevation view printouts. For best results, lay painters tape on the
nished side of the panel before cutting.
10)
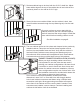
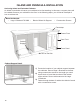
11) Clicktoekickclipintoplaceoncabinetleg.Settoekickandpush
downonclips,untiltoekickislockedintoplace.
INSTALL DOORS, DRAWERS, MOULDING AND TOE KICKS
Oncecabinetshavebeeninstalled,beginbuildingyourcongurationsusingdrawerkits,hingesand
otherhardwarecomponents.Allhardwarecomponentsincludeindividualinstallationinstructions.