
Instructions / Assembly


OPERATING INSTRUCTIONS
Read these instructions carefully before operating and keep for future
reference.
CHARGING KTB1
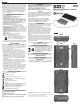
NOTE: DO NOT attempt to insert other USB connector types into USB-A
or USB-C ports (FIG. B)
NOTE: Charge completely before using. To maximize Li-ion battery
life, see Maintenance and Storage sections (other side).
• Connect the included cable to the USB-C Input/Output port
3
, then
connect the other end to any powered USB-A port.
• The battery level indicator LEDs
1
will illuminate (see Table 1).
• A full charge could take 4 to 8 hours, depending on the charger’s output.
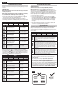
TABLE 1
Not Illuminated Solid Green Blinking Green Solid Red Blinking Red
LED
Status % Charged
Bottom LED blinking red 0% to 10% charged
Bottom LED blinking green 11% to 25% charged
Bottom LED solid green
Next LED blinking green
26% to 50% charged
Bottom 2 LEDs solid green
Next LED blinking green
51% to 75% charged
Bottom 3 LEDs solid green
Next LED blinking green
76% to 99% charged
All LEDs solid green 100% charged
BATTERY STATUS INDICATORS
Press the power button
2
to check KTB1's battery level (Table 2).
The indicator LEDs
1
will turn on, and will automatically turn off after
10 seconds if the power button is not pressed again, or if no device is
connected for charging. NOTE: If the battery malfunctioned, pressing
power button
2
will indicate error status (Table 3).
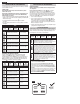
TABLE 2
Not Illuminated Solid Green Blinking Green Solid Red Blinking Red
LED
Status Charge Remaining
All LEDs solid green 76% to 100%
Bottom 3 LEDs solid green
51% to 75%
Bottom 2 LEDs solid green 26% to 50%
Bottom LED solid green 11% to 25%
Bottom LED blinking red 1% to 10%
No LEDs illuminated 0%
OPERATING INSTRUCTIONS
CHARGING DEVICES
NOTE: For best results, use cable provided with your device.
Auto-Sensing ports: The outputs
3
,
4
will automatically turn on
when a device is connected. NOTE: Certain devices that require very low
current to charge may not be detected by the auto-sensing feature. For
such devices, press the power
2
button to begin charging. The status
indicator light may shut-off, but charging will continue on such devices.
1. Connect the cable to your device.
2. Connect the charging cable to one of KTB1’s USB ports
3
,
4
.
The battery status indicator LEDs
1
illuminate and charging begins.
LEDs will remain illuminated as long as charging is occurring. The
device being charged should also provide indication that charging
has begun.
3. KTB1 will automatically shut down once charging is complete and
current is no longer being drawn by the device.
TROUBLESHOOTING
The KTB1 has built-in advanced protection to prevent damage to the
battery. The battery has protection for Output over-current, Short-
circuit, Voltage drop, and High/Low Temperature. If any of these occur,
refer to Table 3:
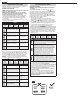
TABLE 3
Not Illuminated Solid Green Blinking Green Solid Red Blinking Red
LED
Possible Issue
Over-current or short circuit: KTB1 will automatically shut down.
Disconnect KTB1 from the charger or device being charged.
Wait for 5-seconds and then reconnect the device being charged
or battery charger. Press the power button to reset and begin
charging.
High or low temperature: If KTB1 senses abnormal operating
temperatures, high or low, it will shut down. It will not recharge or
charge until the battery returns to normal operating temperatures
(See Operating Temperature in General Specifications section). All
status LEDs will flash green if the power button is pressed. The LED
status will return to normal (See tables 1 & 2) ONLY after KTB1
senses normal temperatures. Disconnect KTB1 from all chargers
and devices.
Voltage drop: If KTB1's voltage level drops (discharge over time
or simply drained completely), it will enter Low Power Protection
Mode. The bottom LED will illuminate solid red for 2 seconds when
the power button is pressed. KTB1 will NOT support any device
charging at this time, and must be recharged to a minimum of 5%
before the output ports will activate for charging.
KTB1 will not recharge if:
1. The cable is not properly connected to charger output or battery input.
Check connection.
2. The charging cable is damaged.
Replace with equivalent cable.
3. The charging port or device is not able to supply the minimum voltage and
current for charging.
Connect to appropriate charging source.
4. The connector on the charger or battery is damaged.
Replace charger or battery.
5. An internal battery fault has occurred inside KTB1, preventing the battery
from recharging. See scenarios above. If none apply, KTB1 may be damaged.
Contact Klein Tools Customer Service. DO NOT ATTEMPT TO REPAIR.
ENGLISH
Type C
Micro-B
Mini-B
Micro-A
Mini-A
FIG. B