
Cut Sheet
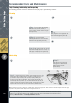
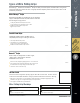


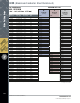
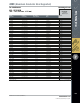
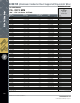

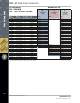
Table Of Contents
- WirePulling Grips
- Recommended Care and Maintenance
- Types of Wire Pulling Grips
- ACSR (Aluminum Conductor Steel Reinforced)
- ACSR (Aluminum Conductor Steel Reinforced)
- ACSS (Aluminum Conductor Steel Supported)
- ACSS/TW (Aluminum Conductor Steel Supported/Trapezoidal Wire)
- AAC (All Aluminum Conductor)
- ChicagoTM Grips
- Steel Strand – Haven’sTM Grips
- Parallel Jaw Grips
- Accessories
- Introduction – Wire-Mesh Grips

260
Wire Pulling Grips
Grip Cleaning, Lubricating and Inspecting
The following guidelines have been established to keep all grips in good working condition.
Recommended Care and Maintenance
Cleaning
Lubricating
1
Step 1. Use the Klein Grip Cleaning
Wire Brush Set (Cat. No. 25450) or
emery cloth to clean the surfaces of grip
jaws (photo #1).
Step 2.
Spray degreaser on the grip jaws, all
joints and moving parts (photo #2).
Step 3. Use the Klein Grip
Cleaning Wire Brush to remove dirt and
debris from the grip jaws (photo #3).
Step 4.
Wipe grips dry with soft cloth.
Repeat all cleaning steps as necessary
until grip is completely clean (photo #4).
3
4
2
Never repair any grip. Grips that are bent, misaligned, or otherwise distorted should be discarded and replaced.
If there is ever a question about the safe condition of any grip, please contact Klein Tools Customer Service
directly at 844-395-3235 or email HIsupport@kleintools.com.
Note: Conductors may have a die-grease coating which can deposit on grip jaws. New conductors should be wiped clean before grip
application. Grip jaws should be wiped clean of all grease before use.
Step 6.
Carefully inspect jaw condition, proper alignment of jaws
and all parts, and possible distortion caused by exceeding safe-load
specifications. Grips should operate smoothly. Spring-loaded grips
should lock open with loop handle in “Down" position and should close
automatically with loop handle “Up." The Klein Parallel Jaw Grip may be
tested by opening and closing the jaws by hand, exercising proper caution.
All parts and rivets should be checked for distortion (illustration #6).
Step 5.
Apply lubricant to all joints and
moving parts. Do NOT lubricate
gripping surfaces of jaws
(photos left
#5
).
6
5
Jaws
closed
Side
plates
Body Jaws
Loop
handle
To lock
open