Closet Culture Install Sheets Closet Kits 2', 4', 6' and 8' Shoe Rack Kit Pant Rack Kit Basket Surround Kit (ENG/FR) (ENG/FR) (ENG/FR) (ENG/FR)
Installation Instructions Closet Kits 2', 4', 6' and 8' 0300-KITA-2CN, 0300-KITA-4CN, 0300-KITA-6CN and 0300-KITA-8CN Tools Needed: STEP 1: Measure 86" from the floor and make two marks on the wall with a pencil (Figure 1). • Tape measure • Stud finder • Level • Pencil • Power drill / Phillips-head screw driver STEP 2: Use a stud finder to find and mark the location of wall studs on the wall.
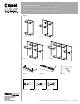
Installation Instructions Instructions Closet Kits 2', 4', 6' and 8' 0300-KITA-2CN, 0300-KITA-4CN, 0300-KITA-6CN and 0300-KITA-8CN 0300-KITA-8CN, Figure 3 2' 4' 6' 8' Figure 4 Figure 5 Figure 6 ECN REV DATE TOLERANCE UNLESS OTHERWISE SPECIFIED 3 PL DEC .005 2 PL DEC .010 ANGLES 1/2 MATERIAL: FINISH: N/A Figure 7a 2700 Oak Industrial Dr. NE Grand Rapids, MI 49505 800-253-1561 www.kv.com customer.service@kv.
Instructions d'installation Ensembles de garde-robe 61 cm, 122 cm, 183 cm et 244 cm 0300-KITA-2CN, 0300-KITA-4CN, 0300-KITA-6CN et 0300-KITA-8CN Outils Requis: • Ruban à mesurer • Détecteur de montants • Niveau • Crayon • Perceuse électrique/ tournevis Phillips étape 1: Mesurez 218 cm à partir du plancher et marquez deux repères sur le mur avec le crayon (Figure 1). étape 2: Trouvez les montants à l’aide du détecteur et marquez leurs localisations.
Instructions d’installation Ensembles de garde-robe 61 cm, 122 cm, 183 cm et 244 cm 0300-KITA-2CN, 0300-KITA-4CN, 0300-KITA-6CN et 0300-KITA-8CN Figure 3 61 cm 122 cm 183 cm 244 cm Figure 4 Figure 5 Figure 6 ECN REV DATE TOLERANCE UNLESS OTHERWISE SPECIFIED 3 PL DEC .005 2 PL DEC .010 ANGLES 1/2 MATERIAL: FINISH: N/A Figure 7a 2700 Oak Industrial Dr. NE Grand Rapids, MI 49505 800-253-1561 www.kv.com customer.service@kv.
Installation Instructions / Instructions d’installation Shoe Rack Kit / Ensemble pour support à souliers 0335-SRK-CN Tools Needed: STEP 1: Remove the top plastic caps (it’s easier from the front) from the shelf brackets). • Phillips-head screw driver STEP 2: Insert the shelf brackets into the wall standards in the desired location (Figure 1). Includes: STEP 3: I f installing wood fascia, attach to the surround by fastening the included mounting screws into pilot holes on the fascia.
Installation Instructions / Instructions d’installation Pants Rack Kit / Ensemble pour support à pantalons 0335-PRK-CN Tools Needed: STEP 1: Remove the top plastic caps (it’s easier from the front) from the shelf brackets. • None STEP 2: Insert the shelf brackets into the wall standards in the desired location (Figure 1). Includes: STEP 3: Install the surround assembly by inserting the six shelf tabs into the slots on the shelf brackets (Figure 2). U.S.
Installation Instructions / Instructions d’installation Basket Surround Kit / Cadre pour panier 0335-SRND-CN Tools Needed: STEP 1: Remove the top plastic caps (it’s easier from the front) from the shelf brackets. • Phillips-head screw driver STEP 2: Insert the shelf brackets into the wall standards in the desired location (Figure 1). Includes: STEP 3: I f installing wood fascia, attach to the surround by fastening the included mounting screws into pilot holes on the fascia. Do not overtighten. U.S.