
Installation Guide

WIRE HALF MOON
Installation Instructions
RN260EFS_B_HlfMnGldeLzSusn_0213
© 2013 Knape & Vogt Manufacturing Company. All rights reserved.
Wire 1/2 moon (1)
Inspect all parts and read all instructions prior to beginning assembly and installation.
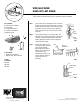
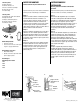
Parts Included
A. Half-moon shelf assembly
B. Side C-Hinge
C. Pin and plastic washers
D. L-bracket, screw and nut
E. Mounting screws
• Phillips head screwdriver
• Drill with 1/16” bit for pilot holes
Product
HM-25-G
HM-28-G
HM-34-G
Step 1 Locate cabinet side for attaching half moon susan shelf.
Wrap the C-hinge around the cabinet frame so the tabs
hold the pin inside the cabinet. Screw C-hinge into place
using two long screws in the side of the cabinet face
frame, and 4 short screws into the back of the cabinet
face frame.
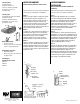
Step 2 The L-bracket performs as a stop for the slides. The
placement of the L-bracket on the slides is opposite the
cabinet door opening. Position bracket on small slide
member, align holes and fasten in place using small
round head screw and nut.
Step 3 Position plastic washers over
holes in the C-hinge. These will
ensure smooth operation
during shelf pivot movement.
Align the holes on the bracket
of the half moon shelf
assembly with the holes in the
C-hinge. Slide pin through all
four holes from the top
downward.
A
step 1
step 2
step 3
Pin
Washer
Basket hinge
bracket
Place “L”
bracket here
Door
Top view of cabinet
Tab
Short
screws
Long
screws
D
B
E
C
KNAPE & VOGT MANUFACTURING COMPANY
2700 Oak Industrial Drive NE • Grand Rapids, MI 49505
800.253.1561 • www.kv.com