
Installation Guide


Clip
Retainer
Tab
Mounting
Straps
Sliding Members
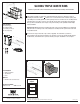
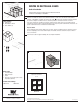
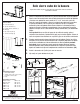
Parts Included
A. Waste Bin (1)
B. Wire Cage (1)
C. Sliding Base Assembly (1)
D. Handle (1)
E. Cage Locking Clip (1)
F. Mounting Screws (4)
Sliding Single Waste Bin
Inspect all parts and read all instructions prior to beginning assembly and installation.
310402-C_0615
2700 Oak Industrial Drive NE , Grand Rapids, MI 49505 USA
800.253.1561 • 616.459.3311 • www.kv.com
©2014 Knape & Vogt. All rights reserved. Made in USA. Knape & Vogt
®
reserves the right to change specifications without notice.
Tools Required
• Phillips head screwdriver
• Drill with 1/16" (1.5mm) bit for
drilling pilot holes
• Pencil
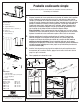
Product Assemblies
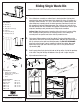
1. Place sliding base assembly on cabinet floor, in desired position. Position front
mounting strap against the back edge of the cabinet face frame. (If installing in a
frameless cabinet, measure 1/2” to 3/4” back from front of cabinet opening, and
align sliding base assembly parallel to cabinet opening.) Close door to make sure
the assembly will not hold cabinet door open. Also, check to see if unit will clear
the door opening when fully extended. Once position is determined, fasten in place
using four mounting screws provided and a Phillips head screwdriver.
Optional Step: Mark placement of mounting holes with a pencil, remove sliding
base assembly and drill pilot holes for fastening screws. Place sliding base
assembly back into position and fasten with the provided screws.
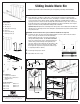
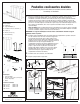
2. Fully extend sliding members out of the cabinet. Place the slotted holes on the
cage onto the tabs on the left hand sliding member. (2A) Rest the cage on top of
the clip retainers on the right hand sliding member, but, DO NOT PUSH DOWN.
Close unit so that the wire cage is completely inside of the cabinet. Now, push
down firmly on the right side of the wire cage, until it is fully seated into the
clip retainers. (2B)
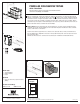
3. Install cage locking clip by placing the tabs on the top of the clip into the openings
in the slide. Then push the top and bottom of the clip until it snaps into place
4. Clip handle onto front of cage.
D
E
F
B
C
A
1
2A
4
2B
Clip Retainer
Pull Bottom
Push Top
Push Bottom
Push Top until it snaps
Step 2
Step 1
3
BLSC9-1-20-R
BLSC10-1-35-R
SBM9-1-20
SBM10-1-35
SBM12-1-50
SBM15-1-20
SBM15-1-35
SCB-9-1-20
SCB-10-1-35
SCB-12-1-50
SCB-15-1-20