
Use and Care Guide


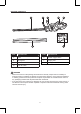
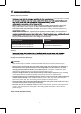


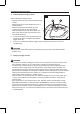
Table Of Contents

9
ASSEMBLY INSTRUCTIONS
1. To Install/Remove Battery Pack
To Attach Battery Pack
a. Make sure that the ON/OFF trigger switch (E) is
in the OFF position.
b. Align the raised portion on the battery pack
with the grooves on the bottom of the tool, then
slide the battery pack onto the tool, as shown.
c. Ensure that the battery-release buttons on the
battery pack snap into place and the battery
pack is secured to the tool before beginning
operation.
NOTICE: When placing the battery pack on the tool,
be sure that the raised rib on the battery pack aligns
with the groove on the tool and the latches snap into
place properly. Improper assembly of the battery
pack can cause damage to internal components.
To Detach Battery Pack
a. Make sure that the ON/OFF trigger switch (E) is in the OFF position.
b. Press the battery-release buttons to release the battery pack.
c. Pull rearward on the battery pack to remove it from the tool.
WARNING
• Battery tools are always in operating condition. Therefore, the ON/OFF trigger switch should
always be in the OFF position when the tool is not in use or when carrying the tool at your
side.
2. To Remove/Install the Blade Guard
WARNING
• Always wear gloves when removing or installing
the blade guard (G). Be careful of the blade and
protect your hands from being injured by the
blade.
• Always remove the battery pack from the
product when you are assembling parts, making
adjustments, cleaning, or when the product is not
in use.
a. The hedge trimmer is shipped with the blade
guard installed. Before use, slide the blade
guard off along the blade ridge and remove it.
b. After using and before storing or transporting
the hedge trimmer, clean the blade and insert the blade into the blade guard; cover the
entire length of the blade and make sure that the open side is facing upward.
1
2
E
Battery-release
buttons
G