
Use and Care Guide


9
LL
●
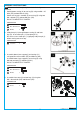
1. Before Using The Mixer
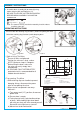
2. Transporting The Mixer
Ensure all bolts are tightened.
Slide retaining clip over handle to prevent
dumping. Always disconnect the power
prior to transporting the mixer.
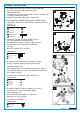
Mixer can be transported in two ways.
a) Turn power to off (“O”) position, disconnect
power cord.
b) Ensure drum is empty.
c) Facing front of mixer, grab handle and top
d) Move mixer to desired location.
of drum. While holding right wheel down
with with your foot, pull mixer toward yourself.
Be careful not to tip mixer on yourself.
Method 1:
●
Position the mixer on a level surface.
NOTE: Maximum slope is 5 degrees.
●
Before filling the drum, make sure
the mixer can easily empty into a
wheelbarrow.
●
●
●
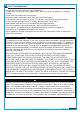
A “GROUND FAULT INTERRUPTER”
protected circuit is recommended for all
outdoor electric devices!
METHOD 1
C1 Capacitor
T1 Thermal Motor Protector
M1 Motor
AA Motor Run Winding
AM Motor Start-up Winding
L1 Phase Wire
N Neutral Wire
PE Earth Wire
S1 Electromagnetic Switch
23
24
N
PE
A1
Black
White
White
Green
AA
AM
T1
Red
C1
U <
L
Blac k
14
O/I
S1
13
Brown
M1
Red
115Vac,60Hz,4.3A
Ensure to lock the retaining clip (Position 1) while transporting the mixer.
Unlock the retaining clip (Position 2) while dumping drum.
OPERATING INSTRUCTIONS
●
●
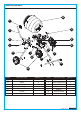
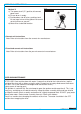
ASSEMBLY INSTRUCTIONS
9. Assemble drum assembly (M) to motor (N) using
motor shaft pin (GG) and cotter pin (JJ).
BE SURE TO SECURE COTTER PIN PROPERLY
BEFORE MIXING ASSEMBLY IS IN MOTION.
HARDWARE USED
1
Motor Shaft Pin
GG
1
Cotter Pin
JJ
Note: The motor shaft may need to be rotated by hand in order to
install the cotter pin.
kobalttools.com
Position
Position
Position
Position