Installation and Care Guide Guide d’installation et d’entretien Guía de instalación y cuidado Centerset Bathroom Sink Faucet Robinet de lavabo de salle de bains à entraxe Grifería de lavabo de baño de orificios centrales K-14660 USA/Canada: 1-800-4KOHLER México: 001-800-456-4537 kohler.com 1123724-2-D ©2012 Kohler Co.
Tools/Outils/Herramientas Plumbers Putty or Suitable Sealant Mastic de plombier ou étanchéité adéquate Masilla de plomería o sellador apropriado Two 3/8" Male Supply Connections Deux raccords mâles d'alimentation de 3/8" Dos conexiones macho de suministro de 3/8" Ø 1-3/8" and Ø 2" Hole Bit Ø 1-3/8" et mèche à orifice de Ø 2" Broca tipo corona perforadora de Ø 1-3/8" y Ø 2" Sealant Tape Ruban d'étanchéité Cinta selladora Plus:/Plus:/Más: • Rags/Chiffons/Trapos • Cable Tie (optional) Serre-câble (optionn
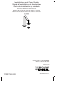
Información importante AVISO: Debido al diámetro no estándar de 2″ (51 mm) de la válvula remota, la válvula remota no se puede instalar en uno de los orificios para grifería estándar de 1-3/8″ (35 mm) del lavabo. En su lugar, seleccione un lavabo sin orificios para grifería e instale la grifería y la válvula remota a través de la encimera. Consulte con el fabricante de la encimera para taladrear correctamente los orificios. Cumpla con todos los códigos locales de plomería y construcción.
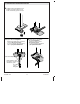
Installation/Installation/Instalación Drain Installation Installation du drain Instalación del desagüe 1 Disassemble the drain. Apply plumbers putty 2 to the underside of the flange. Désassembler le drain. Appliquer du mastic de plombier au dessous de la bride. Desensamble el desagüe. Aplique masilla de plomería al dorso de la brida. Flange Bride Brida Insert the assembly. Attach the flange. Insérer l'ensemble. Attacher bride. Inserte el montaje. Conecte la brida.
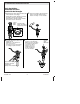
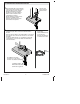
Installation/Installation/Instalación Locate the remote valve within 8" 1 NOTE: (203 mm) of the spout. Refer to the 2 On the underside of the spout, countertop manufacturer for proper hole drilling. REMARQUE: Localiser la valve à distance à 8" (203 mm) du bec. Se référer au fabricant du comptoir pour un forage correct. NOTA: Coloque la válvula remota dentro de 8" (203 mm) del surtidor. Consulte con el fabricante de la encimera para taladrear correctamente los orificios.
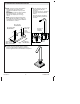
Installation/Installation/Instalación 4 Install the washer and tighten the nut. Installer la rondelle et serrer l'écrou. Instale la arandela y apriete la tuerca. 5 6 Attach the coupling assembly and tighten. Do not overtighten! Attacher l'ensemble de raccordement et serrer. Ne pas trop serrer! Conecte el montaje de acoplamiento y apriete. ¡No apriete demasiado! Attach the hose and tighten. Do not overtighten! Attacher le tuyau et serrer. Ne pas trop serrer! Conecte y apriete la manguera.
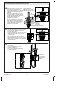
Installation/Installation/Instalación 7Apply plumbers putty to the underside Remote Valve Valve à distance Válvula remota of the remote valve. Insert the remote valve through the surface material. Appliquer du mastic de plombier au-dessous de la valve à distance. Insérer la valve à distance dans le matériau de la surface. Aplique masilla de plomería al lado inferior de la válvula remota. Inserte la válvula remota a través del material de la superficie.
Installation/Installation/Instalación the washer onto the remote 10 Slide valve shank. Thread the ring Surface Material leaving approximately 1/4" (6 mm) Matériau de la surface between the ring and the surface Material de la superficie material. 1/4" Glisser la rondelle sur le manche (6 mm) de valve distance. Visser l'anneau en laissant approximativement 1/4" (6 mm) entre l'anneau et le matériau de la surface. Deslice la arandela en el vástago de la válvula remota.
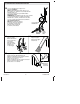
Installation/Installation/Instalación 13 Connect and tighten the supply hoses. Do not overtighten! NOTE: If the installation requires that you coil the supply hoses, maintain a 3" (76 mm) diameter minimum inside coil. Connecter et serrer les tuyaux d'alimentation. Ne pas trop serrer! REMARQUE: Si l'installation exige que vous enrouliez les tuyaux d'alimentation, maintenir un diamètre minimum de 3" (76 mm) à l'intérieur de la bobine. Conecte y apriete las mangueras de suministro.
Care and Cleaning For best results, keep the following in mind when caring for your KOHLER product: • Use a mild detergent such as liquid dishwashing soap and warm water for cleaning. Do not use abrasive cleaners that may scratch or dull the surface. • Carefully read the cleaner product label to ensure the cleaner is safe for use on the material. • Always test your cleaning solution on an inconspicuous area before applying to the entire surface. • Do not allow cleaners to sit or soak on the surface.
Cuidado y limpieza (cont.) Para obtener información detallada de limpieza y los limpiadores a considerar, visite www.kohler.com/clean. Para solicitar información sobre el cuidado y la limpieza, llame al 1-800-456-4537. Warranty KOHLER® Faucet Lifetime Limited Warranty Kohler Co. warrants its Faucets* manufactured after January 1, 1997, to be leak and drip free during normal residential use for as long as the original consumer purchaser owns his or her home.
Warranty (cont.) dispensers; and faucets used in commercial settings, and outside North America, are covered by Kohler Co.’s one-year limited warranty. **Never use cleaners containing abrasive cleansers, ammonia, bleach, acids, waxes, alcohol, solvents or other products not recommended for chrome. This will void the warranty. Garantie Garantie limitée à vie du robinet KOHLER® Kohler Co.
Garantie (cont.) pouvez également avoir d’autres droits qui varient d’un état ou d’une province à l’autre. Ceci constitue la garantie écrite exclusive de Kohler Co.
Garantía (cont.) KOHLER CO. Y/O EL VENDEDOR OFRECEN ESTAS GARANTÍAS QUE SUSTITUYEN TODAS LAS DEMÁS GARANTÍAS, EXPRESAS O IMPLÍCITAS, INCLUYENDO, ENTRE OTRAS, LAS GARANTÍAS IMPLÍCITAS DE COMERCIALIZACIÓN E IDONEIDAD PARA UN USO DETERMINADO. KOHLER CO. Y/O EL VENDEDOR DESCARGAN TODA RESPONSABILIDAD POR CONCEPTO DE DAÑOS PARTICULARES, INCIDENTALES O INDIRECTOS.
Kohler Co.
1123724-2-D