
Installation Guide


8. Install a Rim-Mounted Faucet
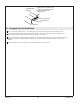
K-1226 Only
Measure and cut a piece of 1/2″ exterior grade plywood 4″ (10.2 cm) x 11-1/2″ (29.2 cm) for the
K-1226.
The faucet should be located in the center of the flat area of the rim. Refer to the faucet
manufacturer’s instructions. Use a pencil to mark the faucet centerlines for drilling.
NOTE: The K-1226 will accept faucets with 4″ (10.2 cm) centers.
NOTICE: Position a thin piece of cardboard on the finished surface of the whirlpool before clamping the
plywood in place. Make sure the clamps do not make direct contact with the finished surface of the
whirlpool. This will reduce the risk of damaging the surface of the whirlpool.
Set a thin piece of cardboard on the finished surface of the whirlpool rim. Position the plywood on
the bottom of the rim, and carefully clamp the plywood in place. Make sure the clamps are in
contact with the cardboard, not the finished surface of the whirlpool.
Carefully drill the faucet holes to the size required by the faucet manufacturer. Remove the clamps
and cardboard.
Install the faucet to the rim and plywood according to the faucet manufacturer’s instructions.
Open the hot and cold water supplies, and check the supply connections for leakage.
Run water into the whirlpool, and check the drain connections for leakage.
4" (10.2 cm)
Measure, cut, and drill a piece of 1/2" exterior
grade plywood 4" (10.2 cm) x 11-1/2" (29.2 cm) for
the K-1226.
Whirlpool Rim
Install the faucet to the rim and
plywood according to the faucet
manufacturer's instructions.
Kohler Co. 11 1010564-2-K