
Installation Guide


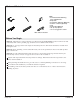

5. Complete the Installation
IMPORTANT! Kohler Co. strongly recommends the use of 100% silicone sealant as instructed in this
installation guide. Other sealants may shrink, separate, and peel over time.
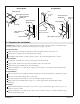
Test Run the Bath
Check all electrical connections and make sure the electrical power to the bath is on.
Operate the user keypad to test the temperature settings.
For additional information on bath operation, refer to the ″Operating Instructions″ section.
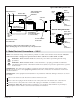
Drop-In Models:
If applicable, carefully remove the protective tape from the bath rim.
Apply a bead of 100% silicone sealant around the entire rim of the bath.
Install water-resistant wallboard to the stud framing.
Apply a minimum 1/8″ (3 mm) bead of 100% silicone sealant to seal all areas where the bath and
wallboard meet.
Flanged Models:
Drill a small pilot hole through the nailing-in flange at each stud. Add shims to eliminate any gaps.
Nail 1/4″ (6 mm) thick furring strips to the studs.
Use large-head galvanized nails to secure the nailing-in flange to the studs.
Install water-resistant wallboard, leaving a 1/8″ (3 mm) gap between the bath edge and the
wallboard.
All Models
Install the finished deck/wall material 1/8″ (3 mm) away from the bath edge to create a groove for
the 100% silicone sealant.
Apply a minimum 1/8″ (3 mm) bead of 100% silicone sealant in the groove between the bath edge
and the finished deck/wall.
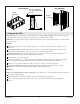
Flanged ModelsDrop-In Models
100% Silicone Sealant
Finished Wall
Water-Resistant
Wallboard
Furring
Strip
100% Silicone
Sealant
Finished Wall
Water-Resistant
Wallboard
100% Silicone Sealant
Finished Deck
Framing
Water-Resistant
Wallboard
Stud
Furring
Strip
Large-Head
Galvanized Nail
1196030-2-E 8 Kohler Co.