
Instructions / Assembly
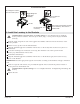

4. Install the Lavatory to the Brackets
CAUTION: Risk of personal injury or product damage. Do not attempt to lift or install the
lavatory without assistance. The lavatory can break, chip, or cause personal injury if handled
carelessly.
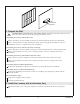
Pinch the toggle wing nuts closed on the toggle bolt assemblies and insert into the front holes of the
lavatory bottom.
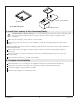
Lift the lavatory up above the mounted brackets.
Align the installed toggle bolt assemblies with the slots on the tie bar, then set the lavatory down on
the brackets.
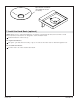
Locate the mounting holes in the back of lavatory, then mark the holes with a pencil. Lift the
lavatory up off the brackets and set aside.
Pre-drill the marked holes.
Align the installed toggle bolt assemblies with the slots on the brackets again, then set the lavatory
down on the brackets.
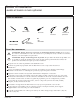
IMPORTANT! Select the appropriate lag bolts and washers according to the thickness and type of finished
wall.
Insert two lag bolts and washers (not provided) through the holes located in the pockets in back of
lavatory, then into the finished wall.
CAUTION: Risk of product damage. Do not overtighten the bolts. Overtightening will damage the
lavatory.
Tighten all bolts.
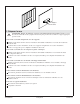
Toggle Wing Nut
Toggle Bolt
Assembly
Pinch wing nut closed to
insert into lavatory hole.
As Viewed From Below
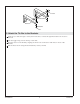
Pocket in back
of lavatory
Insert toggle bolt
into slot.
Insert lag bolt and washer through
back of lavatory, then attach to
finished wall.
Tie Bar
Kohler Co. 5 1012580-2-E