
Instructions / Assembly


Installation
NOTE: Observe all local plumbing and building codes.
Install a supply shut-off valve below the tank.
Install the carrier according to the carrier manufacturer’s instructions.
NOTE: All-wax gaskets are not appropriate for this installation.
Install a gasket to the toilet outlet according to the gasket manufacturer’s
instructions.
Mount the toilet per the carrier manufacturer’s instructions.
Install the flush valve according to the flush valve manufacturer’s instructions.
Flush the toilet several times and check all connections for leaks.
Periodically check for leaks for several days following the installation.
Installation
REMARQUE: Respecter tous les codes de plomberie et de bâtiment locaux.
Installer une valve d’arrêt d’alimentation au-dessous du réservoir.
Installer le support conformément aux instructions du fabricant.
REMARQUE: Tous les joints en cire ne sont pas appropriés pour cette installation.
Installer le joint d’étanchéité dans l’orifice de sortie des W.C. conformément aux
instructions du fabricant du joint.
Installer le W.C.conformément aux instructions du fabricant.
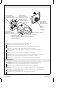
Cap/Capuchon/Tapa
Washer/Rondelle/Arandela
Fiber Washer
Rondelle en fibres
Arandela de fibra
Toilet/W.C./Inodoro
Bearing Nut
Écrou de support
Tuerca de soporte
Outlet Coupling
Couplage de sortie
Acoplamiento de la salida
Gasket
Joint
Empaque
Toilet Outlet
Sortie du W.C.
Salida del inodoro
Bearing Washer
Rondelle support
Arandela de soporte
Carrier Stud
Montant de support
Varilla roscada del soporte
1115558-2-A 2 Kohler Co.