
Installation Guide

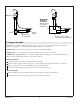

3. Install the Bath
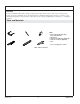
NOTICE: Do not lift the bath by the piping, pump, or blower, or use these components for structural
support of the bath. To avoid damage to the bath, lift at the sides of the bath.
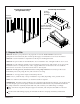
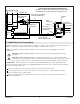
If the subfloor is not level, shim the bath support blocks as necessary.
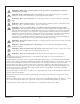
Option 1: Construction adhesive: Apply a generous amount of high-quality construction adhesive
to the bottom of the support blocks.
Option 2: Cement or mortar bed: Apply 1″ (25 mm) to 2″ (51 mm) of mortar cement in the
installation area. Do not use gypsum cement or drywall compound, as they will not provide an
acceptable, durable bond.
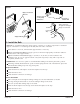
IMPORTANT! Use care not to pinch or crush the flexible tubing as the bath is placed into position.
With help, carefully lift the bath into position. Tilt the pump/blower end of the bath into place first.
Shift the flexible tubing away from any pinch points.
Drop-In Installation
Install the drain tee and tailpiece. Secure the tailpiece into the trap.
Install the faucet valve.
Check the drain connections for leakage.
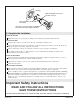
Alcove Installation
Drill a small pilot hole through the nailing-in flange at each stud. Add shims as needed.
Use large-head galvanized nails to secure the nailing-in flange to the studs.
Nail 1/4″ (6 mm) thick furring strips to the studs.
Insert the drain tailpiece into the trap. Secure the drain tailpiece to the trap.
Install the faucet valve.
Check the drain connections for leakage.
Cement or
Mortar Bed
Clear a space
for the pump
and blower.
Option 1
Nail
Option 2
Alcove Installations
Support Blocks
Apply construction
adhesive.
Drill a small hole
through the nailing-in
flange at each stud.
Stud
Furring
Strip
Kohler Co. 7 1208018-2-D