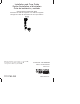
Installation and Care Guide Guide d’installation et d’entretien Guía de instalación y cuidado Closing Overflow Cable Bath Drain Fermeture du drain de baignoire avec câble de trop-plein Desagüe de cable de rebosadero de cierre para bañera K-7116 M product numbers are for Mexico (i.e. K-12345M) Los números de productos seguidos de M corresponden a México (Ej. K-12345M) USA/Canada: 1-800-4KOHLER México: 001-800-456-4537 kohler.com 1113750-2-B ©2010 Kohler Co.
Before You Begin CAUTION: Risk of property damage. To prevent water leaks, ensure a watertight seal on all bath drain connections. NOTE: Use caution when this drain is installed on whirlpools or airbaths. The jet action may cause the water to splash when the jets are activated. NOTE: We recommend users fill the bath to the bottom of the overflow, enter the bath, close the overflow, and resume filling the bath to an appropriate level.
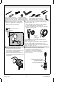
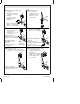
Installation/Installation/Instalación Plumbers Putty 100% Silicone Sealant Mastic à la silicone à 100% Mastic de plombier Sellador 100% de silicona Masilla de plomería 1Measure the thickness of the bath. Mesurer l'épaisseur de la baignoire. Mida el grosor de la bañera. Hacksaw or Tubing Cutter Scie à métaux ou coupe tubes Sierra para metales o cortatubos If "A" is 1/4" (6 mm) or greater: install the thin 2 gasket, 3/8" (1 cm).
Installation/Installation/Instalación 5 Slide the overflow ell over alignment tool. 6 Align the drain ell vertically. Aligner le coude du drain verticalement. Alinee verticalmente el codo del desagüe. Faire glisser le coude de trop-plein par-dessus l'outil d'alignement. Deslice el codo del rebosadero sobre la herramienta de alineación. Bend here if needed. Plier ici si nécessaire. Doble aquí si es necesario. Dry the fit overflow ell. Tool will hold it in place.
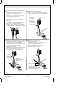
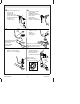
Installation/Installation/Instalación 9 Cut the pipe with a tubing cutter 10 Assemble the tee to or hacksaw. Couper le tuyau avec un coupe-tuyau ou une scie à métaux. Corte el tubo con un cortatubos o sierra para metal. the overflow ell. Assembler le T sur le coude du trop plein. Monte la T al codo del rebosadero. Remove the drain ell. Retirer le coude du drain. Retire el codo de desagüe. 12 Remove the drain ell. 11Dry fit the overflow ell. Retirer le coude du drain. Retire el codo de desagüe.
Installation/Installation/Instalación 15 Remove the alignment tool, 16 Apply silicone sealant and both ells. Retirer l'outil d'alignement ainsi que les deux coudes. Retire la herramienta de alineación y ambos codos. Flange Bride Brida 17 Apply plumbers putty. Appliquer du mastic de plombier. Aplique masilla de plomería. 19 Tighten the drain ell. to the gaskets. Appliquer du mastic d'étanchéité à la silicone sur les joints d'étanchéité. Aplique sellador de silicona a los empaques.
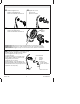
Installation/Installation/Instalación 21 Install the alignment tool. 22 Tighten the screws. Installer l'outil d'alignement. Instale la herramienta de alineación. Serrer les vis. Apriete los tornillos. 23 Remove the alignment tool. Slot Rainure Ranura Retirer l'outil d'alignement. Retire la herramienta de alineación. IMPORTANT!: Make sure the center of the push button is centered in the opening. IMPORTANT!: Assurer que le centre du bouton poussoir est centré dans l'ouverture.
Installation/Installation/Instalación 25 Handle Poignée Manija Slot Rainure Ranura Setscrew Vis de retenue Tornillo de fijación Handle Poignée Manija Tab Languette Lengüeta Back View Vue arrière Vista posterior 26 Make sure the handle functions correctly. S'assurer que la poignée fonctionne correctement. Asegúrese de que la manija funcione correctamente. Check for leaks./Vérifier s'il y a des fuites./Verifique que no haya fugas. Open (Handle is out.) Closed (Overflow cannot close.
Care and Cleaning For best results, keep the following in mind when caring for your KOHLER product: • Use a mild detergent such as liquid dishwashing soap and warm water for cleaning. Do not use abrasive cleaners that may scratch or dull the surface. • Carefully read the cleaner product label to ensure the cleaner is safe for use on the material. • Always test your cleaning solution on an inconspicuous area before applying to the entire surface. • Do not allow cleaners to sit or soak on the surface.
Cuidado y limpieza (cont.) Para obtener información detallada de limpieza y los limpiadores a considerar, visite www.kohler.com/clean. Para solicitar información sobre el cuidado y la limpieza, llame al 1-800-456-4537. Warranty ONE-YEAR LIMITED WARRANTY KOHLER plumbing products are warranted to be free of defects in material and workmanship for one year from date of installation. Kohler Co. will, at its election, repair, replace or make appropriate adjustment where Kohler Co.
Garantie (cont.) DOMMAGES PARTICULIERS, IMPRÉVUS OU DE CIRCONSTANCE. Certains états/provinces ne permettent pas la limitation sur la durée de la garantie implicite, ou l’exclusion ou la limitation de dommages spéciaux, accessoires ou indirects, et, par conséquent, ces limitations et exclusions pourraient ne pas s’appliquer dans votre cas. Cette garantie vous donne des droits légaux spécifiques. Vous pouvez également avoir d’autres droits qui varient d’un état/province à l’autre.
Service Parts/Pièces de rechange/Piezas de repuesto 1100344 Gasket/Joint/Empaque 1142324 Screw Kit Kit de vis Kit de tornillos 1102978 Overflow Plate Plaque de trop-plein Placa del rebosadero 1115029 [3/8" (1 cm)] 1100353 [9/16" (1.