
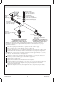
Dimensions Guide
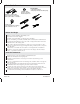

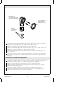


2. Install Overflow Ell
Position the tapered gasket with the tapered side against the overflow ell and the
thin edge of the gasket at the top of the overflow ell, as shown.
Attach the tapered gasket in this position on the overflow ell.
Lubricate each O-ring, then slide each O-ring onto each groove of the overflow ell.
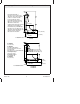
Align the overflow ell with the overflow hole of the bath.
From inside the bath, insert the two flathead screws into the mounting holes on
the overflow ell.
Thread screws into overflow ell approximately three to four turns. Do not tighten
the screws completely. The overflow ell must be loose in order to align the rest of
the drain.
Installer le coude de trop-plein
Positionner le joint conique avec le côté conique contre le coude du trop-plein et le
rebord fin du joint au-dessus du coude du trop-plein, tel qu’illustré.
Attacher le joint conique en cette position sur le coude du trop-plein.
Lubrifier chaque joint-torique, puis faire glisser chacun d’entre eux sur chaque
rainure du coude de trop-plein.
Aligner le coude de trop-plein avec l’orifice de trop-plein de la baignoire.
À partir de l’intérieur de la baignoire, insérer les deux vis à tête plate dans les
orifices de fixation situés sur le coude de trop-plein.
O-Ring
Joint torique
Arosello
Overflow Ell
Coude du trop-plein
Codo del rebosadero
Tapered Gasket
Joint conique
Empaque cónico
1114758-2-A 8 Kohler Co.