
Installation Guide
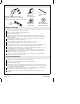
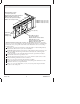
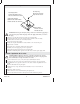

1. Install the Spout Supply Tube
NOTE: Leave the protective sleeve on the spout supply tube until the spout
installation.
Drill a 7/8″ (2.2 cm) D. hole at the proper location in the floor.
Slide the brass washer from the bottom of the spout supply tube over the threads
until the washer reaches the supply tube shoulder.
Insert the spout supply tube through the mounting hole from the top of the floor.
The flat portion of the brass washer should face forward. The spout supply tube
will be suspended by the brass washer.
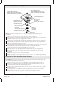
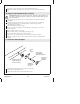
Slide the plate (oriented with the tabs toward the deck) and washer onto the spout
supply tube from the bottom and thread on the nut. Tighten the nut.
Secure the plate to the rough deck with two wood screws.
Slide the washer onto the supply tube and thread the nut on and tighten it.
Ensure that the valves are closed (cold = fully counterclockwise; hot = fully
clockwise).
Attach the tee to the valves; solder, if required.
Plumb the supply to the supply tube using 1/2″ Nom. or 5/8″ OD copper tubing.
Installer le tube d’alimentation du bec
REMARQUE: Laisser en place le manchon de protection du tube d’alimentation du
bec jusqu’à l’installation de ce dernier.
Percer un trou de 7/8″ (2,2 cm) de diamètre au bon emplacement dans le sol.
Glisser une rondelle en laiton sur le filetage du tube d’alimentation du bec et
contre l’épaulement du tube d’alimentation d’eau.
Insérer le tuyau d’alimentation d’eau au bec à travers l’orifice de fixation à partir
du dessus du sol.
La partie plate de la rondelle en laiton devrait faire face vers l’avant. Le tube
d’alimentation du bec sera suspendu à l’aide d’une rondelle en laiton.
Spout Supply Tube
Tuyau d'alimentation du bec
Tubo de suministro del surtidor
Brass Washer
Rondelle en laiton
Arandela de latón
Wood Screw
Vis à bois
Tornillo para madera
Washer
Rondelle
Arandela
Supply Tube Shoulder
Épaule de tube d'alimentation
Reborde del tubo de suministro
Wood Screw
Vis à bois
Tornillo para madera
Tee/T/T
Plate/Plaque/Placa
Nut/Écrou/Tuerca
Kohler Co. 7 1089448-2-A