
Installation Guide


Installation
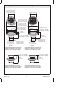
Step 3 — Galvanized Lath Layer
Mark the height of the bottom of the flange adapter on the wall furthest from the
center of the drain.
Using a level, mark this height around the perimeter of the shower base.
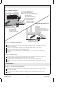
Staple galvanized lath over the building paper.
Cuta7″ (17.8 cm) diameter hole in the lath 1/2″ (1.3 cm) away from the flange
adapter.
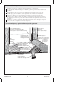
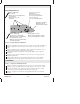
Step 4 — Mortar Layer
Trowel mortar over the galvanized lath from the outside of the flange adapter up
to the marked height of the perimeter of the shower base.
Verify the slope of the mortar is even. Fill in any low spots with mortar.
Allow the mortar to cure. Refer to the mortar manufacturer’s instructions for cure
time.
Installation
Étape 3 — Couche de latte galvanisée
Marquer la hauteur de la base de l’adaptateur de bride sur le mur le plus éloigné
du centre du drain.
Avec un niveau à bulle, marquer la hauteur autour du périmètre de la base de
douche.
Building Paper
Papier de construction
Papel de construcción
7" (17.8 cm) diameter hole.
7" (17,8 cm) de diamètre.
Orificio de 7" (17,8 cm) de diámetro.
Lath/Grille/Malla
Marked height
Hauteur marquée
Altura marcada
Mortar Layer
Couche de mortier
Capa de mortero
Drain Outlet
Sortie de drain
Salida del desagüe
Flange Adapter
Adaptateur de bride
Adaptador de la brida
Flange Adapter
Adaptateur de bride
Adaptador de la brida
Step 3/Étape 3/Paso 3
Step 4/Étape 4/Paso 4
1090854-2-B 8 Kohler Co.