Automatic Ice Cube Maker User Manual Be sure unit is standing upright 24 hours prior to plug-in.
Table of Contents Page ICE MAKER SAFETY………………………………………………………………………………..2 IMPORTANT SAFEGUARDS ………………………….……………………….………………3 - 5 TECHNICAL INFORMATION ……….………………. …….………………..…………………… 5 COMPONENT LOCATIONS .…………………...…………………...……………………………6 ICE MAKER INSTALLATION …….……………….………………….. ...……………..……. 7 – 12 Unpacking………….………………………………………………………………...………7 Installing the Adjustable Feet………………………………………………………...………7 Location Requirements…….………………………………………………………………8 Electrical Requirements.……………………………………………………………………….
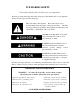
ICE MAKER SAFETY Your safety and the safety of others are very important. We have provided many important safety messages in this manual and on your appliance. Always read and obey all safety messages. This is the Safety Alert Symbol. This symbol alerts you to potential hazards that can injure or kill you and others. All safety messages will follow the Safety Alert Symbol and either the words “DANGER”, “WARNING” OR “CAUTION”.
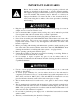
IMPORTANT SAFEGUARDS Before the ice maker is used, it must be properly positioned and installed as described in this manual, so read the manual carefully. The supplier strongly recommends that you have a professional install your new machine. The warranty may be affected or voided by an improper installation.
It is important for the ice maker to be leveled in order to work properly. You may need to make several adjustments to level it. All installations must be in accordance with local plumbing code requirements. Make certain that the hoses are not pinched or kinked or damaged during installation. Check for leaks after connection. Never allow children to operate, play with or crawl inside the ice maker.
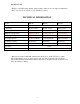
Extension Cord Because of potential safety hazards under certain conditions, it is strongly recommended that you do not use an extension cord with this ice maker. TECHNICAL INFORMATION Model KD-50 KD-70 Rated power KD-110 115V AC~60Hz Refrigerant R134a, 5.64oz R134a, 5.93oz R134a, 8.82oz Ice-making/Ice-harvest rated current 3.0A/4.0A 4.1A/5.1A 6.0A/9.0A High/Low side pressure 320psig/120psig 320psig/120psig 320psig/120psig Width*depth*height 15.5”x17.7”x36.7” 19.7”x17.7”x36.7” 24.
COMPONENT LOCATIONS Ice scoop Inner door scoop Top cover Door door seal gasket Ice storage bin Front cover Nozzle Slideway Evaporator Ice cube full sensor Water curtain Control box (behind front cover) Condenser Condenser filter 6
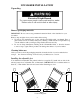
ICE MAKER INSTALLATION Unpacking Excessive Weight Hazard Use two or more people to move and install ice maker. Failure to do so can result in back or other injury. Remove packaging materials IMPORTANT: Do not remove any permanent instruction labels or the data label on your ice maker. Remove tape and glue from your ice maker before using. To remove any remaining tape or glue, rub the area briskly with your thumb.
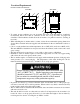
Location Requirements INSTALLATION CLEARANCES: TOP VIEW SIDE VIEW • To ensure proper ventilation for your ice maker, the front of the unit must be completely • • • • • unobstructed. Allow more than 4” clearance at rear, 0.6” at top and sides for proper air circulation. The installation should allow the ice maker to be pulled forward for servicing if necessary. When installing the ice maker under a counter, follow the recommended spacing dimensions shown.
Electrical Requirements Electrical Shock Hazard Plug into a grounded 3-prong outlet. Never remove the grounding prong from the plug. Never use an adapter. Never use an extension cord. Failure to follow these instructions can result in fire, electrical shock or death. A standard electrical supply (115VAC, 60 Hz, 15 A), properly grounded in accordance with the National Electrical Code and local codes and ordinances is required.
Leveling the Ice Maker Once the ice cube machine is set in its enclosure, if the base is not level, you can adjust the feet by rotating the under block (see below) until the machine is level. Turning the under block counter-clockwise reduces the machine’s height up Turning the under block clockwise increases the machine’s height Under block It is important for the ice maker to be leveled, or water may not flow properly through the evaporator (ice mold).
NOTE: Connection to the water line may vary according to installation requirements. Drain IMPORTANT: This ice maker is not a freezer, it must connect to a drain line. Your machine comes equipped with a gravity drain. Depending on your plumbing setup, a condensation pump may be required. Poor drainage will cause a high rate of melting in the ice storage bin and may cause flooding or your machine to shut off. Connecting the drain line: 1. 2. 3. 4.
Installation Types This ice maker has been designed for Mobile (free-standing), Enclosed (as under a cabinet) or Built-in (sealed) installation indoor. In any case, there must be adequate air space around the unit for proper ventilation. (See diagrams on page 7.) Mobile installation: A mobile installation will allow you to install the ice maker free-standing in any place you desire provided you have access to a water supply. You must follow the stated instructions for a. Electrical requirements b.
OPERATION Final Check List before Operation 1. Have all packing materials and tape been removed from the interior and exterior of the ice maker? 2. Did you clean the ice storage bin? 3. Have the installation instructions been followed, including connecting the machine to water, drain and electricity? 4. Has the machine been leveled? 5.
Operating Method 1. Remove the 2 screws at the bottom of the front cover. 2. Grasp the right and left sides of the front cover, raise it a little and then take it off. Press the ON/OFF switch beside the condenser. The light will be on. The ice maker will startworking automatically and feeding water. Power switch 3. After the first feeding of the water, the machine will automatically go to the ice making stage, and the sound of water spraying will be heard. Front cover 4.
How the machine uses water: The ice maker begins with a fixed charge of water that is contained in the water sump. As the water is sprayed against the freezing evaporator surface , the portion of water that does not contain mineral impurities will freeze and stick to the ice cube molds. freezing portion of the ice-making cycle, the water in the sump will become highly concentrated with mineral impurities.
Shut off the water supply at the main water source. Disconnect the water supply line from the water inlet valve. Disconnect the drain pipe to the drain line or floor drain. Allow the ice maker to run for an hour or more until all remaining ice cubes have been ejected from the ice maker assembly. Shut off the electric supply at main electrical power source.
Before proceeding with cleaning and maintenance operations, make sure the power line of the unit is disconnected and the water line is shut off (EXCEPTION: Ice maker system cleaning). Exterior Cleaning The door and cabinet may be cleaned with a mild detergent and warm water solution such as 1 oz of dishwashing liquid mixed with 2 gallons of warm water. Do not use solvent- based or abrasive cleaners. Use a soft sponge and rinse with clean water. Wipe with a soft clean towel to prevent water spotting.
Interior Cleaning The ice storage bin should be sanitized occasionally. Clean the bin before the ice maker is used for the first time and reused after stopping for an extended period of time. It is usually convenient to sanitize the bin after the ice making system has been cleaned and the storage bin is empty. 1. Disconnect power to the unit. 2.
5. Remove the slideway from the water sump. Sprinkler arm Slideway 6. Find the sprinkler and raise it. Disconnect it from the water tube which is connected at the back of the sprinkler arm. Sprinkler Water tube Sprinkler arm Water sump 7. A de-scaling solution can be prepared in a plastic basin with Nu-Calgon Nickel-Safe Ice Machine Cleaner. Mix 4 ounces of the ice machine cleaner per gallon of warm water.
brush to remove any thick or stubborn residue and to help the dissolving action. Rinse under a stream of tap water. 8. Wipe down the interior of the water sump with the de-scaling solution and warm water. Rinse thoroughly with clear water. 9. Reassemble all the parts of the sprinkler, slideway and row of flake covers. 10. Perform steps 1, 3, 6, 7 and 8 of the Ice Making System Cleaning procedure below.
The ice machine cleaner contains acids. DO NOT use or mix with any other solvent-based cleaner products. Use rubber gloves to protect hands. Carefully read the material safety instructions on the container of the ice machine cleaner. DISCARD the first batch of ice produced after cleaning. 6. Repeat steps 4 and 5 (without Ice Maker Cleaning Solution) to rinse the ice making system 3 times. NOTE: The use of the Ice Maker Cleaner Solution in the water sump during the rinse is not needed. 7.
Control Box (behind front cover) BIN FU LL IC E H A R V EST _ + O N /O FF C LEA N A D JU ST M O D E Descriptions of LEDs and buttons: 1. Bin full (Red) LED: Bin Full indicator light. When this LED is lit, the ice storage bin is full of ice or the ice-full sensor is covered with ice. The unit will stop working.When ice cubes are taken out of the ice storage bin, clearing the sensor, the red LED will keep flashing for 3 minutes. Then the unit will restart and return to the ice making mode. 2.
for the desired ice size. Smaller ice setting: By pressing the “Clean” (-) button, you can decrease the size of the ice cubes. The “BIN FULL” LED (red) will flash as you lower the ice size and will finally be blinking at the setting of smallest ice size. Larger ice setting: By pressing the “Mode” (+) button, you can increase the size of the ice cubes. The “HARVEST” LED (yellow) will flash as the larger size is set and will blink when the setting of largest ice size has been reached.
ROUBLESHOOTING Before Calling for Service If the unit appears to be malfunctioning, read through the operation section of this manual first. If the problem persists, check the troubleshooting guide below and on the following page. The problem could be something very simple which can be solved without a service call.
25